

Deploying ApportoService on Windows VMs
This page is a child of the Deployment guide and documents how to install and manage the ApportoService agent on Windows VMs, both manually and via Microsoft Active Directory Group Policy (GPO). It complements the cluster installation and gateway/load balancer setup documented elsewhere.
Before you begin
-
Confirm your RDP Management Gateway is reachable from target VMs and you have the API Key for registration.
-
Identify each VM’s intended Server Type:
multi-session(Windows Server session host) orsingle-session(e.g., Windows 11). -
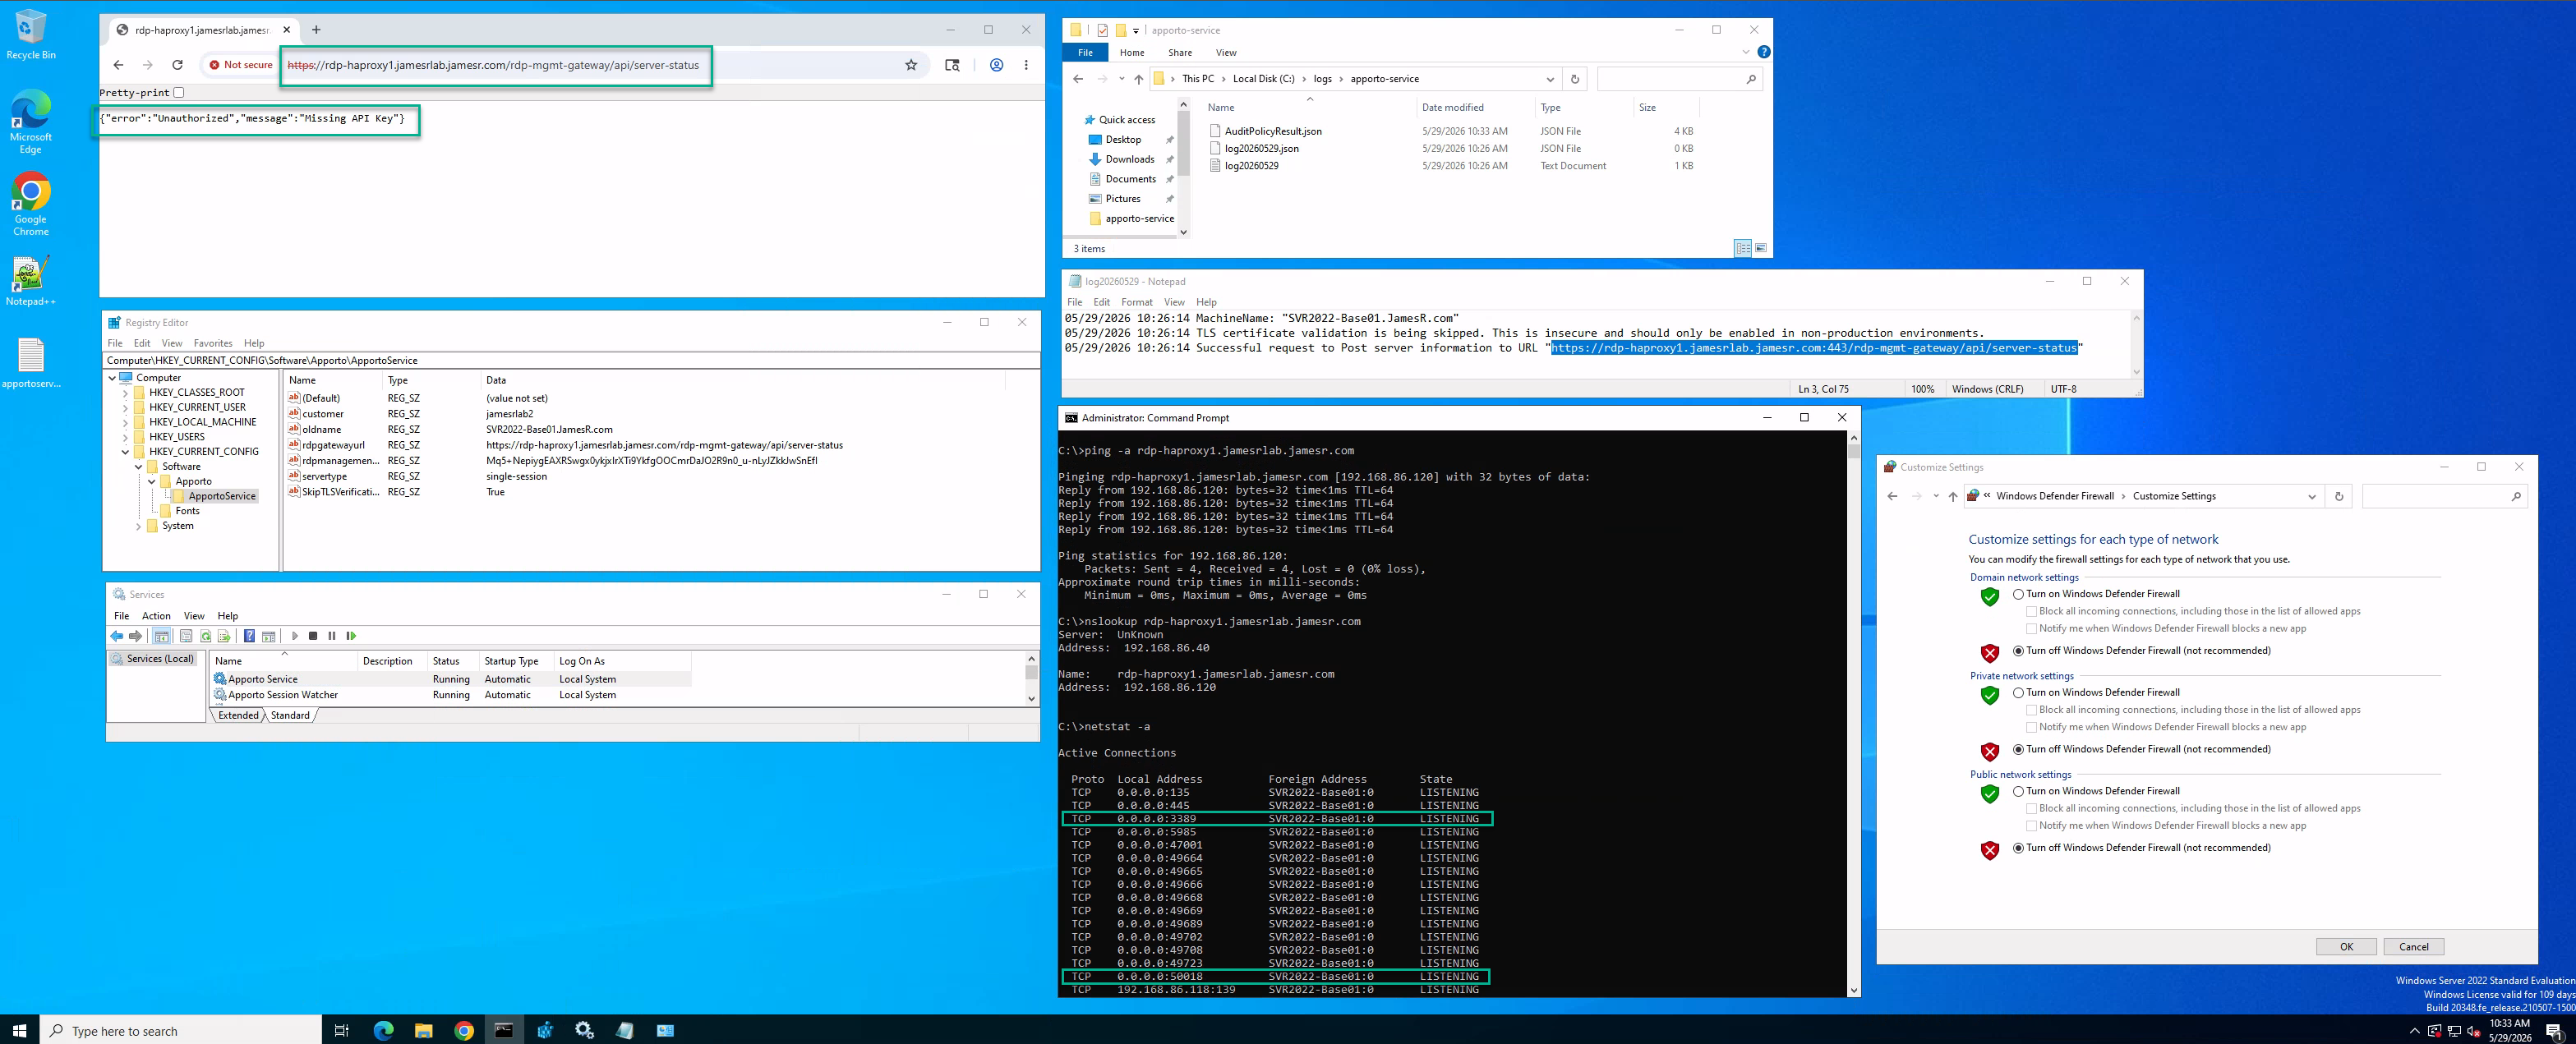
The following Ports need to be Opened\Listening state on the VM:
-
TCP 3389 (RDP) from control plane/gateway to VM, and locally listening on the VM.
-
TCP 50018 for ApportoService communication.
-
-
Have local admin rights on the VMs (for manual installs) or Group Policy admin rights (for GPO deployment).
Manual installation (small number of VMs)
Step 1 — Obtain the installer
Download or obtain the latest ApportoService MSI package (version 1.0.1060 or later is recommended) Copy the .MSI to the target VM.
Step 2 — Run msiexec with your environment values
Open an elevated Command Prompt and change directory to the folder containing the MSI. Use the appropriate command for your server type, replacing placeholders with your values.
# Multi-session (Windows Server)
msiexec /i ApportoInstaller_1.0.1060.msi RDPGATEWAYURL="https://<rdp-mgmt-gw FQDN>/rdp-mgmt-gateway/api/server-status" RDPMANAGEMENTGATEWAYAPIKEY="<your-api-key>" SERVERTYPE="multi-session" CUSTOMER="<your-customer-code>" SKIPTLSVERIFICATION="true" LOG="C:\ApportoMSIInstaller.log"

# Single-session (Windows 11)
msiexec /i ApportoInstaller_1.0.1060.msi RDPGATEWAYURL="https://<rdp-mgmt-gw FQDN>/rdp-mgmt-gateway/api/server-status" RDPMANAGEMENTGATEWAYAPIKEY="<your-api-key>" SERVERTYPE="single-session" CUSTOMER="<your-customer-code>" SKIPTLSVERIFICATION="true" LOG="C:\ApportoMSIInstaller.log"
Parameter reference:
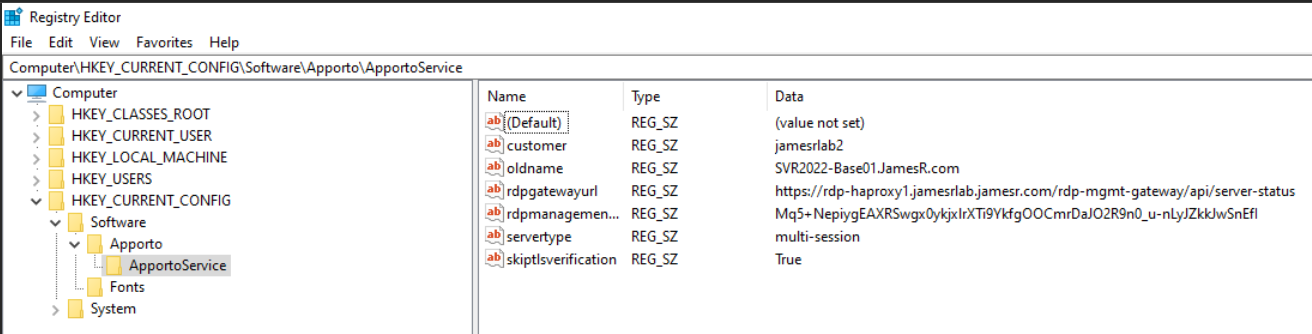
- RDPGATEWAYURL: Use the server-status endpoint on your RDP Management Gateway
- RDPMANAGEMENTGATEWAYAPIKEY: Provided by Apporto/control plane for your tenant
- SERVERTYPE: multi-session or single-session
- CUSTOMER: Your tenant/customer code
- SKIPTLSVERIFICATION: Use false in production (requires valid certs on the VM)
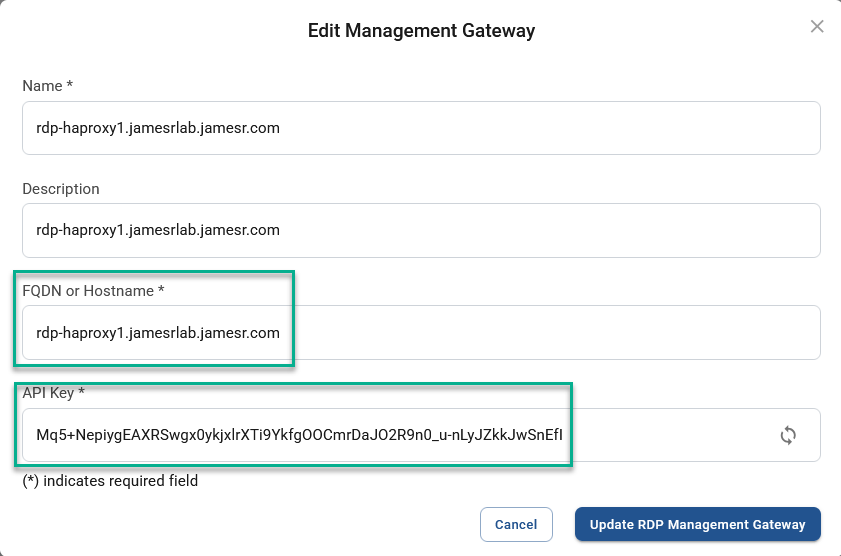
Values can be changed via Registry, post install as needed:
Step 3 — Install runtime dependencies
Install the following required dependencies from the installer support directory:
Default path: C:\Program Files\Apporto\InstallerSupport
-
aspnetcore-runtime
-
dotnet-runtime
Step 4 — Reboot and verify
-
Reboot the VM.
-
Check logs at
C:\logs\apporto-service\. A successful initialization includes a line such as: “Successful request to Post server information to URL https://<rdp-mgmt-gw>/rdp-mgmt-gateway/api/server-status”. -
From a Browser access the Full URL and it should return this API message:

-
ApportoService — Running
-
Apporto Watcher Service — Running
-
-
In the control plane, navigate to Servers → Unassigned and confirm the VM appears.
Example Troubleshooting Info:
Deploying via Active Directory GPO (recommended for scale)
Overview
Use a Computer Configuration GPO to assign the MSI and optional Startup scripts to install the ASP.NET Core and .NET runtime dependencies. Maintain separate GPOs for single-session vs. multi-session VMs to pass the correct SERVERTYPE.
Step 1 — Prepare a network share
-
Create a UNC share accessible by all domain-joined VMs, for example:
\\<dc or fileserver>\ApportoService. -
-
ApportoService MSI (v1.0.1060 or later)
-
The complete InstallerSupport directory (includes aspnetcore-runtime.exe and dotnet-runtime.exe)
-
(Optional) MST transform file if used in your environment
-
Two startup scripts (sample below)
-
Step 2 — Import Apporto ADMX/ADML (optional)
From a machine where the MSI has been installed, locate C:\Program Files\Apporto\InstallerSupport\Apporto ADMX.zip. Copy policy definitions to your domain controllers:
-
.ADMX→C:\Windows\PolicyDefinitions\ -
.ADML→C:\Windows\PolicyDefinitions\en-US\
Step 3 — Create Computer policy to assign the MSI
-
Open Group Policy Management and create a new GPO targeting the OU that contains your VMs.
-
Navigate to Computer Configuration → Policies → Software Settings → Software installation → New → Package.
-
Browse to the MSI on the UNC path and select Advanced deployment to set properties.
-
RDPGATEWAYURL="https://<rdp-mgmt-gw FQDN>/rdp-mgmt-gateway/api/server-status" RDPMANAGEMENTGATEWAYAPIKEY="<your-api-key>" SERVERTYPE="multi-session" # or single-session CUSTOMER="<your-customer-code>" SKIPTLSVERIFICATION="true" -
Create separate GPOs for multi-session and single-session groups as needed.
Step 4 — Add startup scripts to install dependencies
Create the following scripts on the UNC share and add them to Computer Configuration → Policies → Windows Settings → Scripts (Startup):
Step 5 — Apply and verify
-
On target VMs, run
gpupdate /forceor reboot. -
On reboot, Windows will install the assigned MSI and run startup scripts.
-
-
Services: ApportoService and Apporto Watcher Service are running.
-
Logs in
C:\logs\apporto-service\indicate successful registration. -
VM appears in Servers → Unassigned in the control plane.
-
Portal configuration (after VM registration)
Once the VM appears in Servers → Unassigned, complete these steps in the Apporto Portal to make it available to end users.
Step 1 — Assign the VM to a Server Pool
-
Log in to the Apporto Portal as MSP or Admin.
-
Navigate to Servers → Unassigned tab.
-
Select the newly registered Windows VM from the list.
-
Click Assign to Server Pool.
Step 2 — Create a Server Pool (if needed)
-
Select Create New Server Pool.
-
Supply the required information (pool name, description, etc.) in the UI.
Step 3 — Create a Desktop Pool
-
Navigate to Desktop Pools.
-
Click Create Desktop Pool and supply a name.
-
Click Associate Server Pool and select the Server Pool created above.
Step 4 — Publish an App or Desktop
-
Navigate to Apps and Desktops.
-
Click Create App / Desktop.
-
Enter a Name and Description (these are visible to end users who log in to the portal).
-
Select the correct Type for your use case.
-
Click Add Group and choose either All Users or the appropriate AD groups.
-
Click Add Group (bottom-right) to confirm, then Save Changes.
Step 5 — Verify end-user access
Navigate to My Apps and Desktops (top-level node). You should now see your published App or Desktop available for HS-Hyperstream launching.
Troubleshooting
-
Confirm ports 3389 and 50018 are open and listening on the VM and permitted by firewalls.
-
Verify logs in
C:\logs\apporto-service\for connection errors or TLS messages. -
Test gateway connectivity in a browser: https://<rdp-mgmt-gw FQDN>/rdp-mgmt-gateway/api/server-status should return the API page.
-
Ensure SERVERTYPE matches the OS role (single-session vs. multi-session).
-
If
SKIPTLSVERIFICATION=false, ensure the VM trusts the RDP gateway’s SSL certificate chain. -
Review MSI installation log at the path you specified with
LOG=, for exampleC:\ApportoMSIInstaller.log. -
Re-run
gpupdate /forceif deploying via GPO and confirm the computer object is in the correct OU. -
In the portal Servers node, use the Refresh Tracer Data button a few times over several minutes. The VM's Status column should remain Running.
-
Windows 11 / single-session note: For single-session VMs in on-premises environments, ensure no other Console or RDP sessions are active on the VM, as this will prevent correct status reporting. Only one session can be active at a time (this is a Microsoft limitation for Windows 11 in on-premises environments).
-
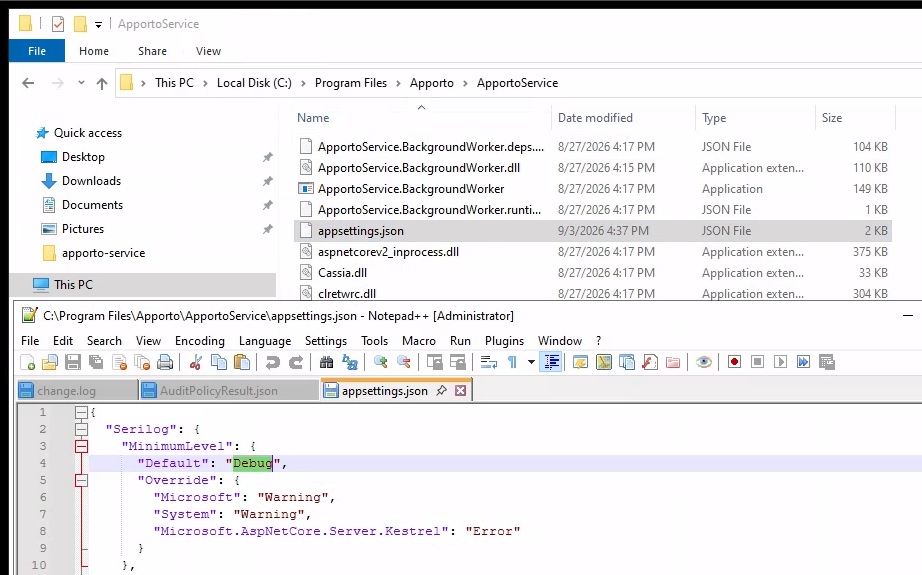
By default Logs are only using Verbose\Informational, In the Event more detailed Logs are needed, first stop the Apporto Service, then edit the “appsettings.json” and change to Debug. Save the .json file and restart the Apporto Service.
Security and best practices
-
Use
SKIPTLSVERIFICATION=falsein production. Install appropriate root/intermediate certs on VMs if required. RDP gateway’s SSL certificate chain. -
Store the RDPMANAGEMENTGATEWAYAPIKEY securely. Limit GPO scope to only the OUs that require the key and restrict share permissions.
-
Version your MSI and scripts on the UNC share and document change control.