

Available in Q4 2026 - updates to the .OVA Cluster Nodes are required for this feature.
Single Sign-On to Desktop settings for On‑Premises Deployments
Overview
Single Sign-On to Desktop (SSO2D) allows users to sign in to the Apporto Portal through their organisation’s identity provider and launch their on-premises Windows desktops without a second login.
This guide covers the Active Directory, certificate-service, Windows host and Apporto configuration required to enable SSO2D. It is intended for the Windows, Active Directory and Apporto administrators responsible for the deployment.
Who should use this guide
-
Windows administrators managing Apporto for SSO2D requirements.
Architecture and sign-in flow
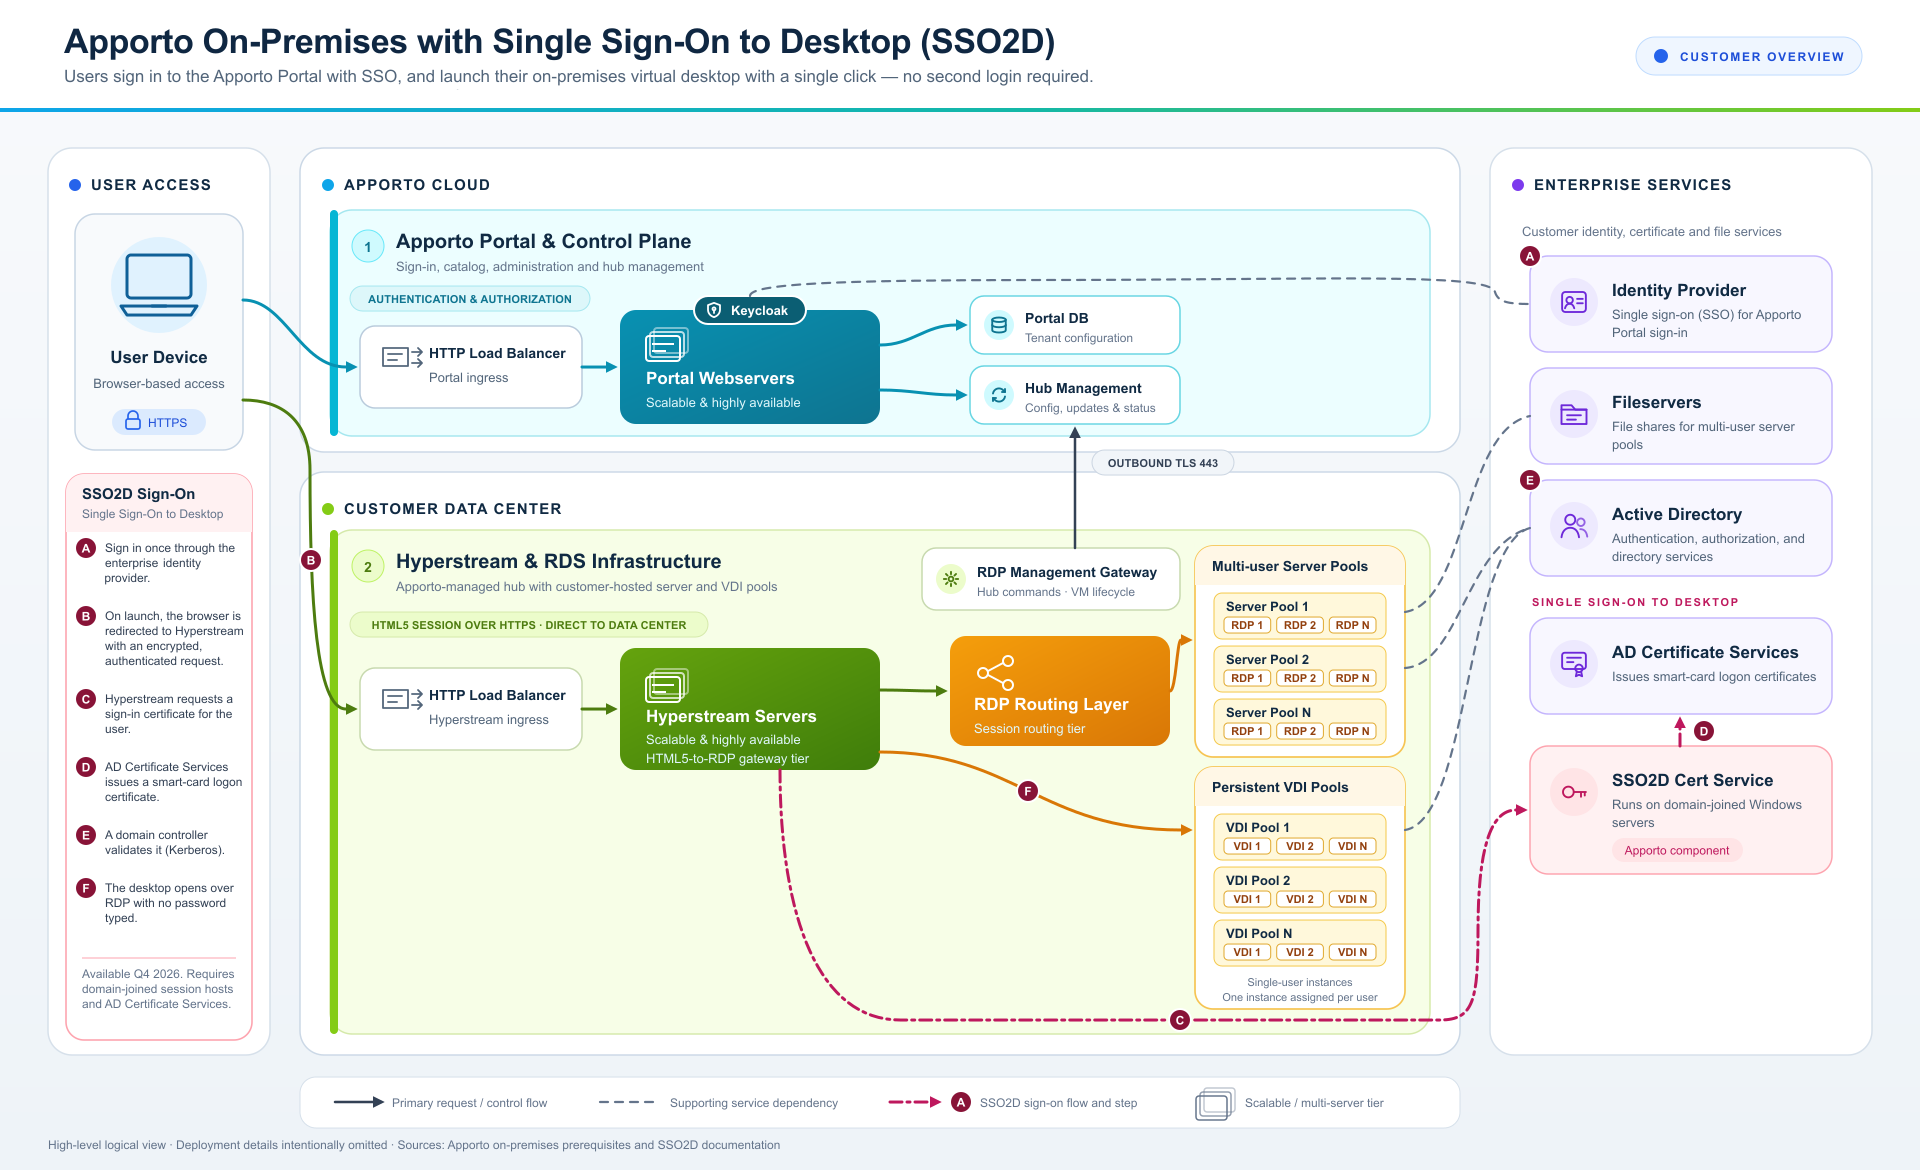
The diagram shows how portal sign-in, certificate enrolment and desktop launch fit together across Apporto Cloud and the customer’s on-premises environment.
Prerequisites
-
One or two Windows CE-Agent (Certificate Enrollment Agent) VMs to run the Apporto SSO Certificate Service. One VM can be used for a proof of concept; two are recommended for production. The examples in this guide use Windows Server 2022.
-
Access to a Domain Controller and an Active Directory Certificate Authority (CA) for obtaining certs.
-
Group Policy Management Console (GPMC), with permissions to create and link GPOs to the target organisational units (OUs).
-
Access to the Apporto portal/tenant UI control plane to configure SSO2D settings.
-
The approved Apporto SSO Certificate Service and Windows ApportoService MSI installers.
-
Updated .OVA cluster nodes that support SSO2D.
-
Where portal sign-in uses an identity provider, an IdP attribute containing the user’s AD sAMAccountName.
-
Optionally, installation of Redis Cache using 3rd party Memuraoi.
The following Windows service builds are referenced by this guide. Contact Apporto Support or Engineering for the approved builds to use.
|
Component |
Build referenced |
|---|---|
|
Apporto SSO Certificate Service |
1.0.627 or later |
|
Windows ApportoService |
1.1.1257 or later |
The Windows policies in this guide assume RDP is used for desktop connections. Unless stated otherwise, they are Computer Configuration policies.
These recommendations and configuration should be validated in a staging OU before production rollout.
Network requirements
Configure the required network and Windows Firewall rules before testing. Refer to the on-premises deployment prerequisites and required ports for the wider deployment requirements.
The certificate-service configuration references the following ports:
|
Port |
Purpose |
|---|---|
|
TCP 443 |
HTTPS, where used by the deployment |
|
TCP 3443 |
Default HTTPS port for the Apporto SSO Certificate Service |
|
TCP 6379 |
Redis cache, where enabled and where network access is required |
Apply the rules to the relevant source and destination systems. This list does not replace the wider Active Directory, CA and Apporto deployment connectivity requirements.
Prepare Active Directory and certificate templates
Create the enrolment account and the certificate templates required by the SSO2D certificate service.
Create the Certificate Enrollment User
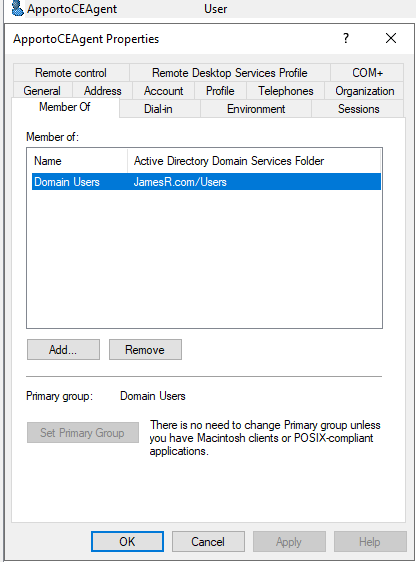
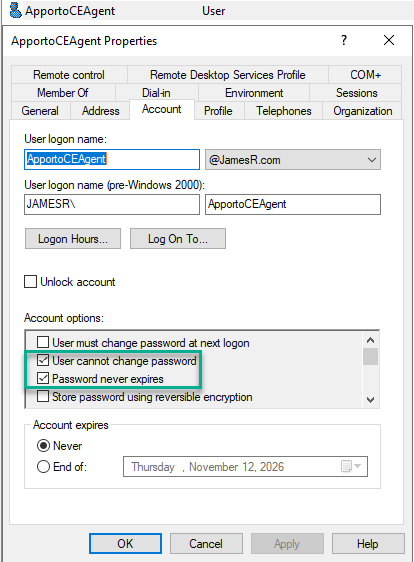
Within Active Directory Users and Computers, Create a new AD Domain User account that will be used for the certificate enrollment purposes. Suggested name “ApportoCEAgent”.
This account will also be used as the logon account for the Apporto SSO Certificate Service.
Configure the enrolment-agent template
Create three certificate templates on your AD Certificate Authority. They serve different purposes:
-
The enrolment-agent template authorises the service to request certificates on users’ behalf.
-
The user logon template defines the certificates used to sign users in to Windows.
-
The HTTPS server template secures connections to the certificate service.
Start with the enrolment-agent template:
-
Open the Certificate Templates MMC.
-
Right click Enrollment Agent and select Duplicate Template.
-
Configure the template properties and permissions as per the screenshots below.
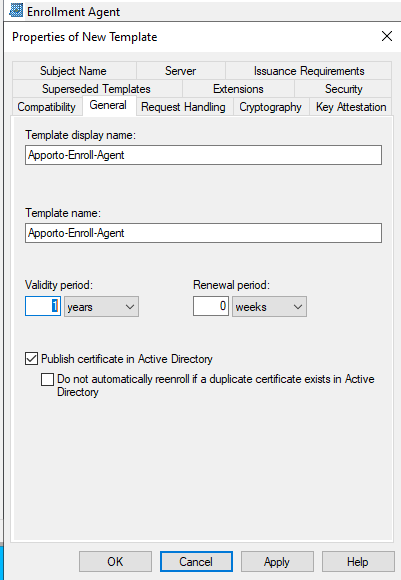
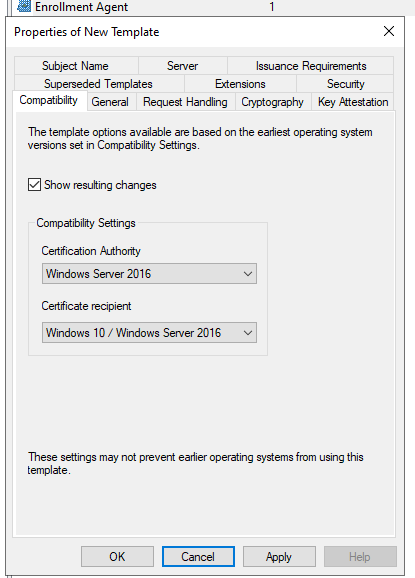
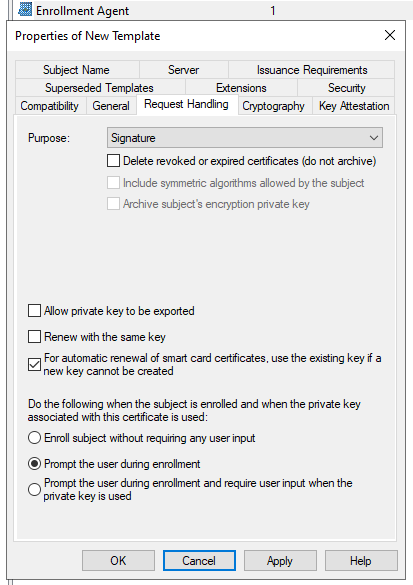
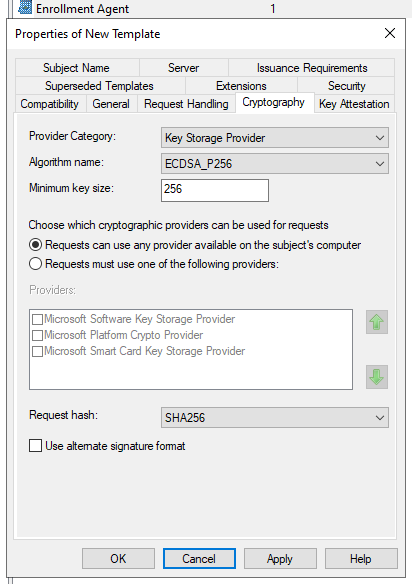
Under Application Policies, ensure that Certificate Request Agent is present.
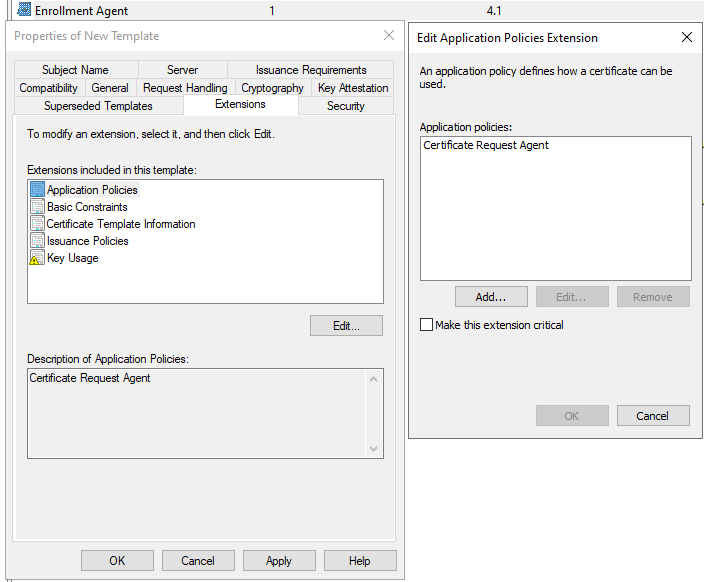
Under Key Usage, ensure Digital signature and Make this extension critical are selected, as shown.
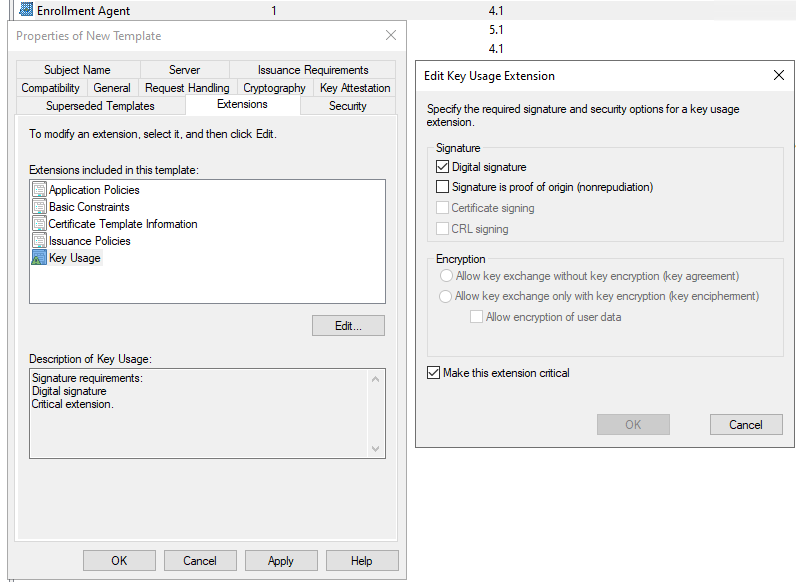
Complete the remaining properties and permissions shown below.
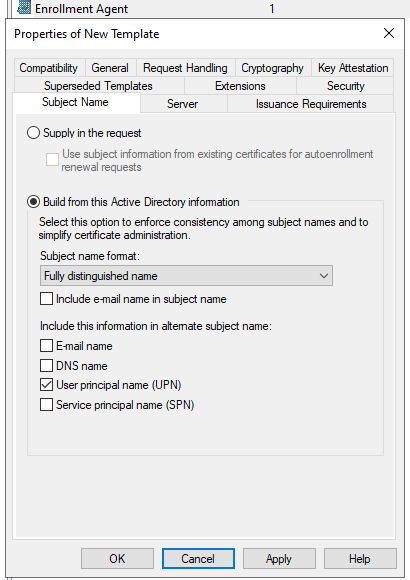
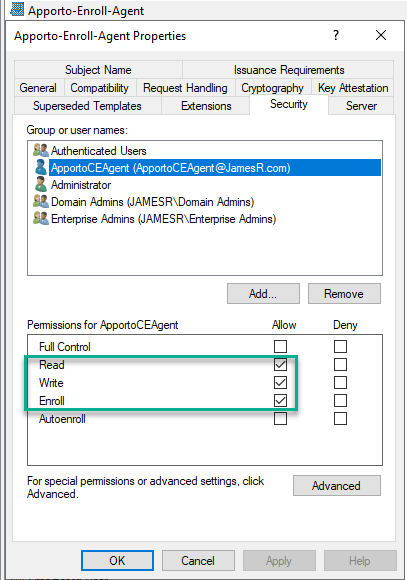
Click Apply, then OK to complete this template configuration.
Configure the user logon template
Create the template used to issue user logon certificates:
-
Open Certificate Templates MMC.
-
Right click Smartcard Logon and select Duplicate Template.
-
Configure the template properties as per the screenshots below.
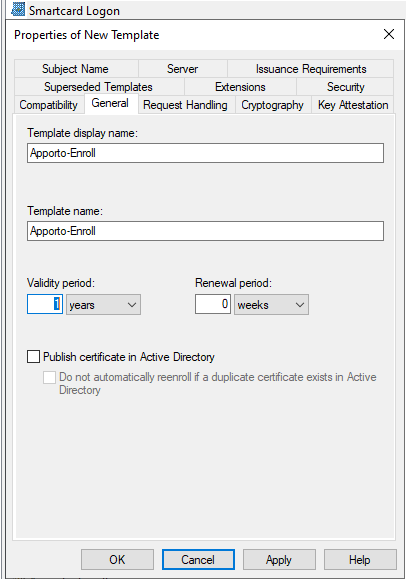
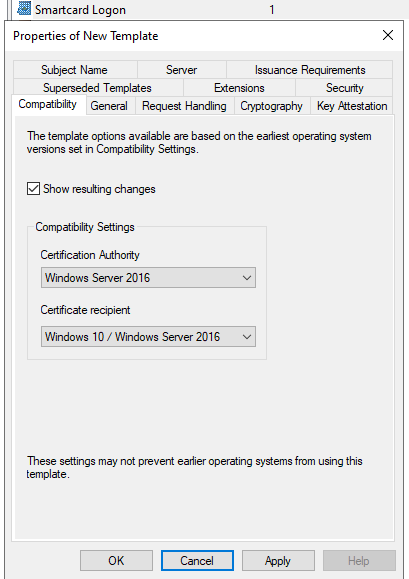
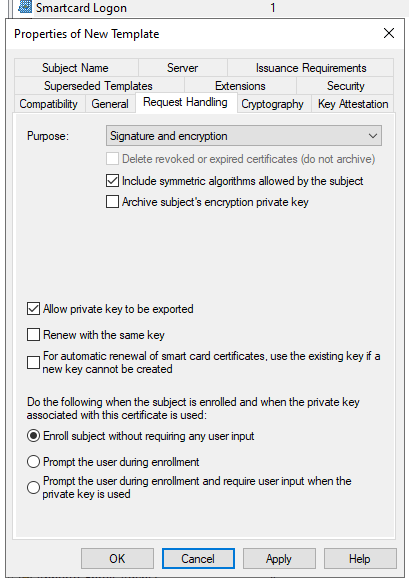
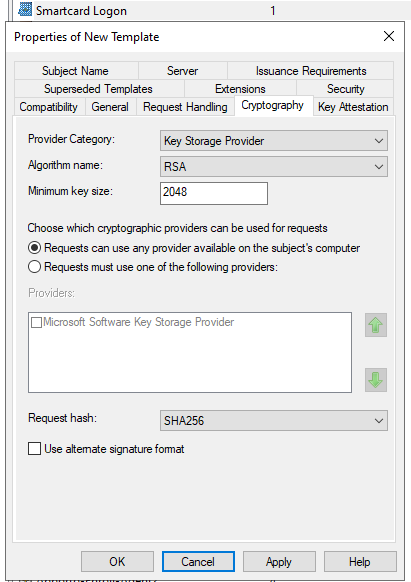
Add Secure Email under Application Policies:
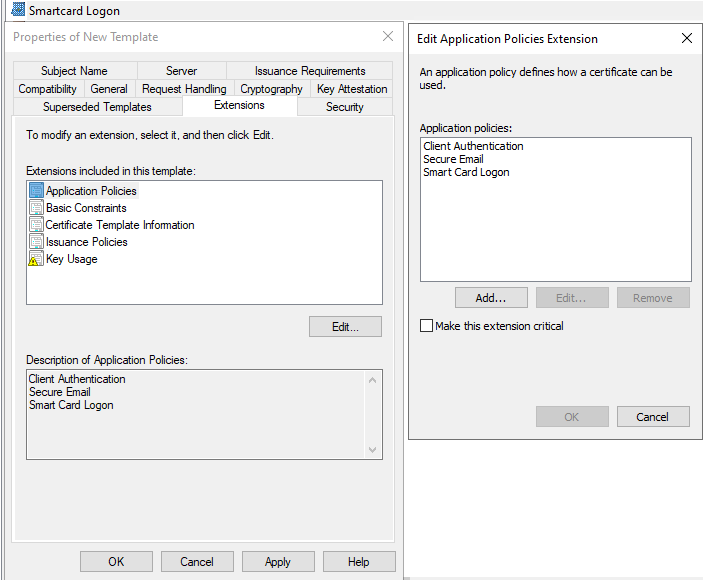
Configure Key Usage as shown:
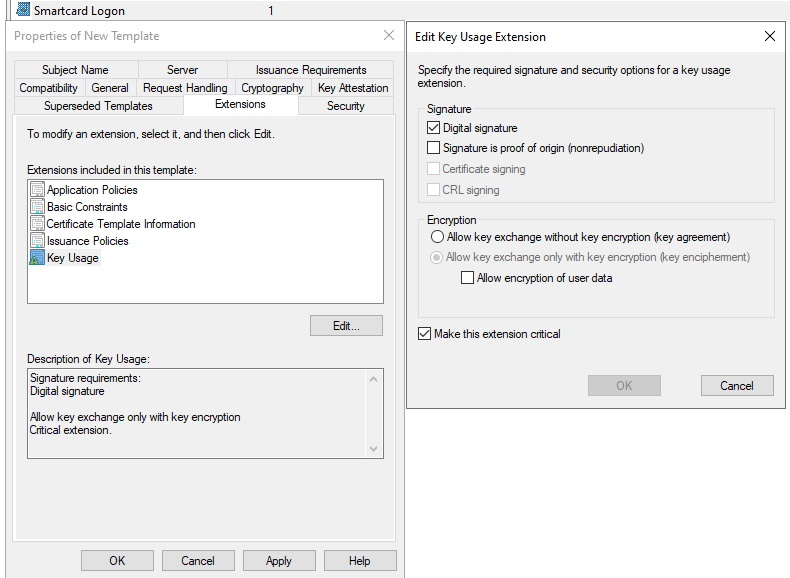
Complete the remaining properties and permissions shown below.
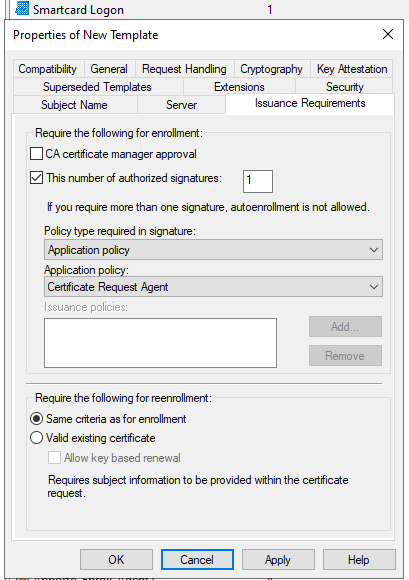
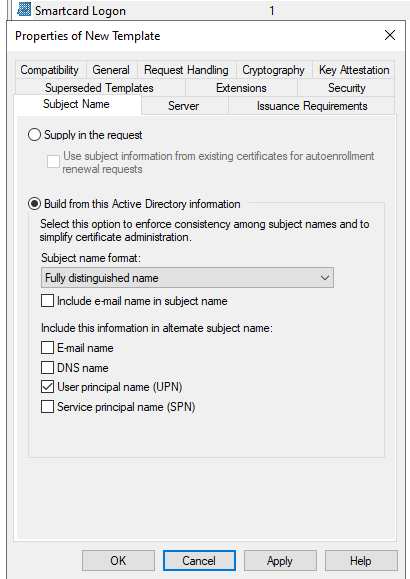
Click Apply, then OK to complete this template configuration.
Configure the HTTPS server template
Create the template used for the certificate service’s HTTPS certificate:
-
Open Certificate Templates MMC.
-
Right click Web Server and select Duplicate Template.
-
Configure the template properties as per the screenshots below.
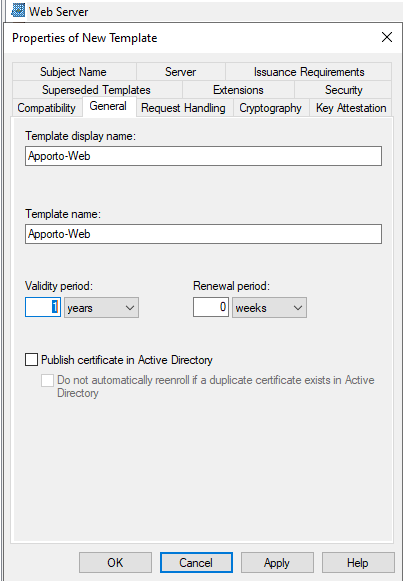
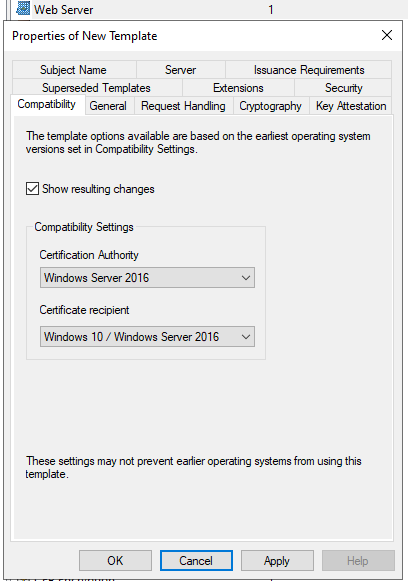
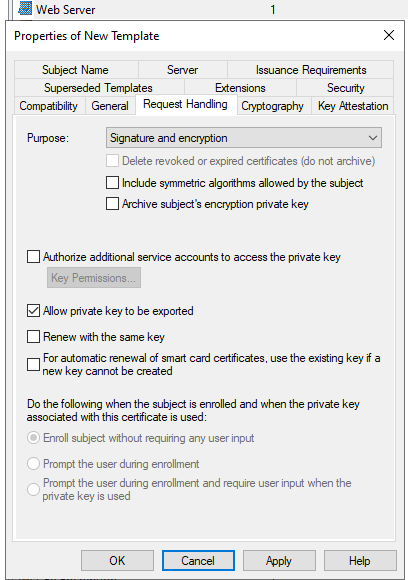
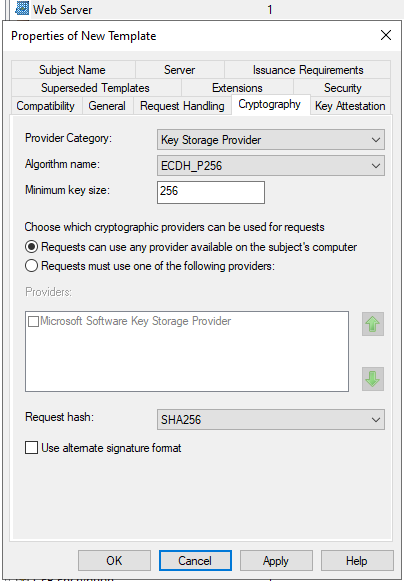
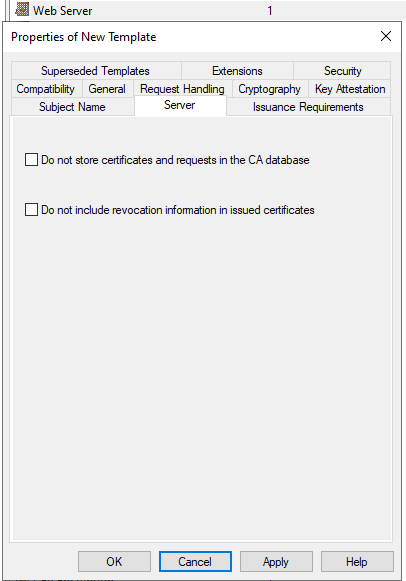
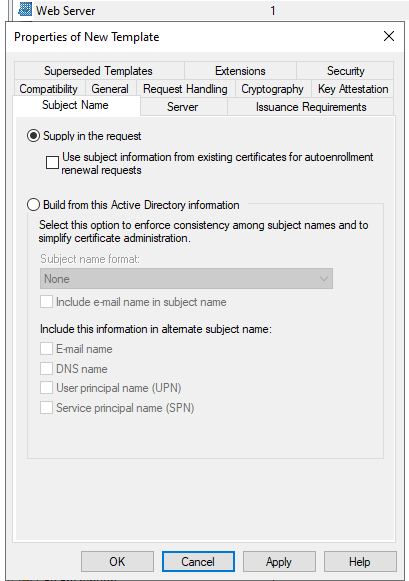
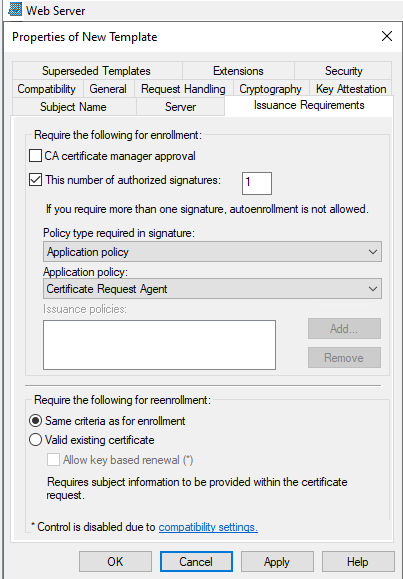
Add the server or servers that will run the Apporto SSO Certificate Service (Apporto-Cert-Gen-Svc), as shown below:
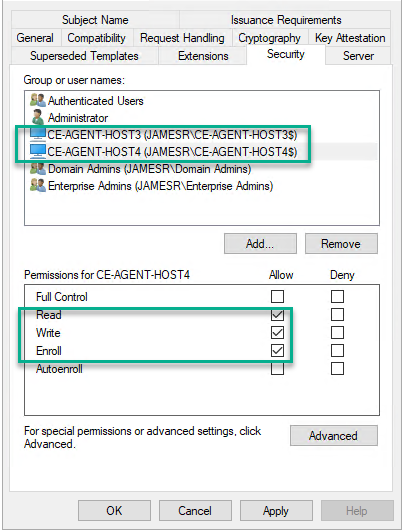
Click Apply, then OK to complete this template configuration.
Publish the certificate templates
Make the new templates available for enrolment:
-
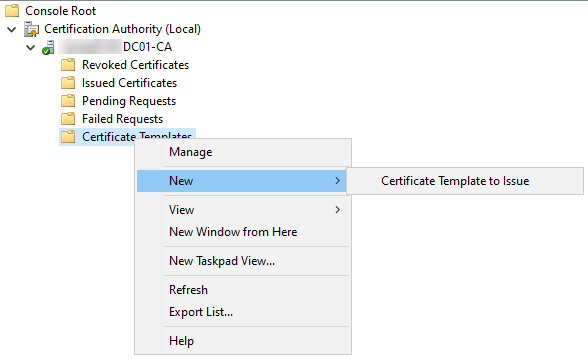
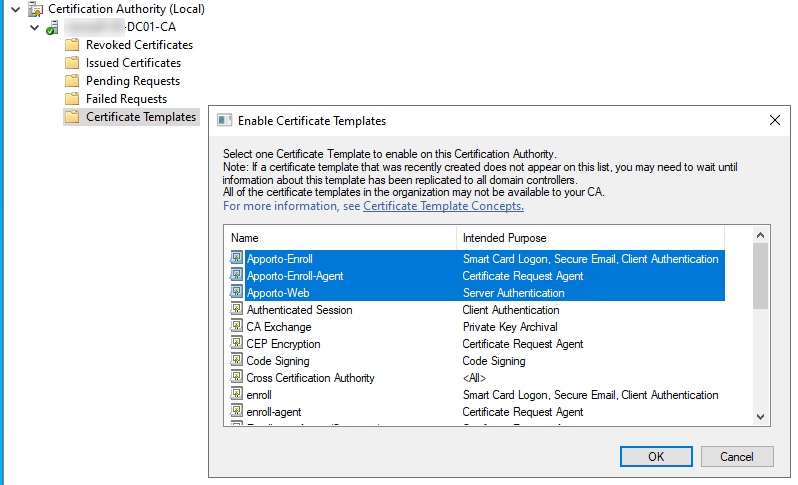
Open the Certification Authority MMC.
-
Right-click Certificate Templates.
-
Select New > Certificate Template to Issue.
-
Select all three templates created above and click OK.
Install and configure the certificate service
Install the Apporto SSO Certificate Service (Apporto-Cert-Gen-Svc) on each CE-Agent VM. The service obtains user logon certificates from Active Directory Certificate Services for use by Hyperstream during desktop launch.
Please ensure that the ports detailed in the earlier Network Requirements are open.
Enrol the enrolement-agent certificate
Complete the following steps on each CE-Agent VM:
-
Add the ApportoCEAgent domain account to the VM’s local Administrators group. These permissions are required for the certificate-enrolment processes.
-
Sign in to the VM as the ApportoCEAgent.
-
Open MMC, add the Certificates snap-in and select My user account. Alternatively, run certmgr.msc.
-
Go to Certificates - Current User > Personal > Certificates.
-
Right-click Personal and select All Tasks > Request New Certificate.
-
Continue with the default options until the certificate-selection page.
-
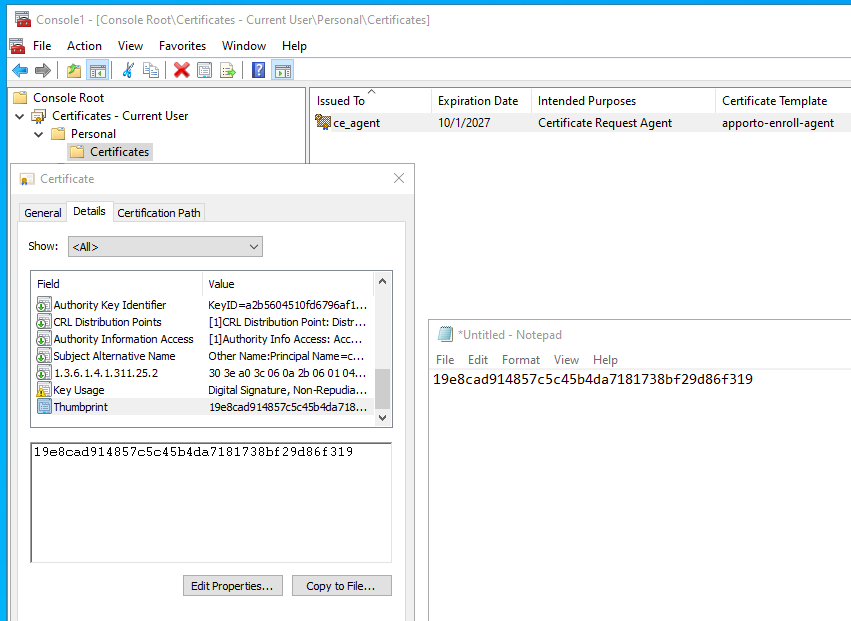
Select the Apporto-Enroll-Agent template, then select Enroll and Finish.
-
Open the new certificate, select the Details tab and copy its Thumbprint. Retain this value (for example paste into notepad) for use later in the configuration.
Enrol and export the HTTPS certificate
The HTTPS certificate is enrolled in the local computer certificate store.
On the VM you installed RDPSSOCertGenSvc service (any user, it can be ce_agent):
-
Open MMC and add the Certificates snap-in.
-
Select Computer account. Alternatively, run certlm.msc.
-
Go to Certificates - Local Computer > Personal > Certificates.
-
Right-click Personal and select All Tasks > Request New Certificate.
-
Continue with the default options until the certificate-selection page.
-
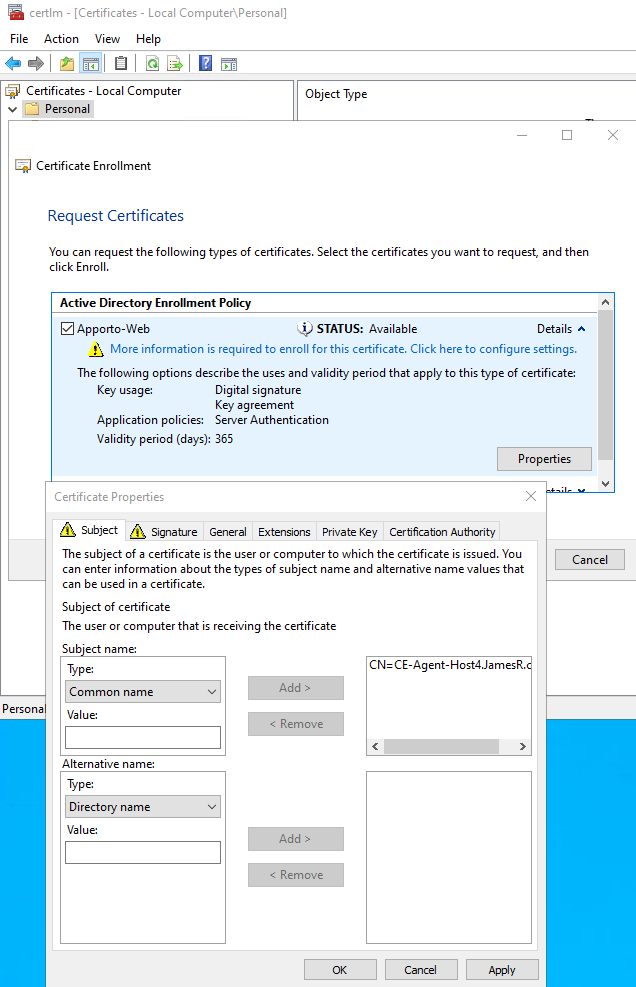
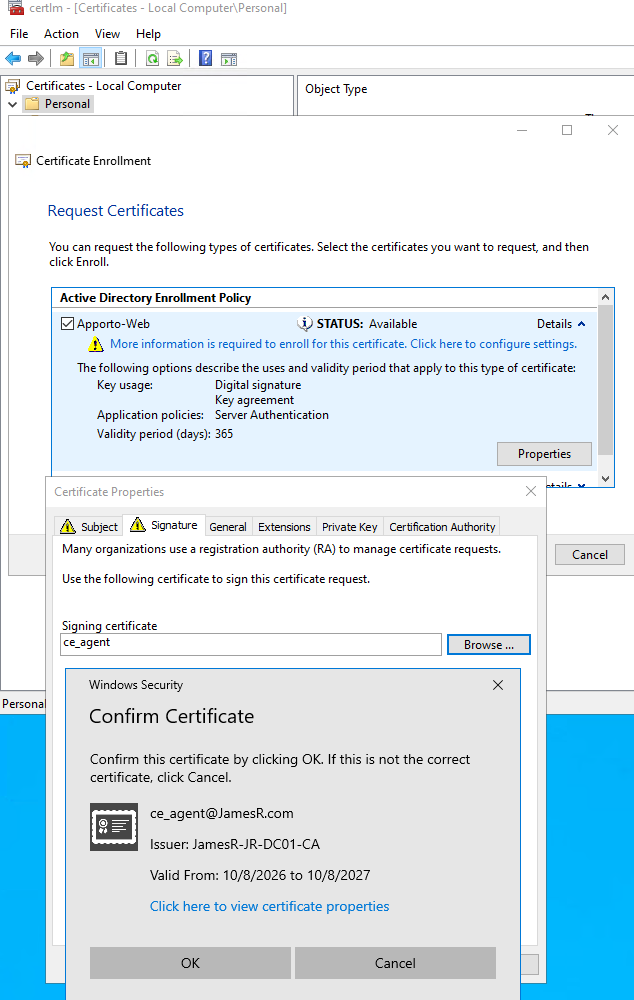
Select the Apporto-Web template and open Details > Properties.
-
Configure the certificate details as shown below. Set the Common name to the FQDN of the CE-Agent VM that you are logged into.
-
Select OK, then complete enrolment.
-
Select the enrolled Apporto-Web certificate and export it in PFX format, including its private key.
-
Ensure that you protect the exported PFX with a password before export. Keep a note of the file path and password for use later as the
PFX_FILEandPFX_PASSPHRASEparameters.
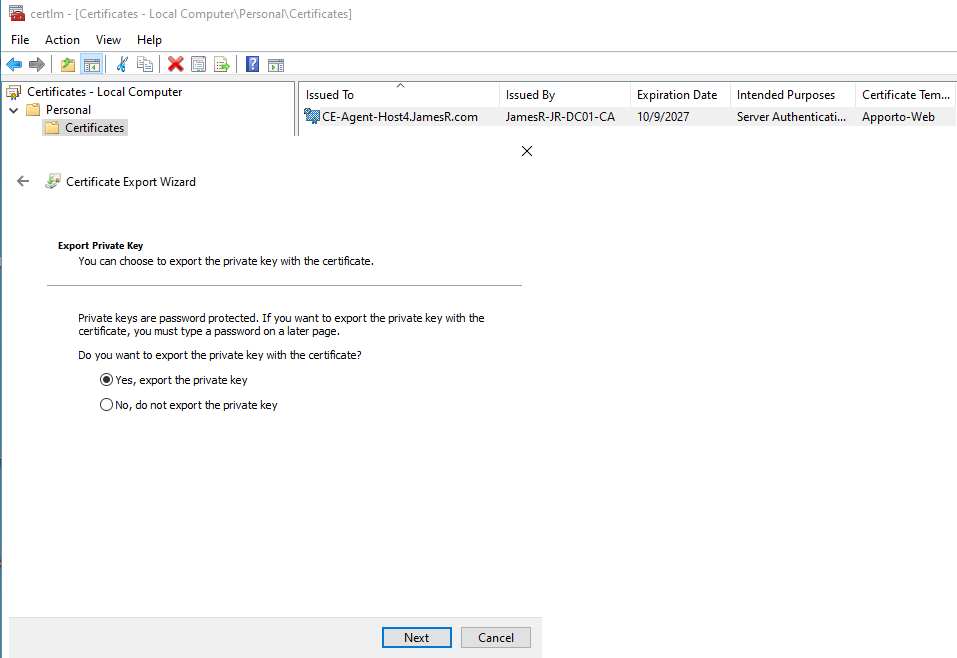
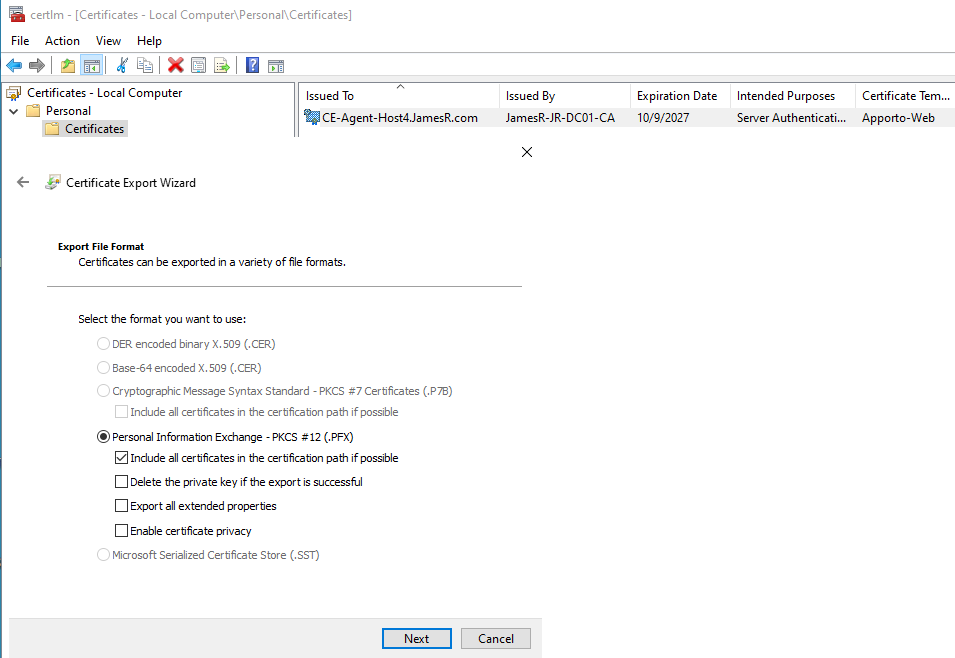
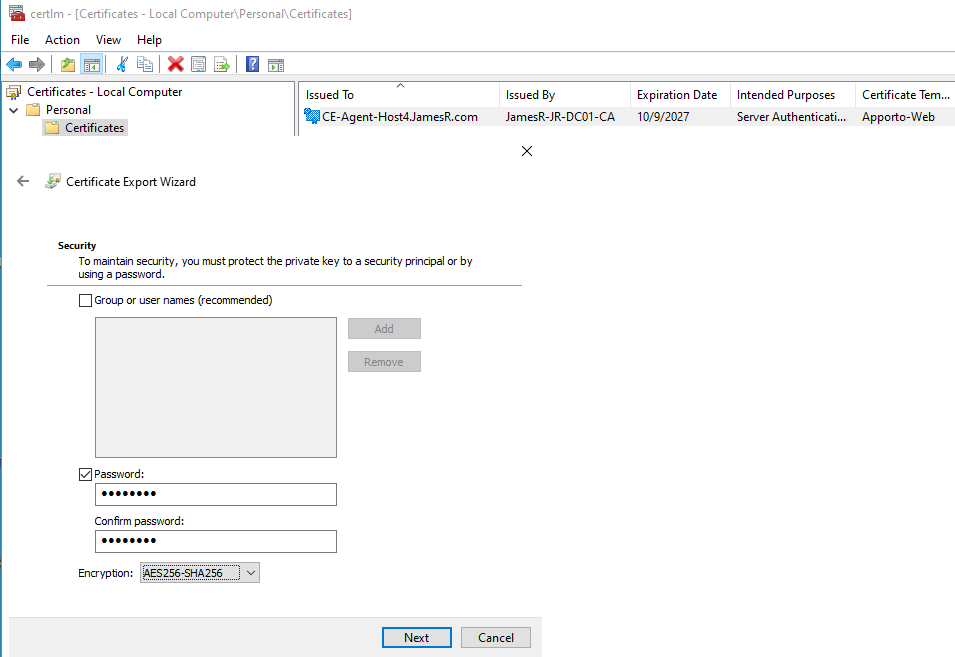
The suggested location for the exported PFX is C:\Certs to be used in the later steps.
Install the service and configure its account
Obtain the approved Apporto SSO Certificate Service installer from Apporto Support or Engineering. For example: apporto-sso-cert-svc-1.0.627 or later version.
-
Install the SSOCertGenSvc service application on one or more CE-Agent VMs while signed in as ApportoCEAgent, with local administrator permissions.
-
During installation, select the HTTPS PFX certificate exported earlier.
-
Enter the password used to protect that PFX.
-
Enter the enrolment-agent certificate thumbprint copied earlier.
-
Enter the user logon certificate template name. In the documented example, this is Apporto-Enroll.
Use the user logon template name here, not Apporto-Enroll-Agent.
-
Complete the installation.
-
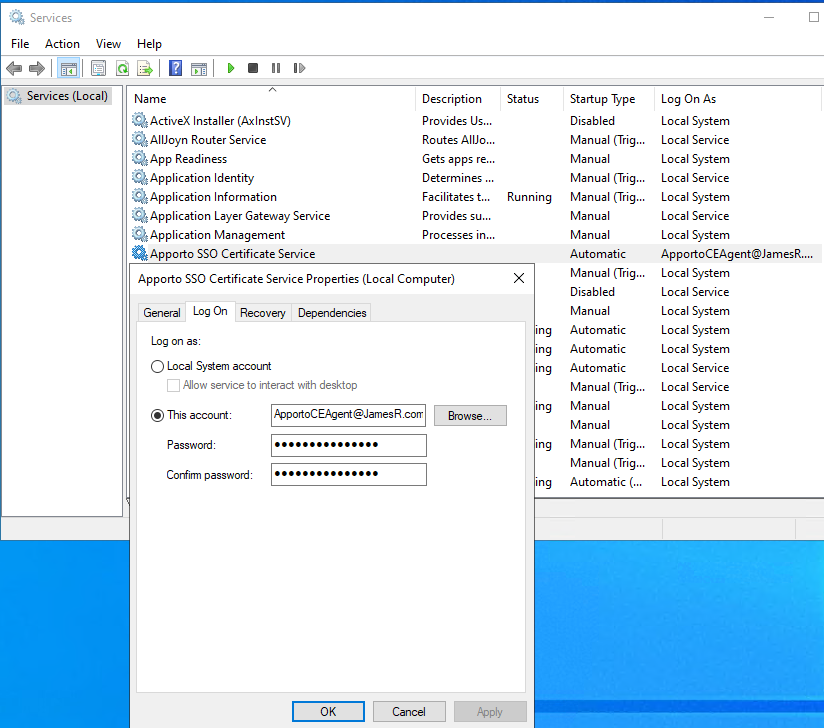
Stop the Apporto-Cert-Gen-Svc service.
-
Open its Properties > Log On settings and configure it to run as the ApportoCEAgent domain account.
Configure the .env settings
Open the following file in a text editor running with administrator permissions:
C:\Program Files\Apporto\Apporto SSO Certificate Service\.env
Configure the values for the deployment.
Before configuring API_KEY: obtain the Certificate Generation Service API Key from the portal settings described under Configure the tenant’s SSO2D settings. The value must match the key configured in the portal.
|
Setting |
Purpose |
|---|---|
|
ENABLE_HTTP |
Set to true if the HTTP service should be enabled. Defaults to false if not specified. |
|
PORT |
Port number of the HTTP service. Defaults to 3000 if not specified. |
|
ENABLE_HTTPS |
Enables the HTTPS service when set to true. Defaults to true if not specified. |
|
HTTPS_PORT |
Port number of the HTTPS service. Defaults to 3443 if not specified. |
|
PFX_FILE |
Path to the web certificate in PFX format (as exported earlier). Used only for providing HTTPS. |
|
PFX_PASSPHRASE |
Password protecting the HTTPS certificate PFX. |
|
CERTIFICATE_DIR_PATH |
The path of a temporary directory where the certificates will be generated. |
|
CERTIFICATE_THUMBPRINT |
Thumbprint of the enrollment-agent certificate obtained in a previous step. |
|
CERTIFICATE_TEMPLATE_NAME |
User logon certificate template name, for example Apporto-Enroll. |
|
API_KEY |
Key used for accesing REST endpoints. |
|
ENABLE_CACHE |
Optional - Enables Redis certificate caching when set to true (requires Redis instance setup). Set to false if caching is not used. |
|
REDIS_HOST |
Optional - host where Redis in installed. |
|
REDIS_PORT |
Optional - network port where Redis is listening. |
|
REDIS_PASSWORD |
Optional - Redis password. |
The example below shows an .env configuration. Replace the example values with those for the deployment.
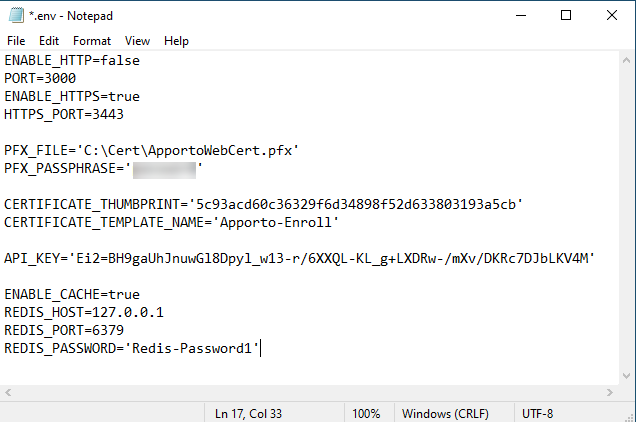
Save the file and start the Apporto SSO Certificate Service. Restart the service after subsequent configuration changes.
Optional: enable certificate caching
Using Redis for certificate caching is optional. Caching speeds up the second and subsequent logins.
The documented Windows cache implementation uses Memurai, which is compatible with Redis.
-
Download and install Memurai from Get Memurai (use the Developer Edition).
-
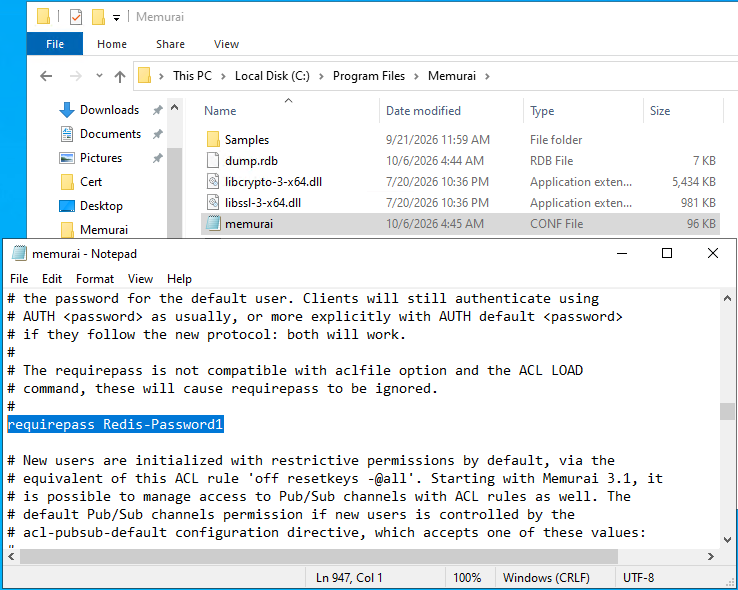
Once installed modify the memurai.conf file and replace the requirepass value with your own password to be used.
-
Configure any deployment-specific host and port settings, referring to the Memurai documentation.
-
Update the certificate service’s .env file with the matching Redis host, port and password, and set ENABLE_CACHE=true.
-
Restart the affected services after applying the configuration.
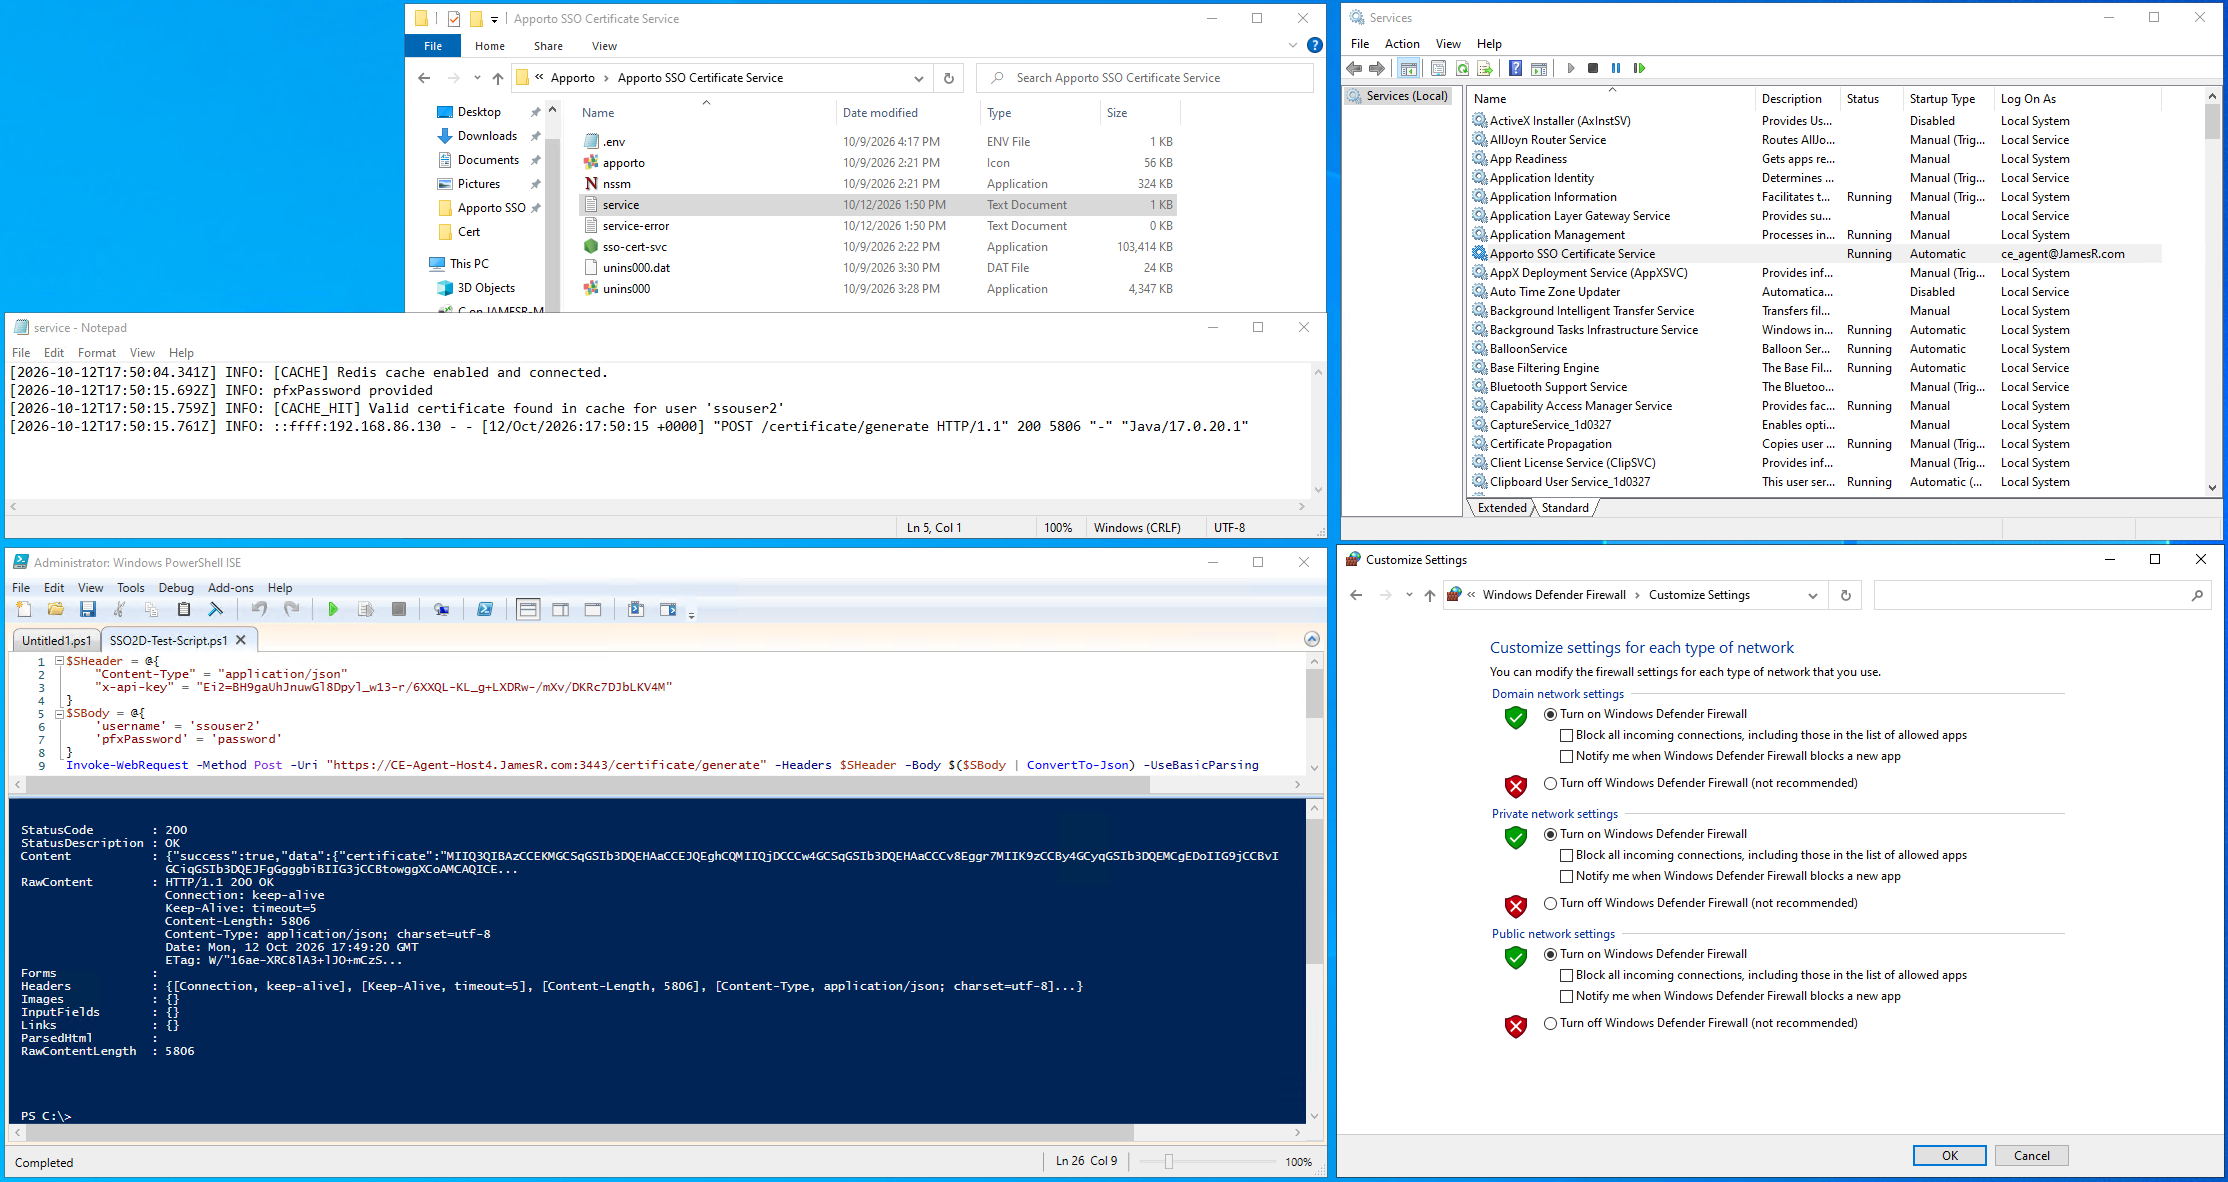
Verify the SSO Certificate Service log
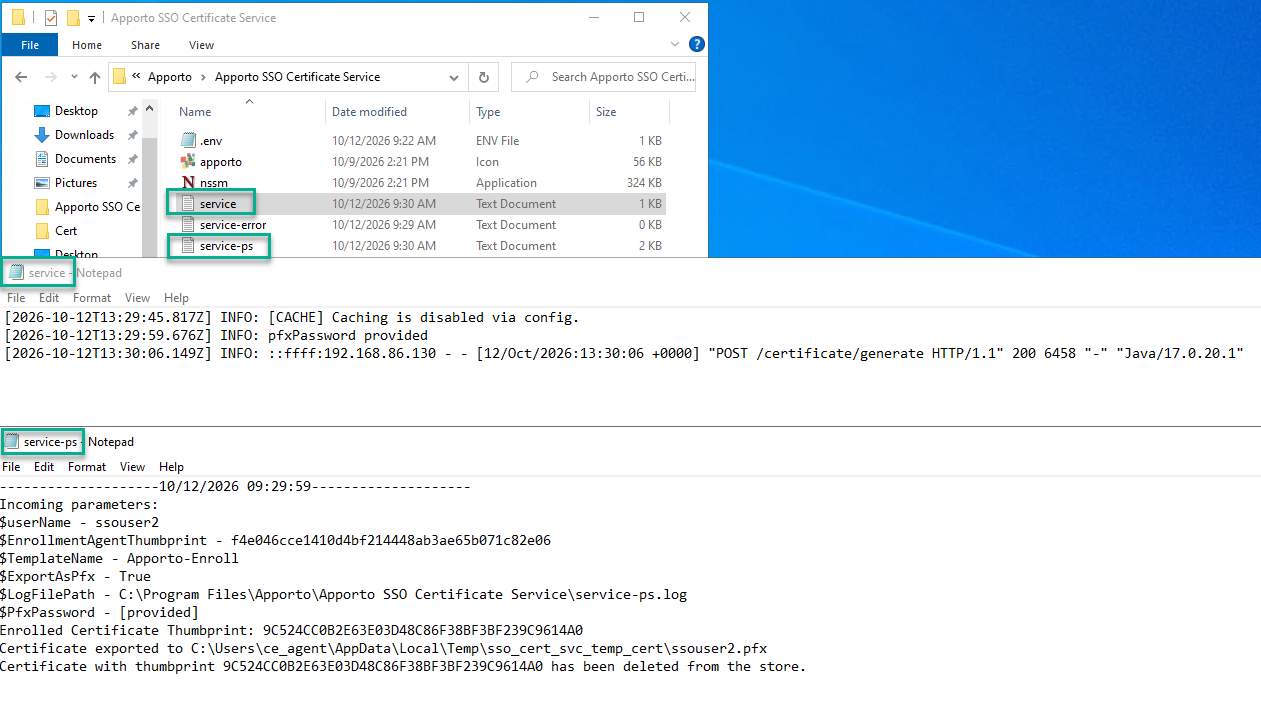
Check C:\Program Files\Apporto\Apporto SSO Certificate Service\service.log for any issues that will be reported.
If ENABLE_CACHE=false the following should be reported in the Log files during an SSO2D Hyperstream Desktop launch:
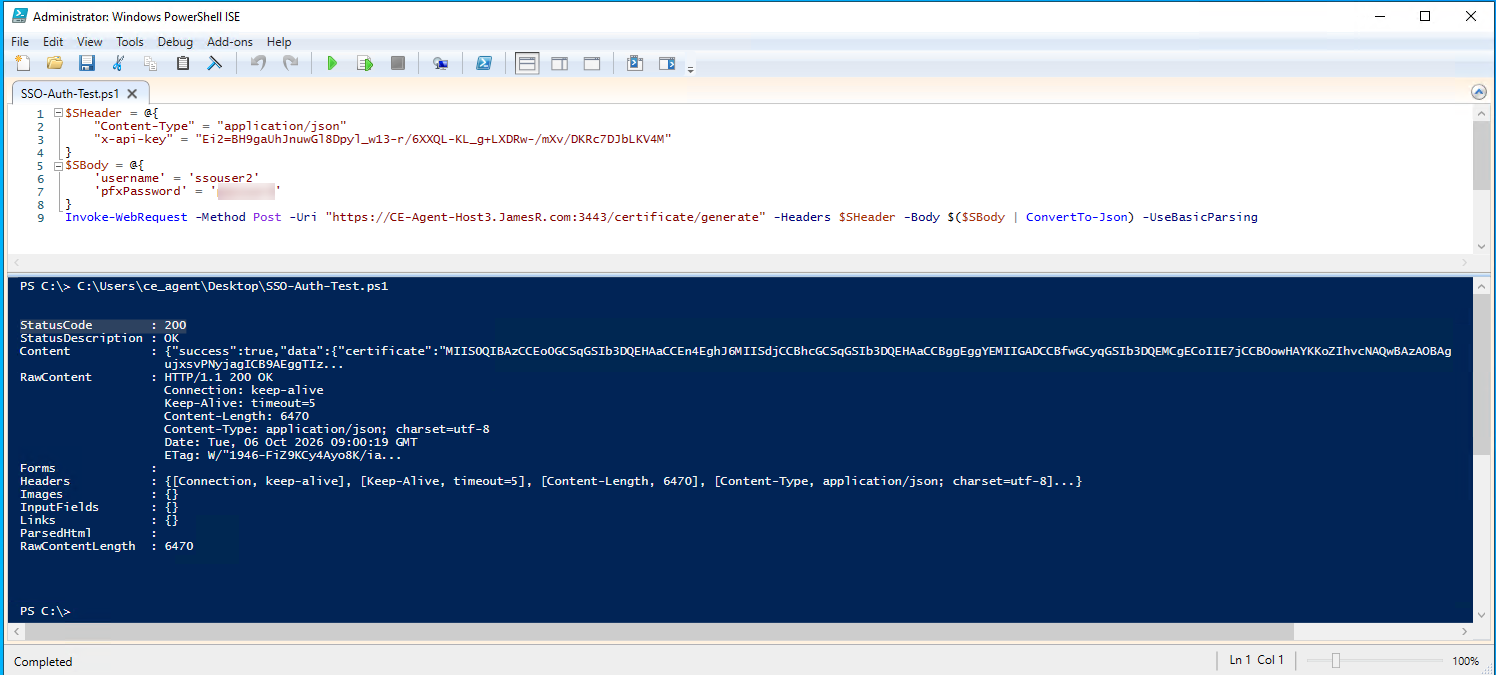
Example Config for Service, Cert Mangement, .ENV file as well as Powershell script that can test a User to ensure it’s getting the correct Certificates and returns a 200.
Note-API-Key is provided from the Portal\Tenant SSO2D config settings:
################ Debug items, Test User connection for HTTPS and Cert:
$SHeader = @{ "Content-Type" = "application/json" "x-api-key" = "Ei2=BH9gaUhJnuwGl8Dpyl_w13-r/6XXQL-KL_g+LXDRw-/mXv/DKRc7DJbLKV4M" } $SBody = @{ 'username' = 'ssouser2' 'pfxPassword' = '?????????' } Invoke-WebRequest -Method Post -Uri "https://CE-Agent-Host3.JamesR.com:3443/certificate/generate" -Headers $SHeader -Body $($SBody | ConvertTo-Json) -UseBasicParsing
################
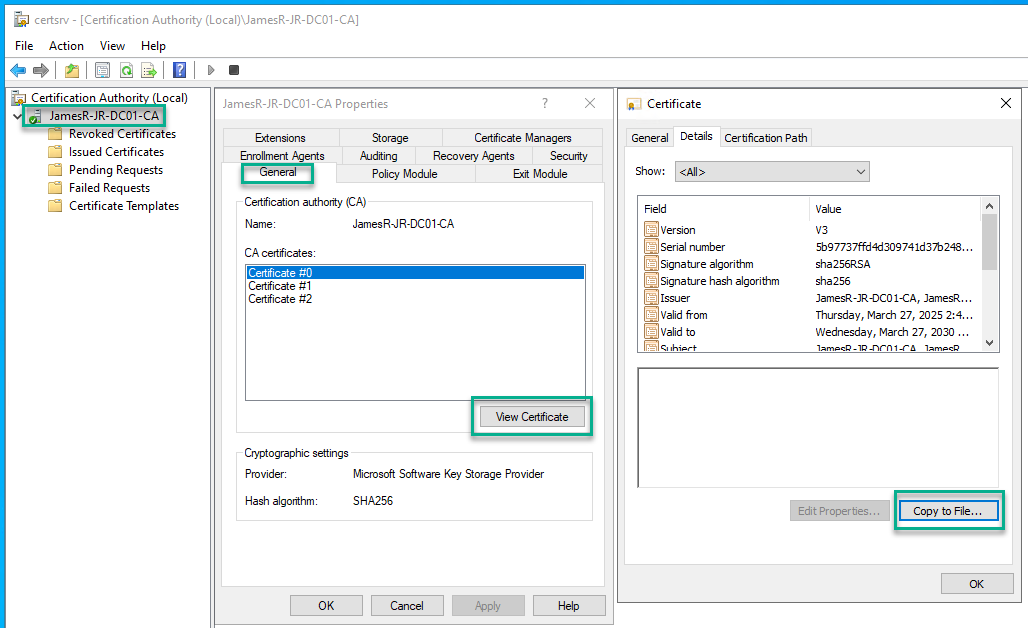
Your Root CA Certificate should be delivered on all the VMs in domain.
-
Open Certification Authority MMC. Right click on the root CA Name - Properties.
-
In Properties open General tab and go to Certificate #0 (this is your root CA) - View Certificate.
-
Open Details tab and click on Copy to File…
-
Next - DER encoded library and save certificate on your drive.
-
Move certificate file to your Domain Controller and Open Group Policy Management Console.
-
Select Group Policy you want to apply and go to - Computer Configuration-Policies-Windows Settings-Security Settings-Public Key Policies-Trusted Root Certification Authorities and import certificate you exported above.
GPO Required Policies
All Required AD GPO Policies in place:
RDS/VDI GPO Settings for On‑Premises Deployments
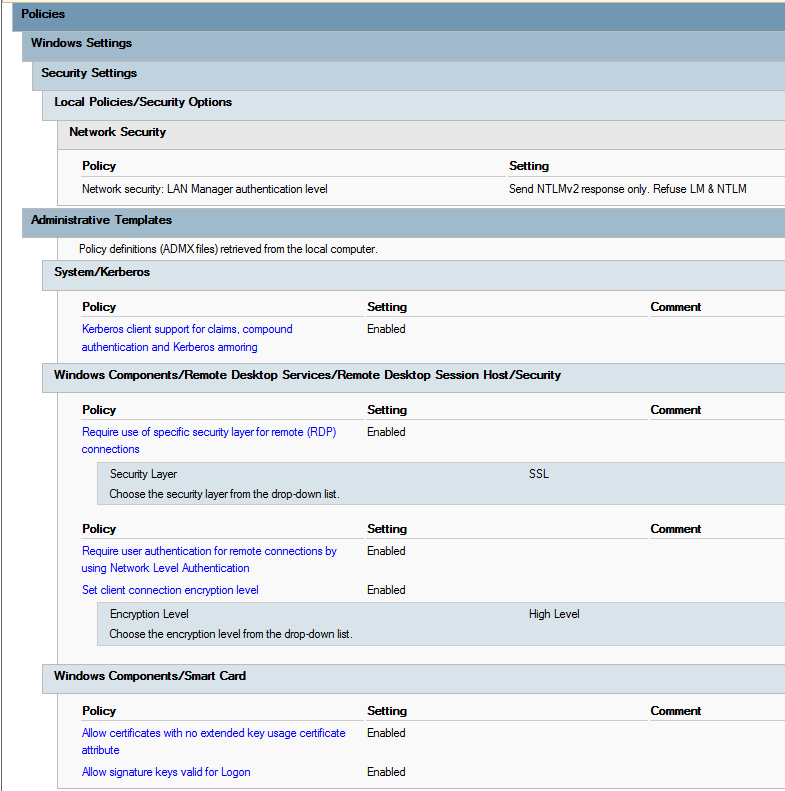
The following are additional AD GPO Policies that will be applied the the RDS Hosts that will be used to launch the SSO2D HS-Hyperstream connections into. These are just SSO2D specific policies.
Computer Configuration-Policies-Windows Settings-Security Settings-Local Policies/Security Options:
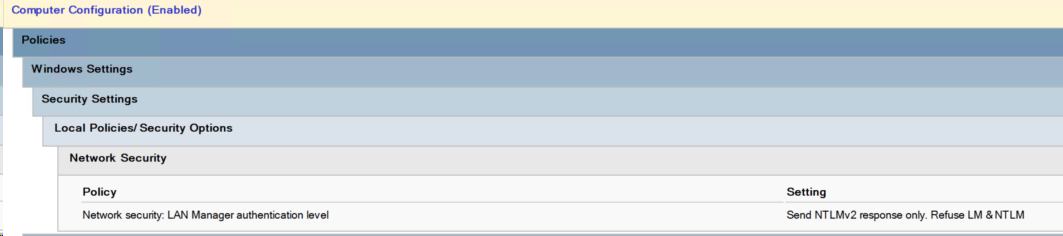
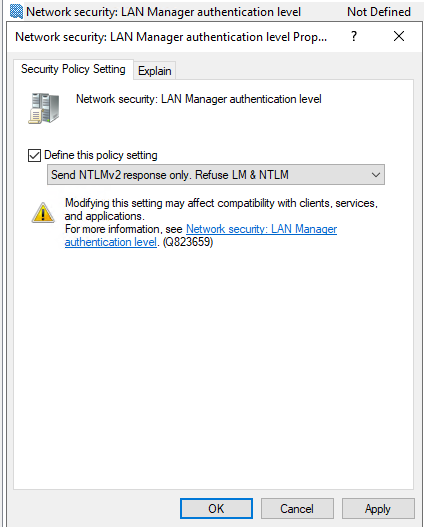
Computer Configuration-Policies-Administrative Templates:
Portal\Tenant - Enable SSO on the Desktop
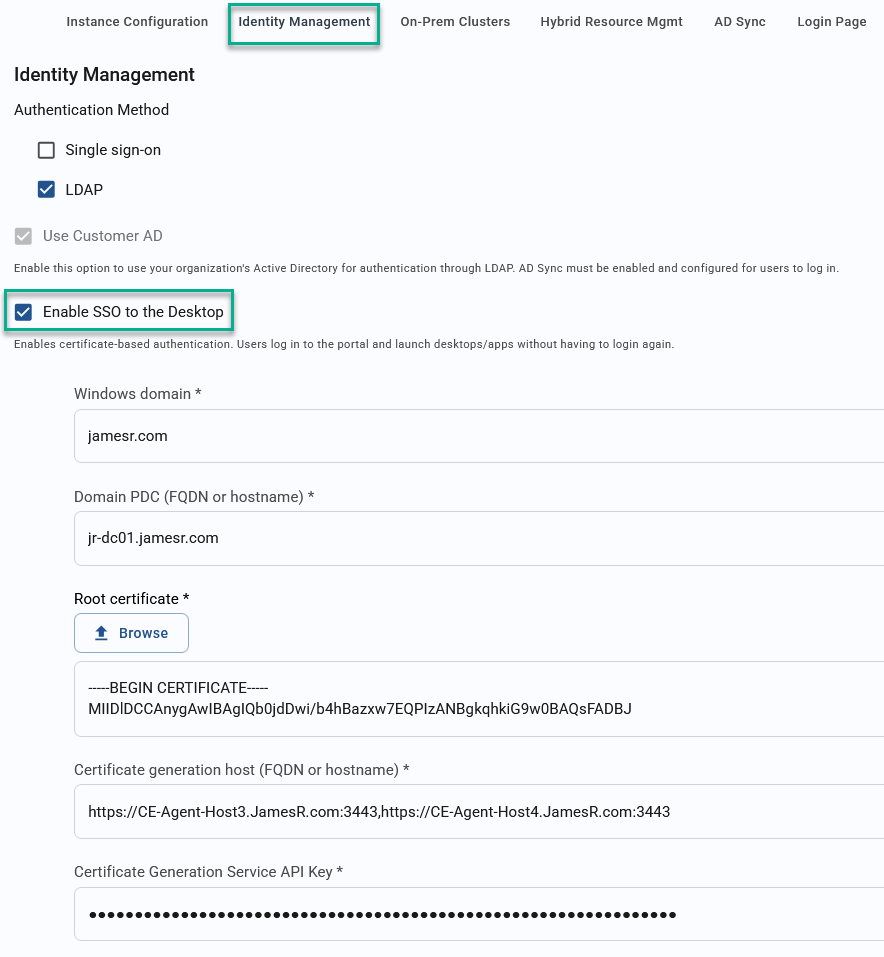
Add the AD Root Certificate.
Note-The Certificate Generation Service API Key will be used to configure the .ENV file in the Apporto-Cert-Gen-Svc system.
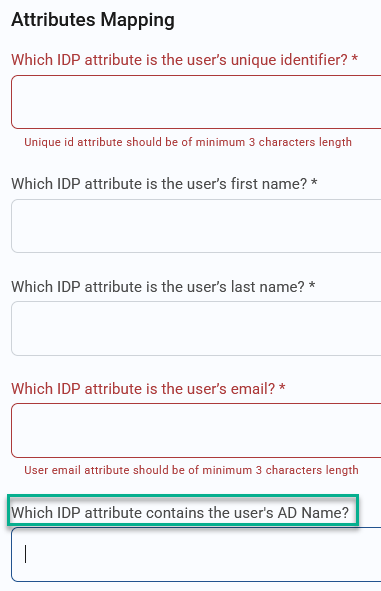
If there will be a usage of SSO-Single sign-on using the top option shown above for Auths into the portal\tenant, note the following that will need to be adjusted:
Setup → Identity Management → SSO domains → open the domain → the attribute mapping section has a field called "User's AD name". The admin puts in the IdP attribute name that carries the sAMAccountName. It's optional, and if it's left empty we simply don't get an AD username.
-
The value has to be the exact attribute name the IdP sends, so you should supply the exact name, not just "sAMAccountName".
-
The AD name is stored on the user at login, so existing users need to sign in again after the mapping is added.
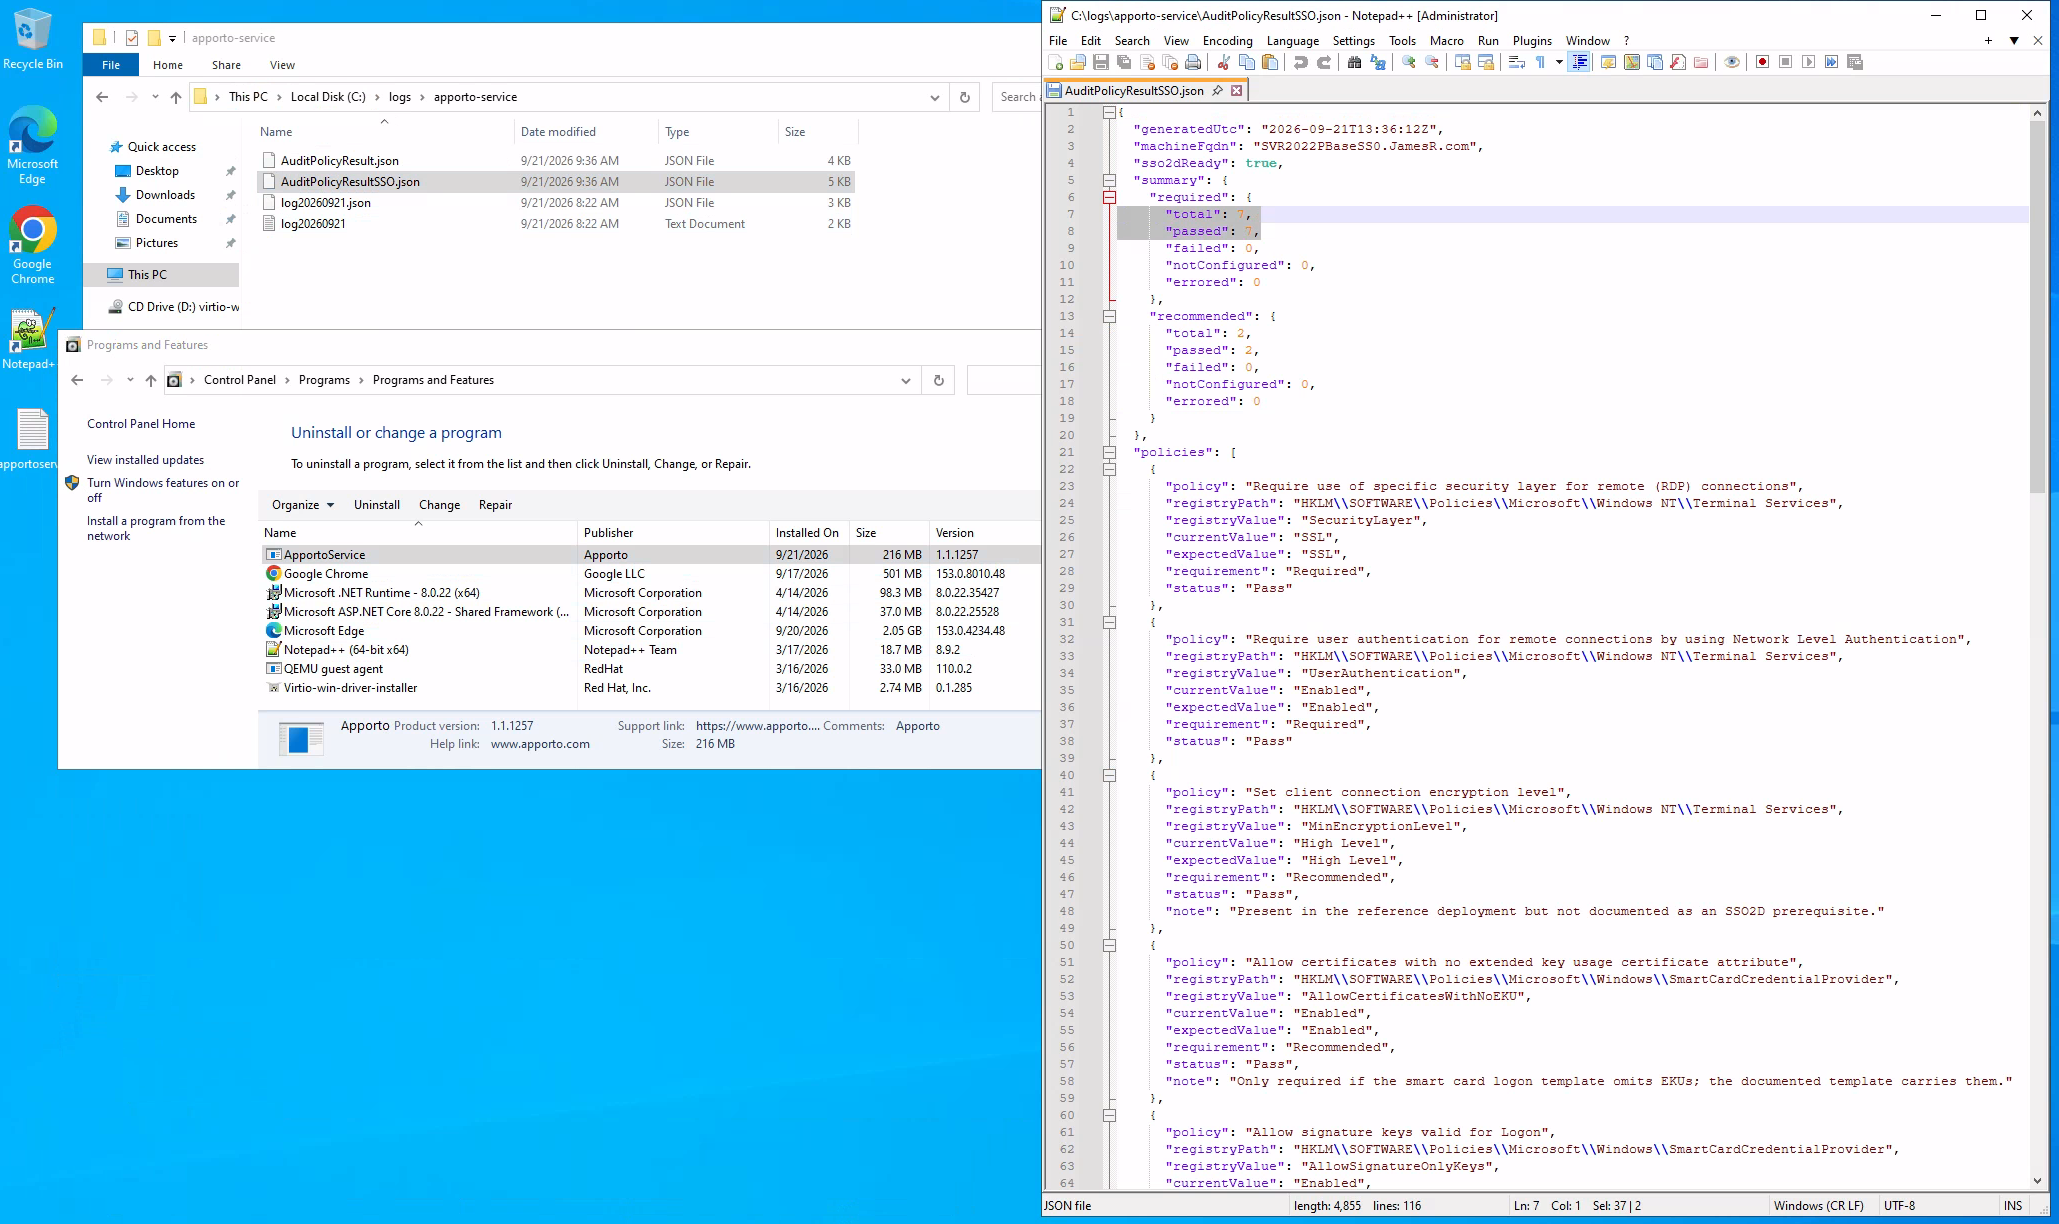
Windows ApportoService
In addition to the above for any systems that will be used for SSO2D and updated Windows ApportoService .MSI build will need to be used.
Contact Support or Engineering for the latest build release to be used.
1.1.1257 or Later
The updated release contains a new .json that can be used to help verify the correct RDP GPO policies have been applied.
For initial configured it’s suggested to Disable the OS Firewall to verify connectivity. If however the RDS Hosts that will be used require Ports to be locked down, please review the following info:
Prerequisites | Required ports
Configure the Server Pool - Edit settings to ensure SSO2D is Enabled for use:
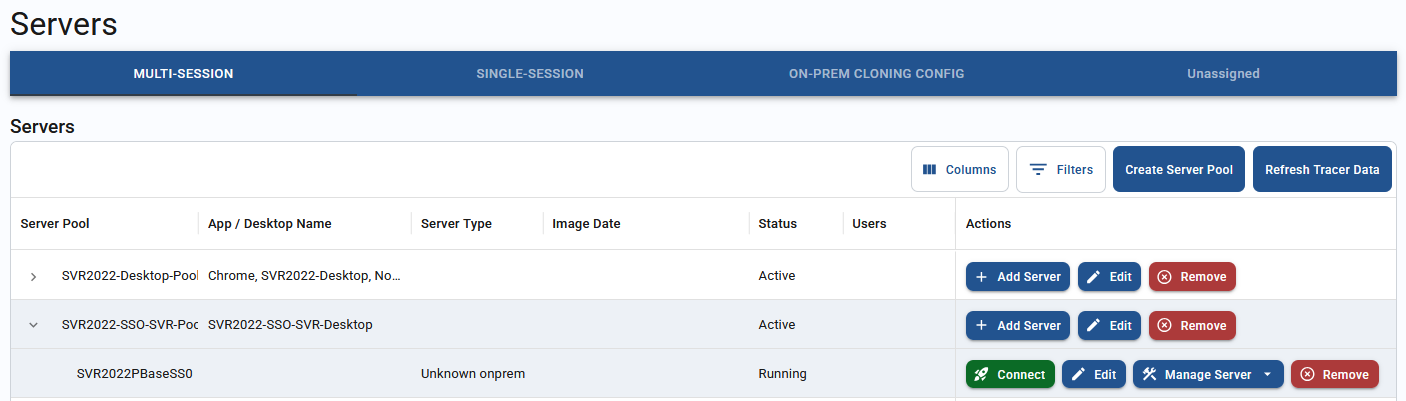
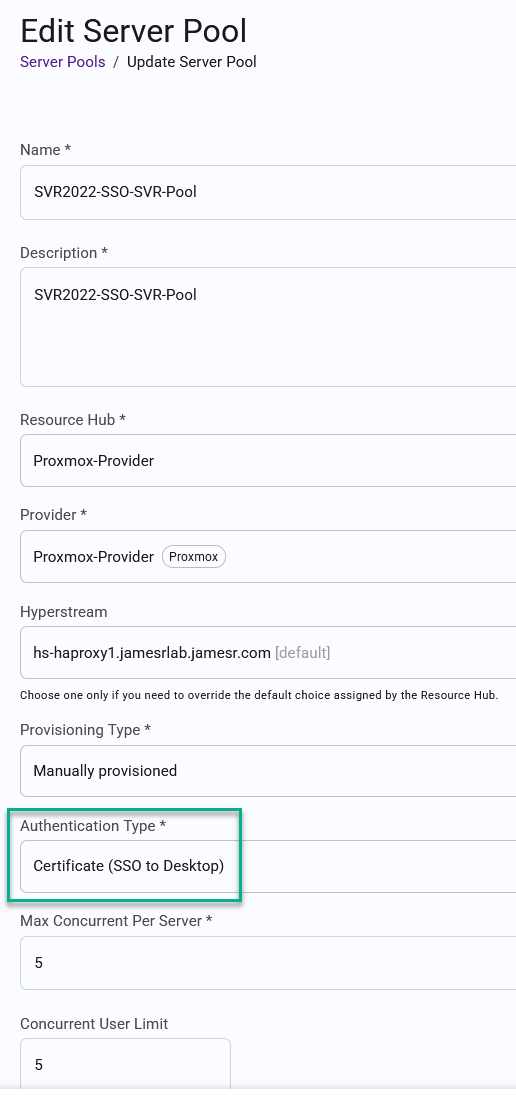
Example of SSO2D Hyperstream Desktop Launch: