

This guide explains how to connect an organisation’s OpenID Connect (OIDC) Identity Provider to Apporto NextGen through Keycloak. Use it as an end-to-end setup checklist: create the Keycloak OIDC broker, configure the OIDC application in the identity provider, exchange client credentials and discovery metadata, map user profile claims, and validate sign-in.
Keycloak acts as the identity broker for Apporto NextGen. Your organisation’s OIDC Identity Provider authenticates users and returns identity claims that Keycloak imports into the tenant realm.
Overview
|
System |
Purpose |
|---|---|
|
Keycloak |
Hosts the tenant realm, OIDC identity provider configuration, user mapping, and optional claim-to-role mapping. |
|
Organisation OIDC Identity Provider |
Hosts the OIDC application, user directory, client credentials, discovery metadata or endpoints, and optional group or role assignments. |
Before you begin
-
Confirm you have administrator access to the Keycloak realm for the customer tenant.
-
Confirm you have administrator access to the organisation’s OpenID Connect identity provider.
-
Have a test user available for validation.
-
Know the Keycloak host and customer tenant realm name.
-
Decide whether authorization will be driven by IdP groups, direct role claims, or only by the user profile.
-
Keep both Keycloak and the identity provider administration consoles open during setup so you can copy values between them.
Configuration flow
-
Add an OpenID Connect v1.0 identity provider in Keycloak and copy the generated Redirect URI.
-
Create an OIDC application in the organisation’s identity provider.
-
Register the Keycloak Redirect URI in the OIDC application.
-
Collect the client credentials and OIDC discovery endpoint or manual endpoint values.
-
Configure the identity provider in Keycloak.
-
Review scopes, signature validation, and advanced Keycloak settings.
-
Assign users or groups to the OIDC application.
-
Create Keycloak identity provider mappers for username, email, first name, and last name.
-
Optionally configure group or role mapping.
-
Test sign-in end to end.
Instructions
Step 1: Add the OpenID Connect provider in Keycloak
-
Sign in to the Keycloak administration console.
-
Select the customer realm.
-
Go to Identity Providers.
-
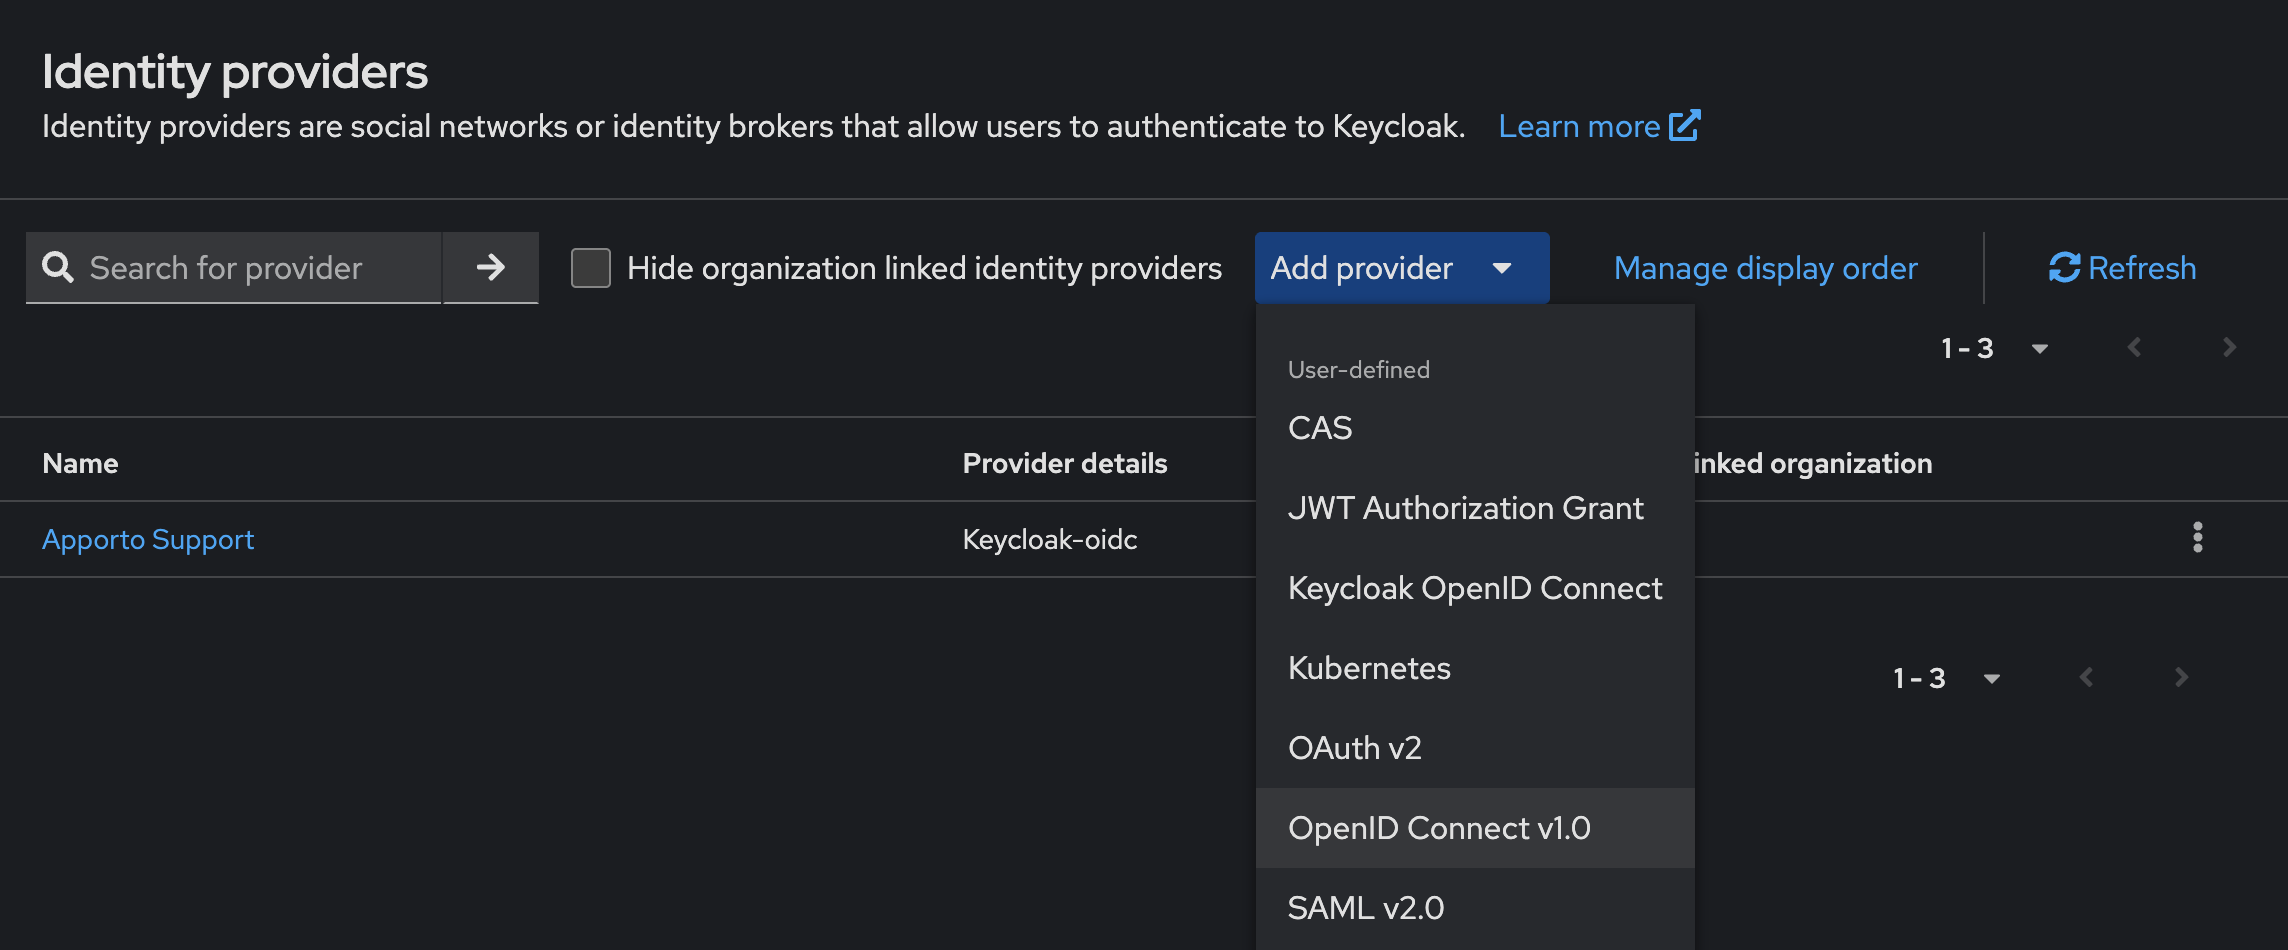
Click Add provider.
-
Select OpenID Connect v1.0.
Set the provider alias
Enter a short, unique alias for the provider. Do not use spaces.
customer-oidc
Keep this Keycloak page open. You will need the generated Redirect URI when setting up the OIDC application in the identity provider.
Collect the Keycloak redirect URI
Copy the Redirect URI generated by Keycloak. The provider alias becomes part of the callback URI.
https://<keycloak-host>/realms/<realm-name>/broker/<alias>/endpoint
If the alias is customer-oidc, the identity provider must redirect users back to /broker/customer-oidc/endpoint exactly.
Step 2: Create the OIDC application in the identity provider
Create a new OIDC application, OpenID Connect app integration, or Web application in the organisation’s identity provider. This application authenticates users and sends them to Apporto NextGen after successful sign-in.
-
Sign in to the identity provider administration console.
-
Create a new OIDC or OpenID Connect application integration.
-
If prompted, choose an application type that supports a confidential server-side client, typically Web Application.
-
Name the application Apporto NextGen, or use another name that administrators will recognise.
-
Continue to the client configuration screen.
Use a confidential web application where possible. Keycloak stores and uses the client secret when it exchanges the authorization code for tokens.
Step 3: Configure the redirect URI, grant type, and application access
Configure the OIDC application with the following values.
|
Setting |
Recommended value |
|---|---|
|
Sign-in redirect URI or callback URL |
Keycloak Redirect URI copied in Step 1 |
|
Application type |
Web application or confidential client |
|
Authorization Code grant |
Enabled |
|
Refresh Token |
Disabled unless explicitly required |
|
Client Credentials grant |
Disabled |
|
Wildcard redirect URIs |
Disabled |
Some providers also require you to choose who can access the application. If so, select the model that fits the customer environment.
|
Access option |
When to use it |
|---|---|
|
Allow all users in the organisation |
Use when every directory user should be allowed to authenticate. |
|
Limit access to selected users or groups |
Preferred when access should be restricted to approved users or groups. |
Step 4: Collect client credentials and discovery information
After saving the OIDC application, collect the values that Keycloak needs.
|
Value |
Use in Keycloak |
|---|---|
|
Client ID |
Client ID |
|
Client Secret |
Client Secret |
|
OIDC discovery endpoint |
Discovery endpoint |
|
Issuer URL |
Used to validate discovered or manual endpoint values |
The discovery endpoint commonly uses this format:
https://<identity-provider-domain>/.well-known/openid-configuration
Treat the client secret as sensitive. Do not publish it in screenshots, tickets, or customer-facing documentation.
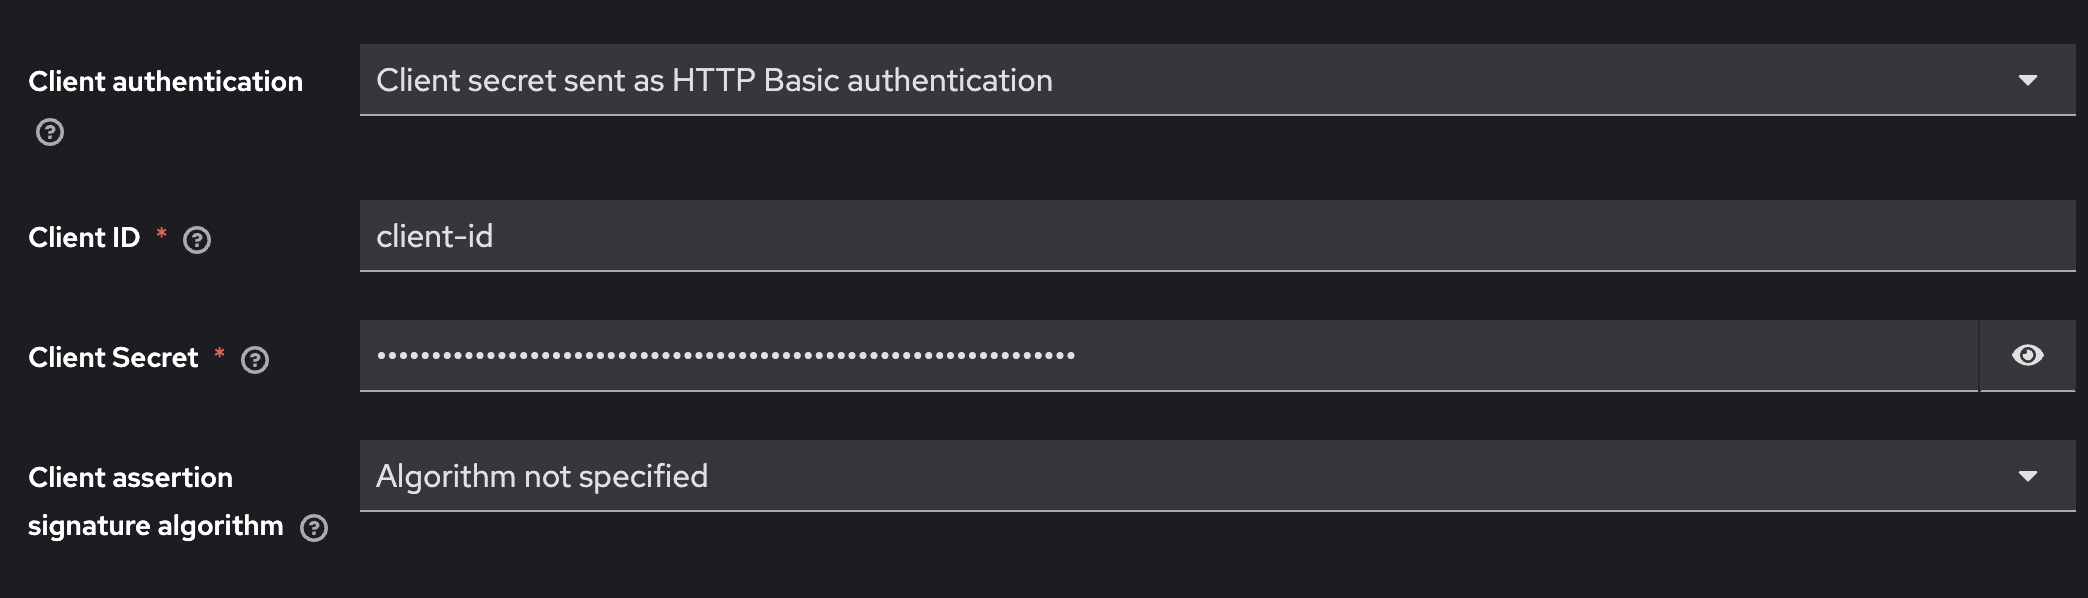
Step 5: Configure OIDC discovery and client authentication in Keycloak
Return to the OpenID Connect identity provider configuration in Keycloak and enter the values collected from the identity provider.
|
Keycloak field |
Value |
|---|---|
|
Use discovery endpoint |
On, if the identity provider supports OIDC discovery |
|
Discovery endpoint |
The IdP discovery URL |
|
Client authentication |
Client secret sent as HTTP Basic authentication |
|
Client ID |
Client ID from the OIDC application |
|
Client Secret |
Client Secret from the OIDC application |
|
Client assertion signature algorithm |
Algorithm not specified, unless the provider requires something different |
HTTP Basic authentication corresponds to the standard client_secret_basic method used by most confidential OIDC web applications.

Step 6: Review OIDC endpoint and advanced Keycloak settings
When OIDC discovery is enabled, Keycloak automatically retrieves the provider's authorization, token, UserInfo, issuer, and JWKS endpoints from the discovery metadata.
Verify that the discovered Issuer, Authorization URL, Token URL, User Info URL, and JWKS URL all belong to the same identity provider environment or authorization server.
If the identity provider does not support OIDC discovery, obtain these endpoint values directly from the identity provider's documentation and configure them manually in Keycloak.
OIDC endpoint paths vary between identity providers. Do not assume standard paths such as /authorize, /token, or /keys; always use the values published by the provider.
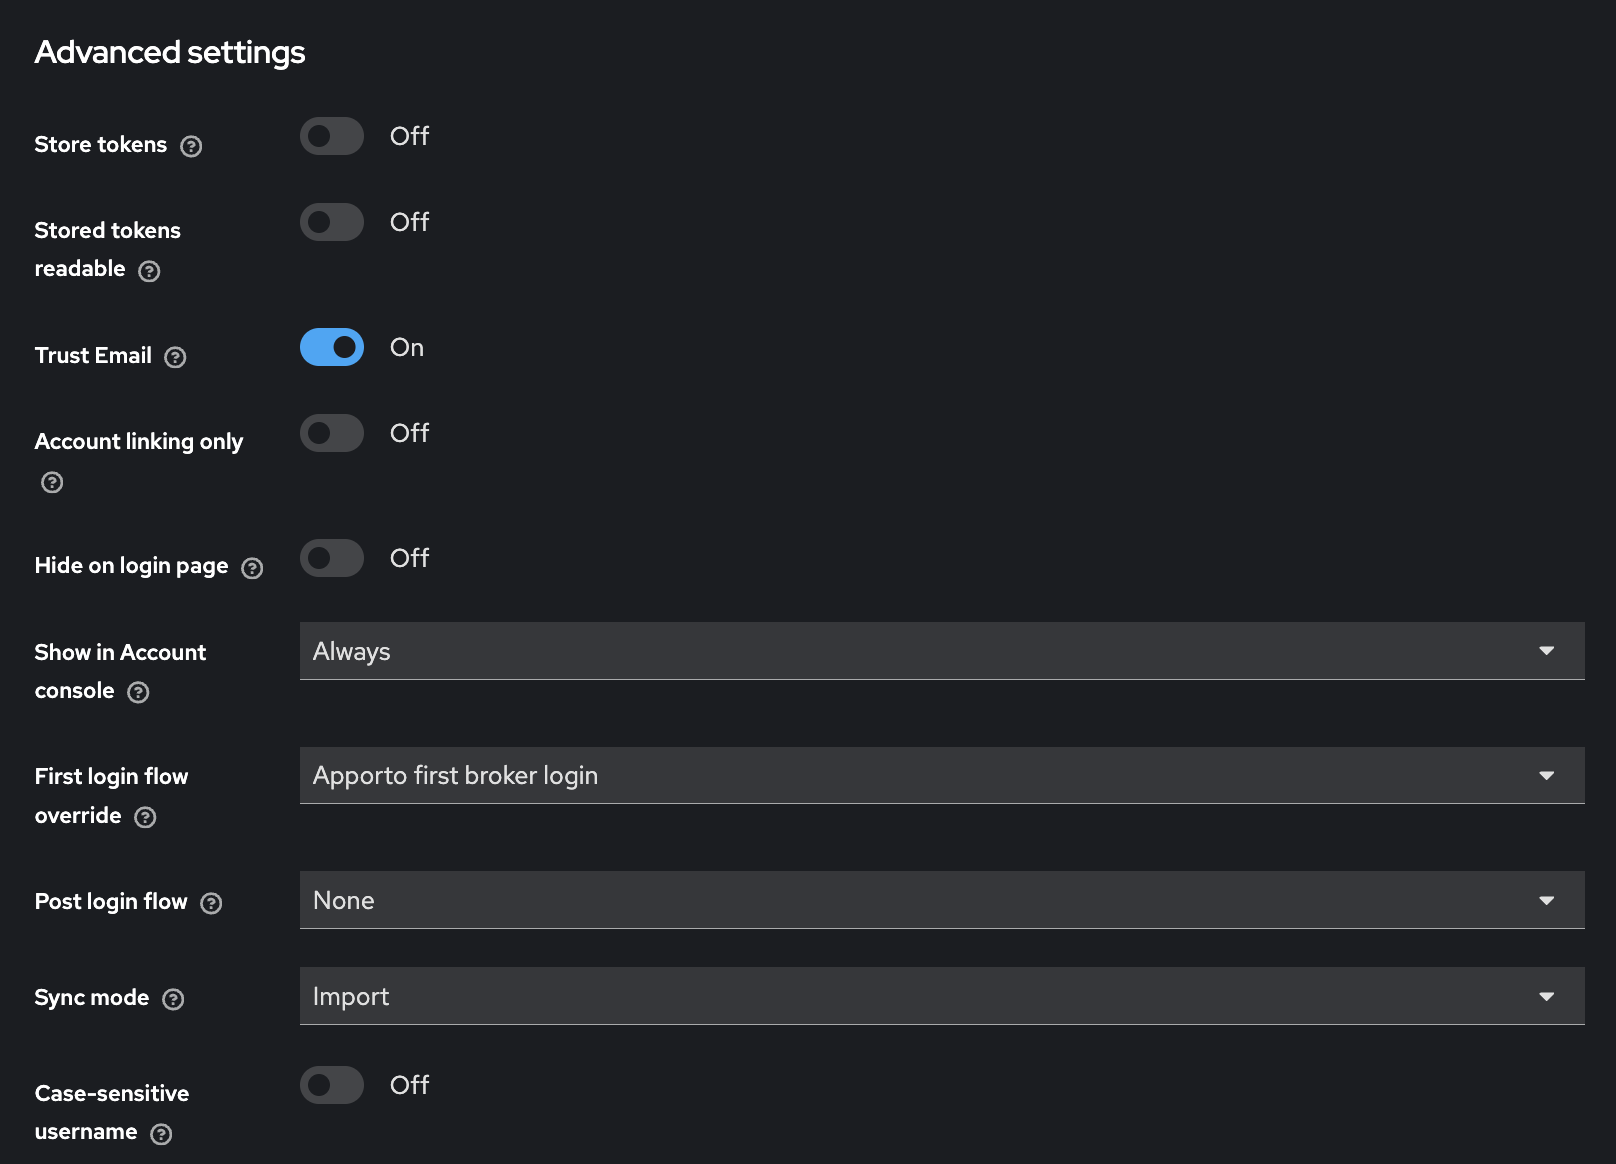
Review the following Keycloak settings.
|
Setting |
Recommended value |
|---|---|
|
Validate Signatures |
On |
|
Use JWKS URL |
On |
|
Send |
On |
|
Send |
Off |
|
Disable nonce |
Off |
|
Disable type claim check |
Off |
|
Scopes |
|
|
Prompt |
Unspecified |
|
Accept prompt=none forward from client |
Off |
|
Requires short state parameter |
Off |
|
Allowed clock skew |
0 |
|
Trust Email |
On |
|
First login flow override |
Apporto first broker login |
|
Post login flow |
None |
|
Sync mode |
Import |
|
Case-sensitive username |
Off |
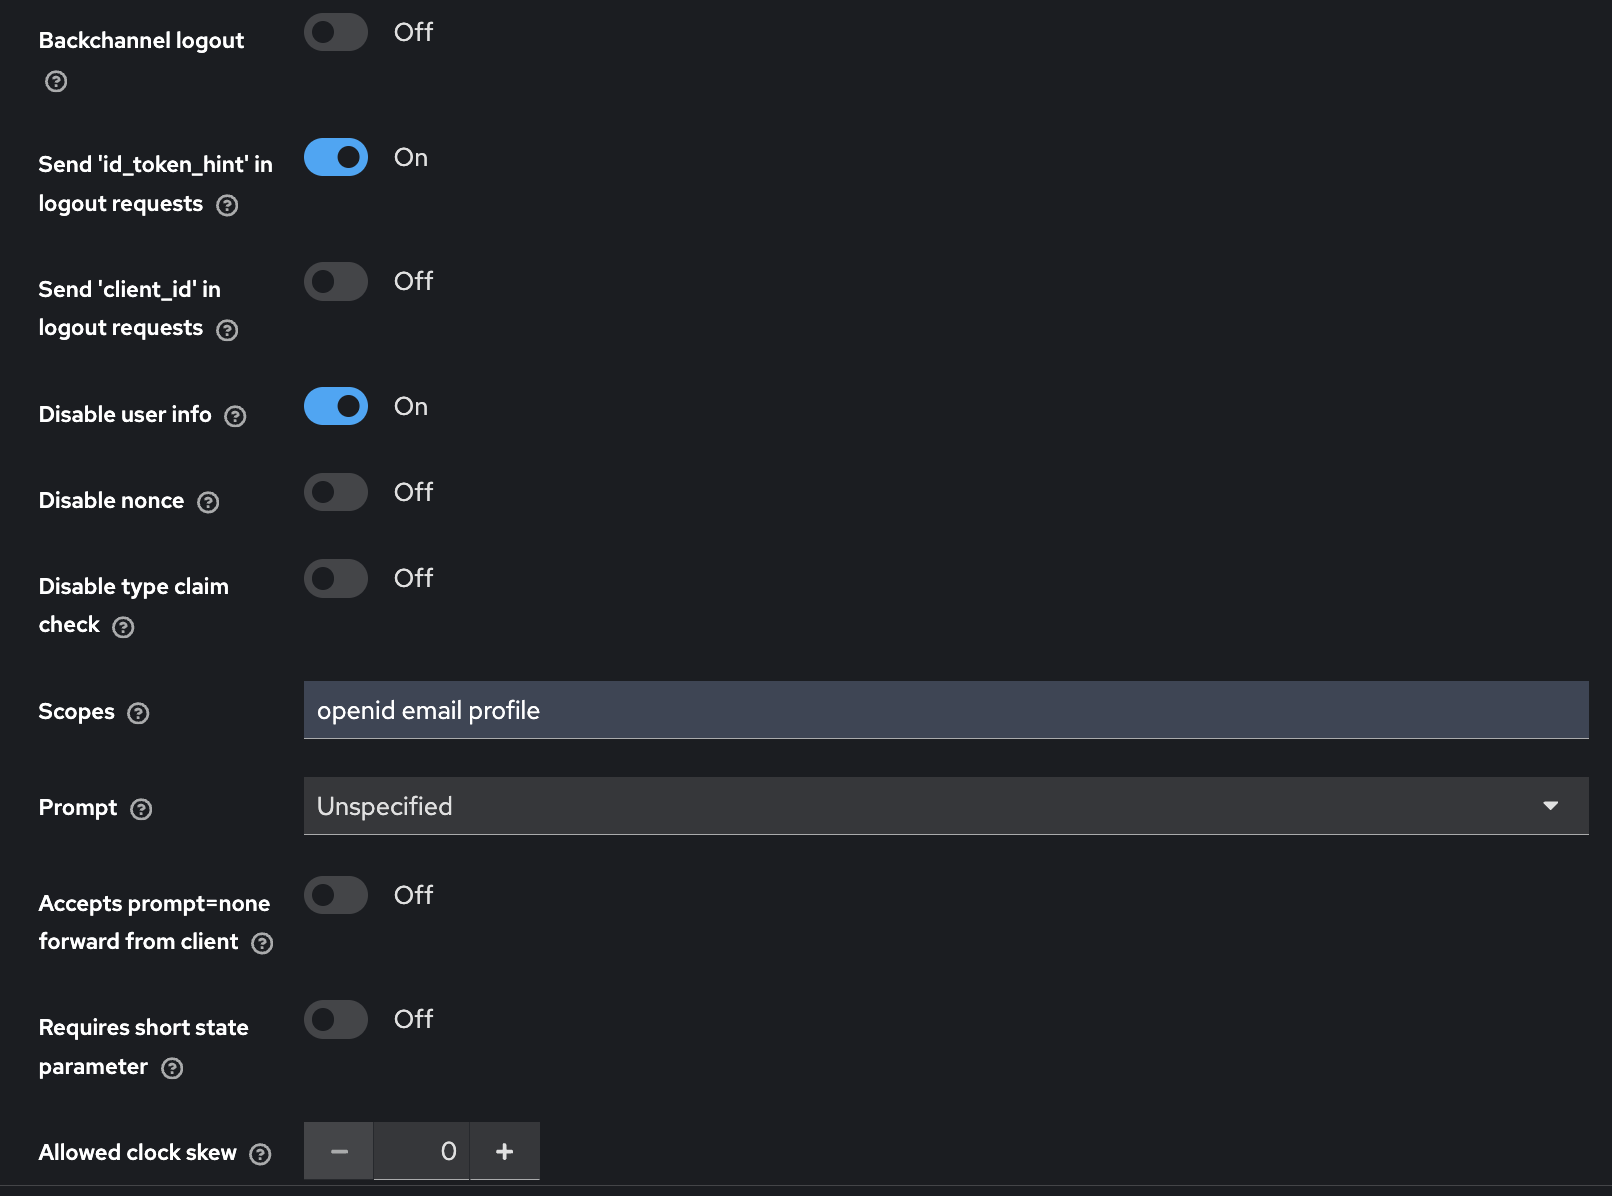
Some providers return only a minimal ID token in the authorization code flow. If required claims such as first name, last name, or email are missing, turn Disable User Info off so Keycloak can retrieve the full profile from the UserInfo endpoint.
Click Save after reviewing the configuration.
Step 7: Assign users or groups to the OIDC application
Some identity providers require users or groups to be assigned to the OIDC application before they can sign in.
-
Open the OIDC application in the identity provider.
-
Assign the required users or groups.
-
Confirm that the application is enabled.
-
Verify the test user is eligible to access the application.
If a user is not assigned to the application, they may not be able to sign in.
Step 8: Add identity provider mappers in Keycloak
Configure identity provider mappers to map the standard OIDC profile claims to the corresponding Keycloak user attributes.
-
In Keycloak, go to Identity Providers → Your OIDC Provider → Mappers.
-
Click Add mapper.
-
Create the recommended mappers listed below.
Recommended mappers
|
User field |
Mapper type |
OIDC attribute name |
Keycloak user attribute name |
|---|---|---|---|
|
Username |
Attribute Importer |
|
|
|
|
Attribute Importer |
|
|
|
First Name |
Attribute Importer |
|
|
|
Last Name |
Attribute Importer |
|
|
Use Attribute Importer to map the required OIDC claims to the corresponding Keycloak user attributes. Keep Sync mode override set to Inherit, and leave Allow Nullable Property disabled to prevent missing claim values from being imported.
-
Username: map the
preferred_usernameclaim to the Keycloakusernameuser attribute.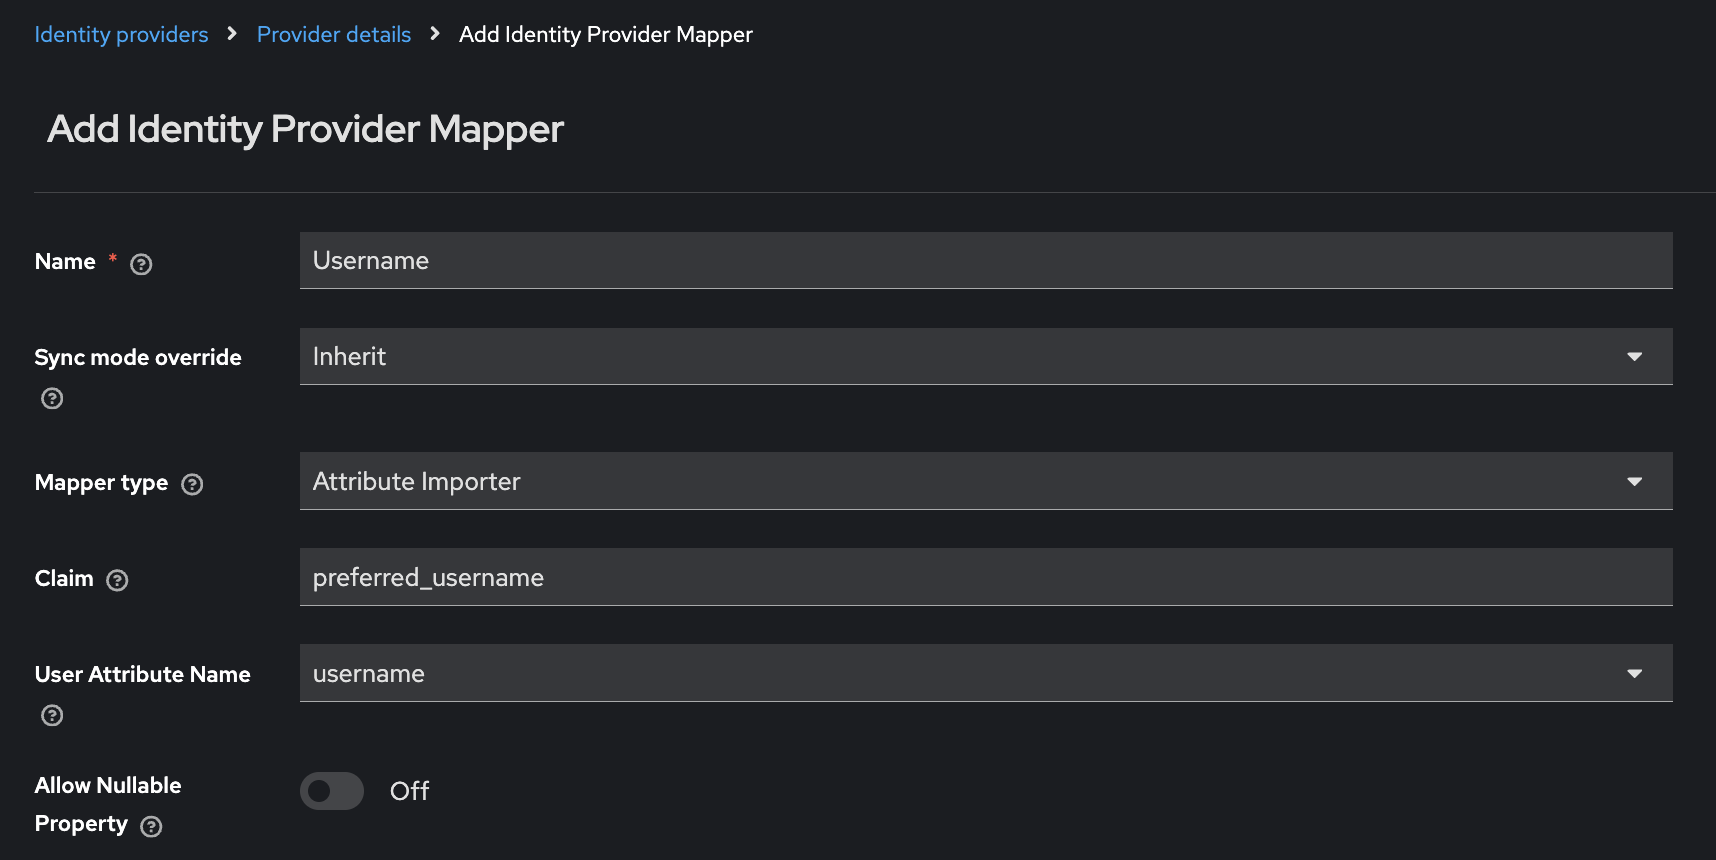
-
Email: map the
emailclaim to the Keycloakemailuser attribute.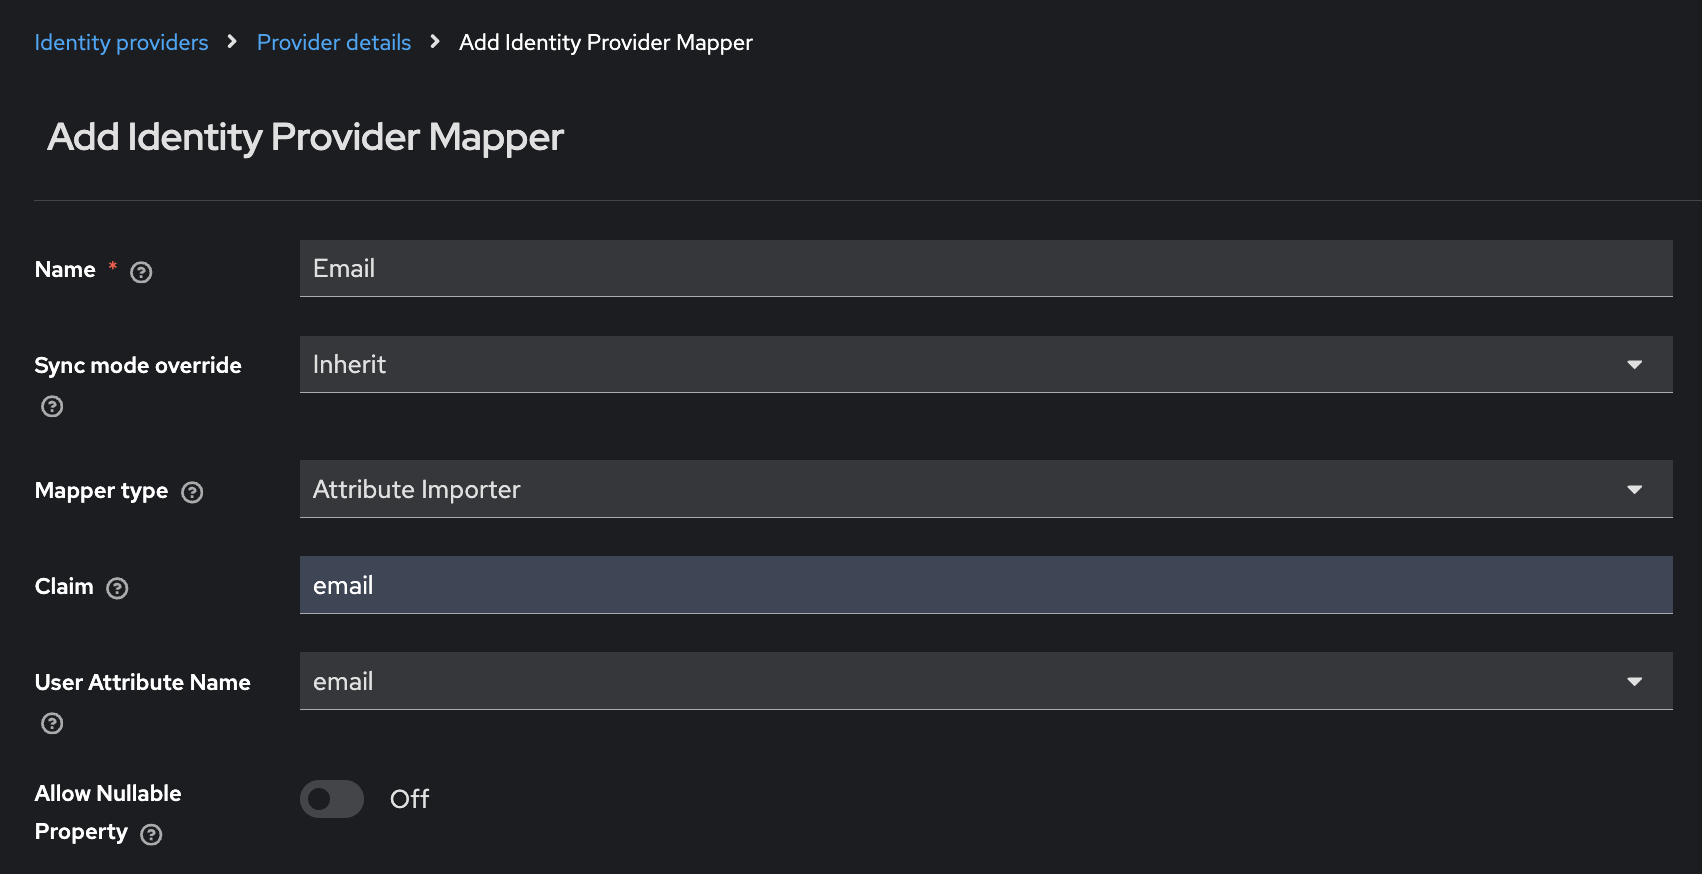
-
First Name: map the
given_nameclaim to the KeycloakfirstNameuser attribute.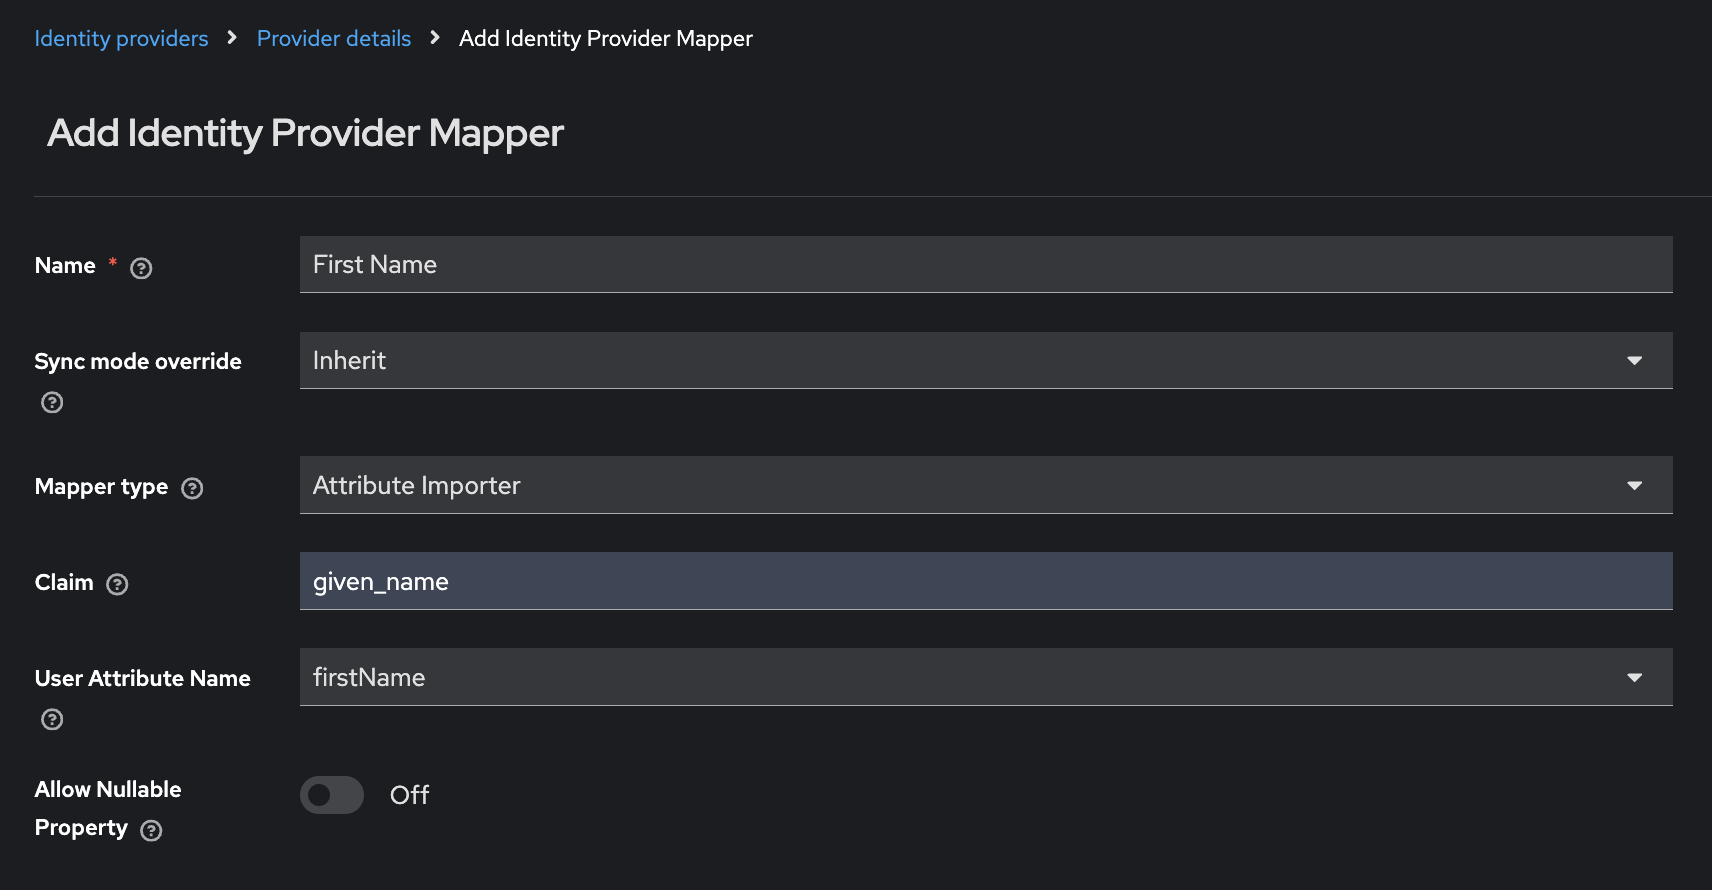
-
Last Name: map the
family_nameclaim to the KeycloaklastNameuser attribute.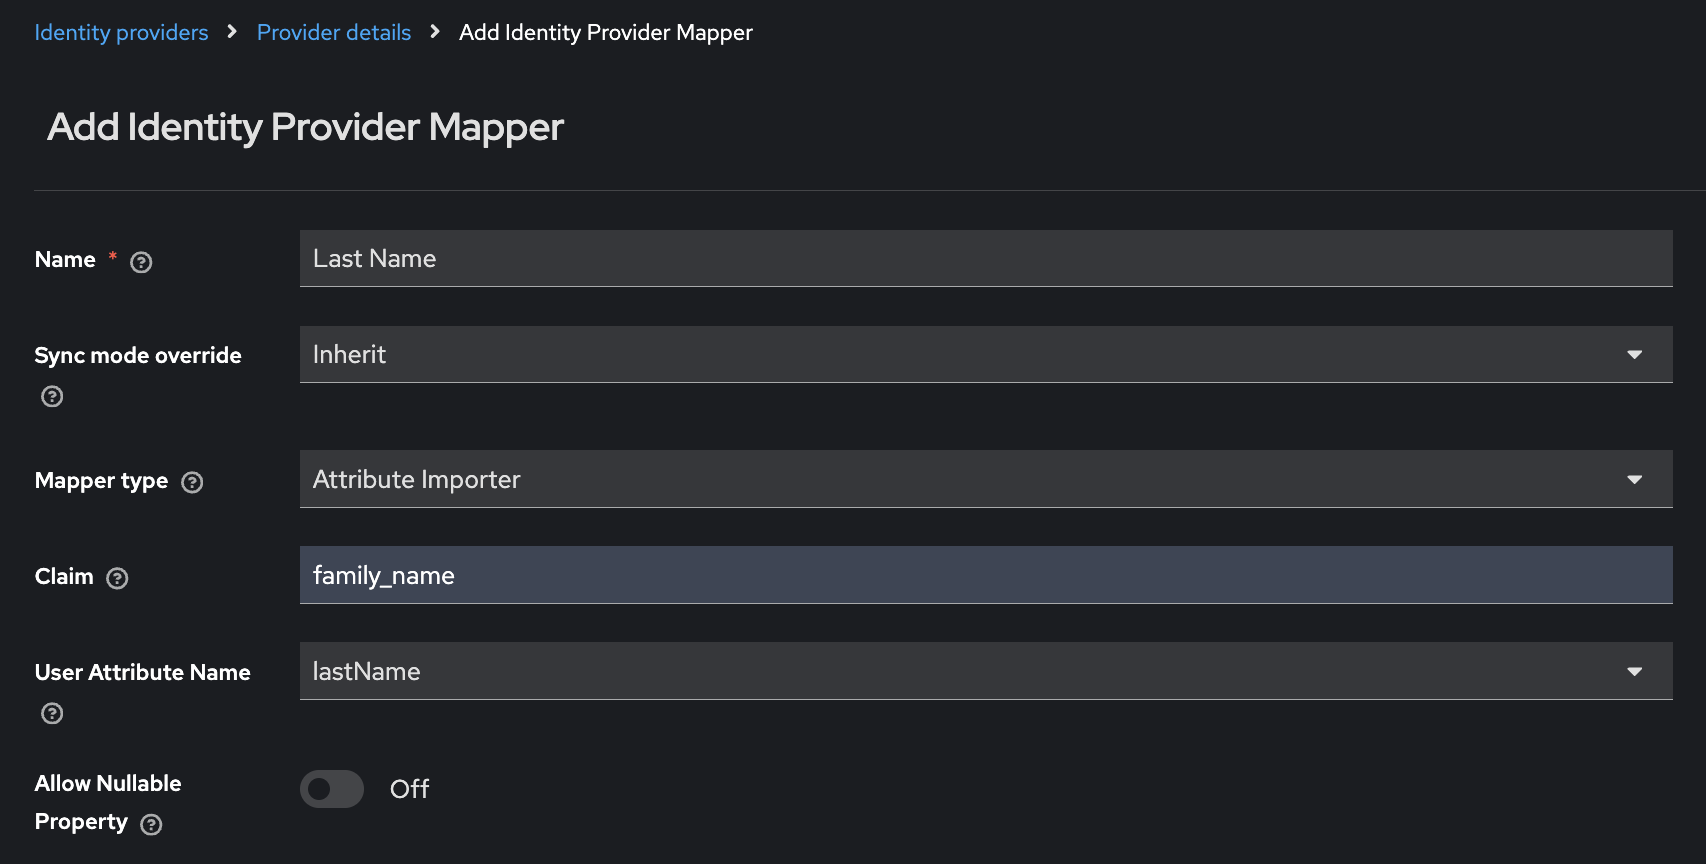
Step 9: Optional group and role mapping
Complete this section only if the identity provider sends groups or roles in the OIDC response.
Group mapping
If the identity provider sends group memberships, the token or user info response should include a claim such as groups.
For a small number of mappings, create a claim-to-role or attribute-to-role mapper for each required mapping.
|
Setting |
Value |
|---|---|
|
Sync Mode Override |
|
|
Mapper Type |
|
|
Attribute or Claim |
|
|
Attribute or Claim Value |
Example: |
|
Role |
Example: |
Role mapping
If the identity provider sends direct application roles, configure Keycloak to map the incoming role claim such as roles.
Supported role names are:
-
msp-admin -
administrator -
sub-admin -
faculty -
tech-support
Create a Claim to Role mapper in Keycloak for each role value you need.
|
Setting |
Value |
|---|---|
|
Sync Mode Override |
|
|
Mapper Type |
|
|
Claim |
|
|
Claim Value |
Example: |
|
Role |
Example: |
Manage each user’s role in one place where possible. If both the identity provider and Apporto assign roles independently, troubleshooting becomes harder.
Step 10: Test the configuration
-
Open the Apporto NextGen sign-in flow for the configured tenant.
-
Choose the OIDC identity provider option if prompted.
-
Sign in with a user that is allowed to access the OIDC application.
-
Confirm the identity provider redirects the browser back to the Keycloak broker endpoint successfully.
-
In Keycloak, verify that the user was created or linked with the expected username, email, first name, and last name.
-
If group or role mapping is configured, verify the expected Keycloak or Apporto role.
-
Confirm the user can complete the Apporto sign-in flow successfully.
Troubleshooting
|
Issue |
What to check |
|---|---|
|
|
The sign-in redirect URI in the identity provider must exactly match the Keycloak Redirect URI, including the broker alias. |
|
|
Verify the Client ID and Client Secret are from the same OIDC application and that Keycloak uses the expected client authentication method. |
|
Issuer or signature error |
Confirm the discovery endpoint, issuer, and JWKS URL are from the same authorization server. Keep Validate Signatures and Use JWKS URL enabled. |
|
User is not assigned |
Verify the application access model and the user or group assignment in the identity provider. |
|
Username is not correct |
Confirm the identity provider sends the expected username claim and that the Keycloak username mapper uses that exact claim. |
|
First or last name missing |
Confirm the |
|
Email missing |
Confirm the |
|
Group claim missing |
Creating a group in the identity provider is not enough. The application must be configured to emit the group claim in the token or user info response. |
|
Group or role mapper does not apply |
The Keycloak claim name and claim value must exactly match the values sent by the identity provider. |
|
Existing user does not update |
Sync mode |
Final checklist
- OpenID Connect v1.0 identity provider created in Keycloak
- Provider alias added without spaces and Keycloak Redirect URI copied
- OIDC application created in the identity provider
- Authorization Code enabled and Keycloak Redirect URI registered exactly
- Client ID and Client Secret collected securely
- Discovery endpoint identified, or manual endpoints collected
- Keycloak configured with discovery or manual endpoints and client authentication
- Validate Signatures and Use JWKS URL enabled
- Scopes set to
openid email profile - Trust Email and Apporto first broker login reviewed
- Users or groups allowed to access the OIDC application
- Username, email, first-name, and last-name Keycloak mappers created
- Optional group or role mapping configured, if required
- End-to-end sign-in tested successfully
- Keycloak user profile validated after login
The OpenID Connect identity provider is configured when eligible users can sign in to Apporto NextGen through the organisation’s identity provider and Keycloak stores the expected profile and authorization values.