

This guide explains how to connect an organisation’s SAML 2.0 Identity Provider (IdP) to Apporto NextGen through Keycloak. Use it as an end-to-end setup checklist: create the Keycloak SAML broker, configure the SAML application in the IdP, import IdP metadata, map user attributes, and validate sign-in.
Overview
Keycloak acts as the service provider for Apporto NextGen. Your organisation’s SAML Identity Provider authenticates users and sends SAML assertions to Keycloak.
|
System |
Purpose |
|---|---|
|
Keycloak |
Hosts the tenant realm and identity provider configuration. |
|
Organisation SAML Identity Provider |
Hosts the SAML application, claims or attributes, signing certificate, and optional group or role assignments. |
Before you begin
-
Confirm you have administrator access to the Keycloak realm for the customer tenant.
-
Confirm you have administrator access to the organisation’s SAML Identity Provider.
-
Decide the IdP attribute names that will be sent for username, email, first name, last name, and optional groups or roles.
-
Keep both Keycloak and the IdP administration consoles open during setup so you can copy values between them.
Configuration flow
-
Add a SAML v2.0 identity provider in Keycloak and collect the Keycloak service provider values.
-
Create a SAML 2.0 application in the organisation’s Identity Provider.
-
Enter the Keycloak ACS URL and entity ID in the IdP application.
-
Configure SAML security, NameID, and user attributes in the IdP.
-
Import the IdP metadata into Keycloak.
-
Review advanced Keycloak settings.
-
Create Keycloak mappers for user attributes and optional groups or roles.
-
Assign users or groups to the SAML application and test sign-in.
Step 1: Add the SAML provider in Keycloak
-
Sign in to the Keycloak administration console.
-
Select the customer realm.
-
Go to Identity Providers.
-
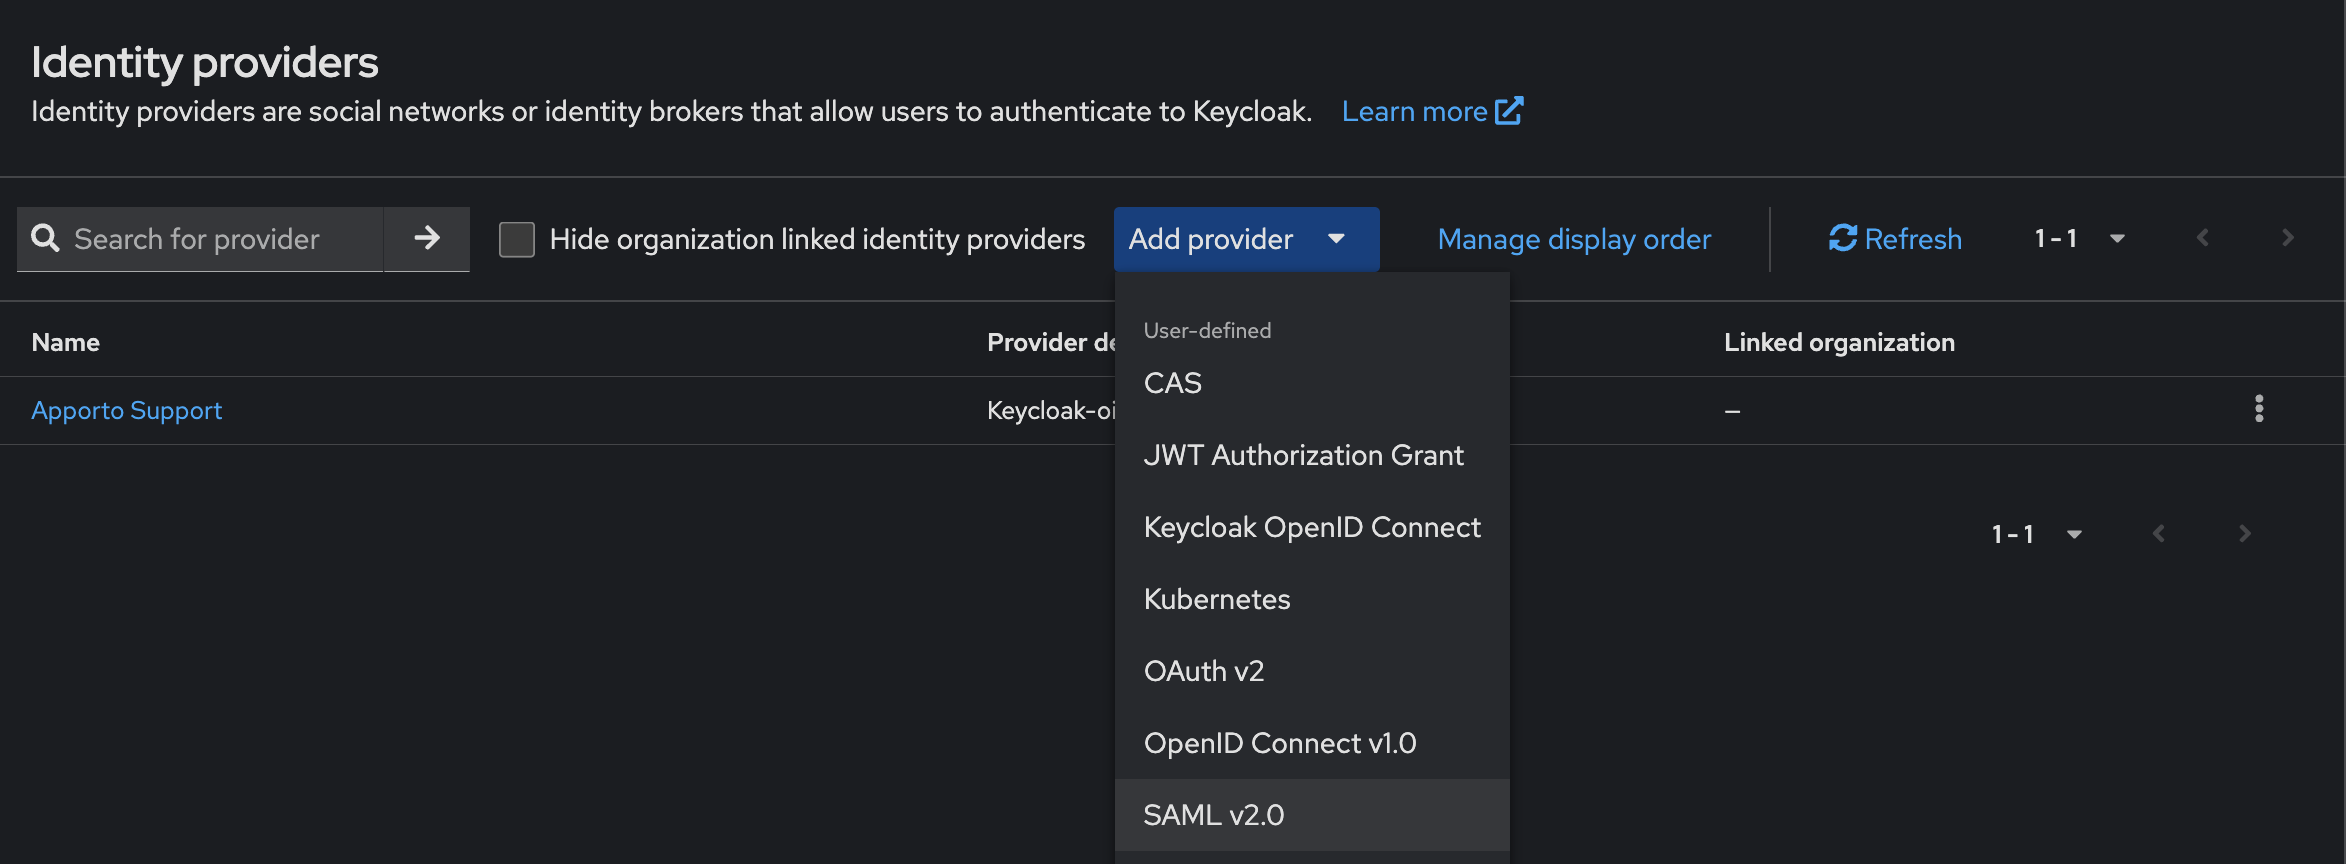
Click Add provider.
-
Select SAML v2.0.
Set the provider alias
Enter a short, unique alias for the provider. Do not use spaces.
Example:
customer-saml
Keep this Keycloak page open. You will need the Redirect URI and Service provider entity ID when setting up the SAML application in the Identity Provider.
Collect Keycloak service provider values
|
Identity Provider field |
Use this Keycloak value |
|---|---|
|
ACS URL, Reply URL, or Callback URL |
Redirect URI |
|
Entity ID, Identifier, or Audience |
Service provider entity ID |
Example Redirect URI:
https://<keycloak-host>/realms/<realm-name>/broker/<alias>/endpoint
Example Service Provider Entity ID:
https://<keycloak-host>/realms/<realm-name>
Step 2: Create the SAML application in the Identity Provider
Create a new SAML 2.0 application or Service Provider integration in the organisation’s Identity Provider. This application authenticates users and sends them to Apporto NextGen after successful sign-in.
-
Sign in to the Identity Provider administration console.
-
Create a new SAML 2.0 application or Service Provider integration.
-
The exact menu name varies by provider. Look for options such as Create SAML application, Create app integration, Add enterprise application, Add custom SAML app, or Add relying party trust.
-
If prompted, choose SAML 2.0 as the sign-in method. If the provider asks for the application type, choose a custom or non-gallery SAML application.
-
Name the application Apporto NextGen, or use another name that administrators will recognise.
-
Continue to the SAML configuration screen.
Step 3: Enter Keycloak details in the IdP application
In the Identity Provider, enter the Keycloak values collected in Step 1.
|
Identity Provider setting |
Value to enter |
|---|---|
|
Entity ID, Identifier, or Audience |
Keycloak service provider entity ID |
|
ACS URL, Reply URL, or Callback URL |
Keycloak Redirect URI |
|
SAML version |
SAML 2.0 |
|
Response binding |
HTTP-POST |
|
Relay State |
Leave blank unless your organisation requires it |
|
Sign-on URL |
Optional |
Step 4: Configure SAML security in the Identity Provider
Use the following settings where the Identity Provider supports them.
|
Setting |
Recommended value |
|---|---|
|
Sign SAML response |
Enabled |
|
Sign assertion |
Enabled |
|
Encrypt assertion |
Optional |
|
Response binding |
HTTP-POST |
|
NameID format |
Email address |
Enable signed responses or signed assertions so Keycloak can verify that the sign-in response came from the Identity Provider.
Step 5: Configure NameID and user attributes in the IdP
The SAML response must include a NameID that uniquely identifies each user. We recommend using the user’s email address or user principal name.
NameID settings
|
Setting |
Recommended value |
|---|---|
|
NameID format |
|
|
NameID value |
User email address or user principal name |
Required and recommended attributes
Configure the Identity Provider to send the user attributes that Apporto NextGen needs.
|
Attribute name |
Description |
|---|---|
|
|
User email address |
|
|
User sign-in name |
|
|
User first name |
|
|
User last name |
|
|
Group memberships, if used |
|
|
Application role, if used |
The provider may use different attribute names, such as mail, givenName, surname, memberOf, or role. That is fine, but the same names must be used later when configuring mappers in Keycloak.
At minimum, send a unique username or NameID and an email address. First name and last name are recommended.
Step 6: Import IdP metadata into Keycloak
Return to the SAML Identity Provider configuration in Keycloak and import the metadata from the Identity Provider.
Option A: Use a metadata URL
-
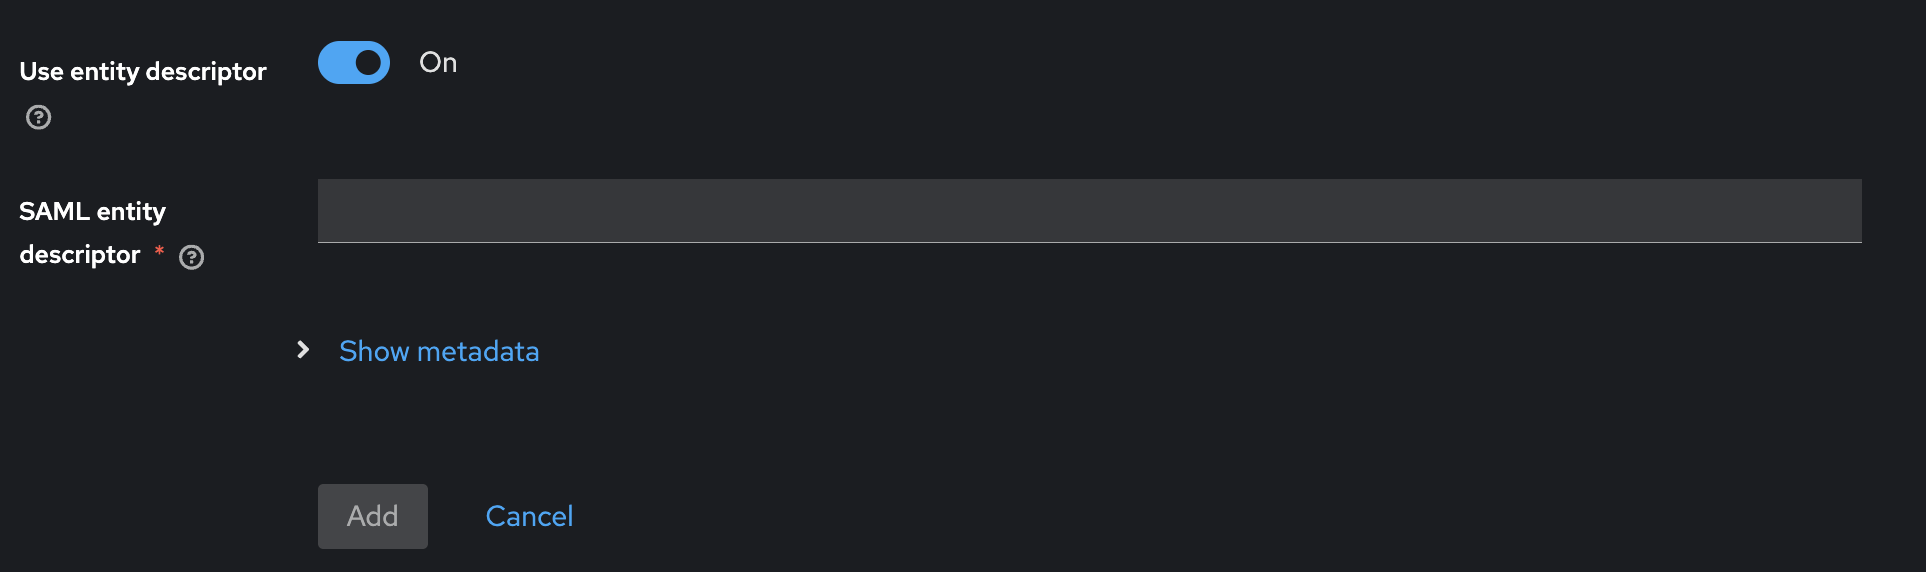
Paste the metadata URL into SAML entity descriptor.
-
Click Add.
Option B: Use a metadata XML file
Import the metadata XML file provided by the Identity Provider.
After importing, confirm that Keycloak has populated the Identity Provider entity ID, Single Sign-On Service URL, and signing certificate.

Option C: Enter values manually
If metadata is not available, enter the values manually.
|
Keycloak field |
Identity Provider value |
|---|---|
|
Identity Provider entity ID |
IdP Entity ID or Issuer |
|
Single Sign-On Service URL |
SAML Login URL |
|
Single Logout Service URL |
Logout URL, if supported |
|
Validating X509 certificate |
Identity Provider signing certificate |
Use a Metadata URL or Metadata XML file where available. Metadata import automatically imports the required SAML configuration and reduces manual configuration errors.
Step 7: Review advanced Keycloak settings
After the metadata is imported, review the SAML Identity Provider settings in Keycloak. Configure only the following fields unless the Identity Provider requires something different.
-
Open the SAML Identity Provider configuration in Keycloak.
-
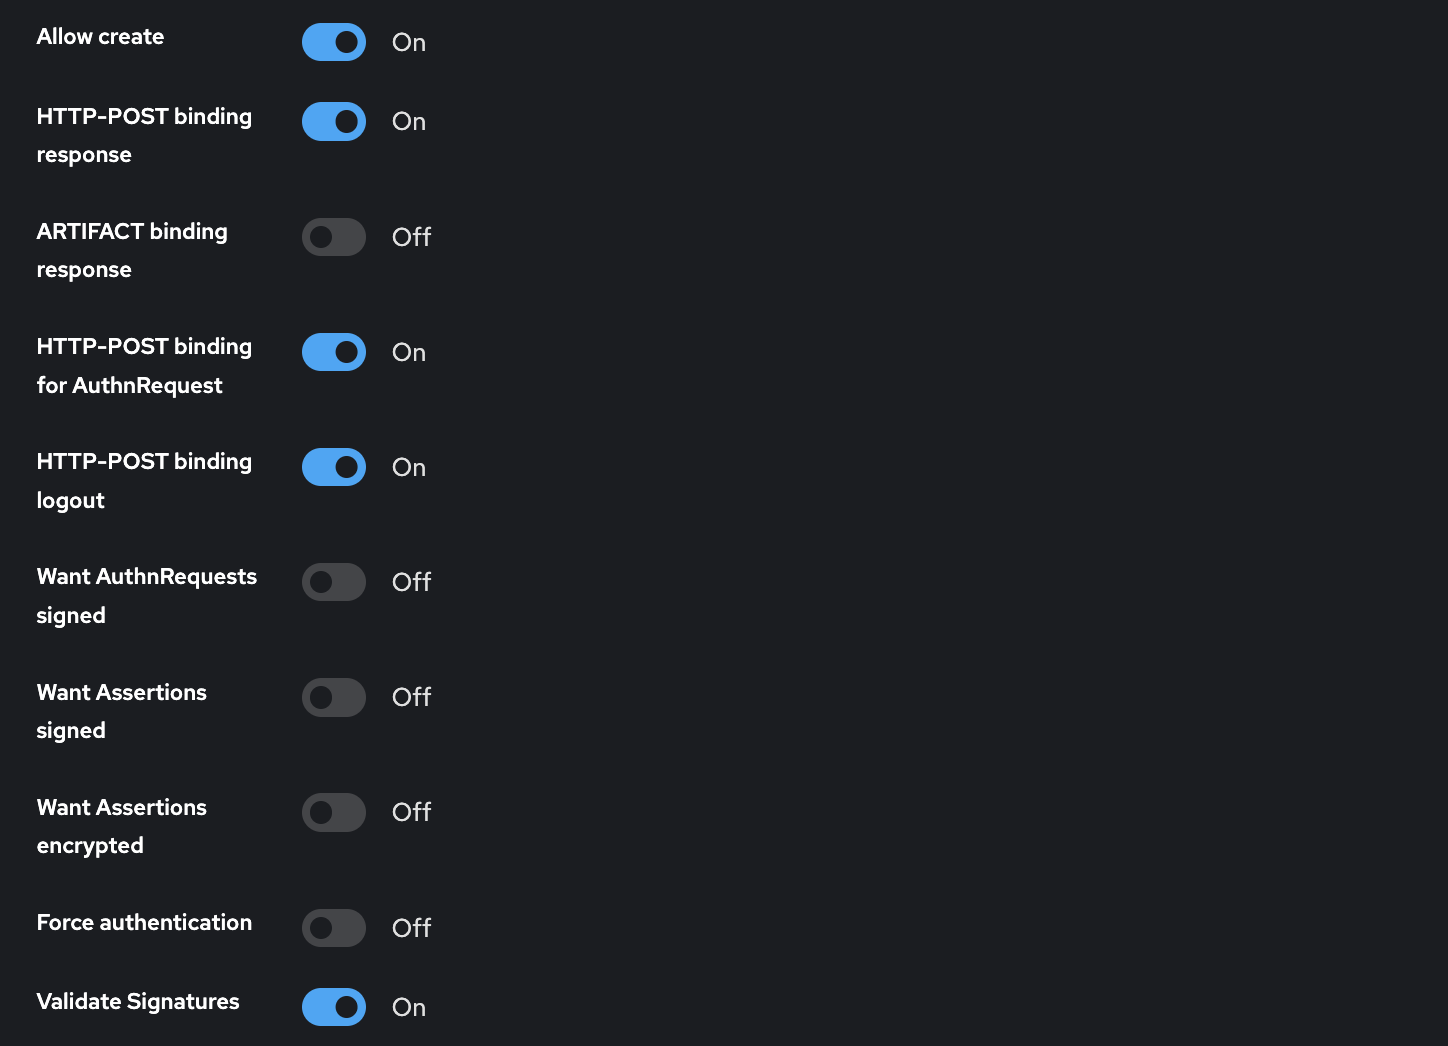
In the SAML settings, keep HTTP-POST binding response, HTTP-POST binding for AuthnRequest, HTTP-POST binding logout, and Validate Signatures turned on.
-
Set NameID policy format to Unspecified.
-
Set Principal type to Attribute [Name].
-
Set Principal attribute to
email. -
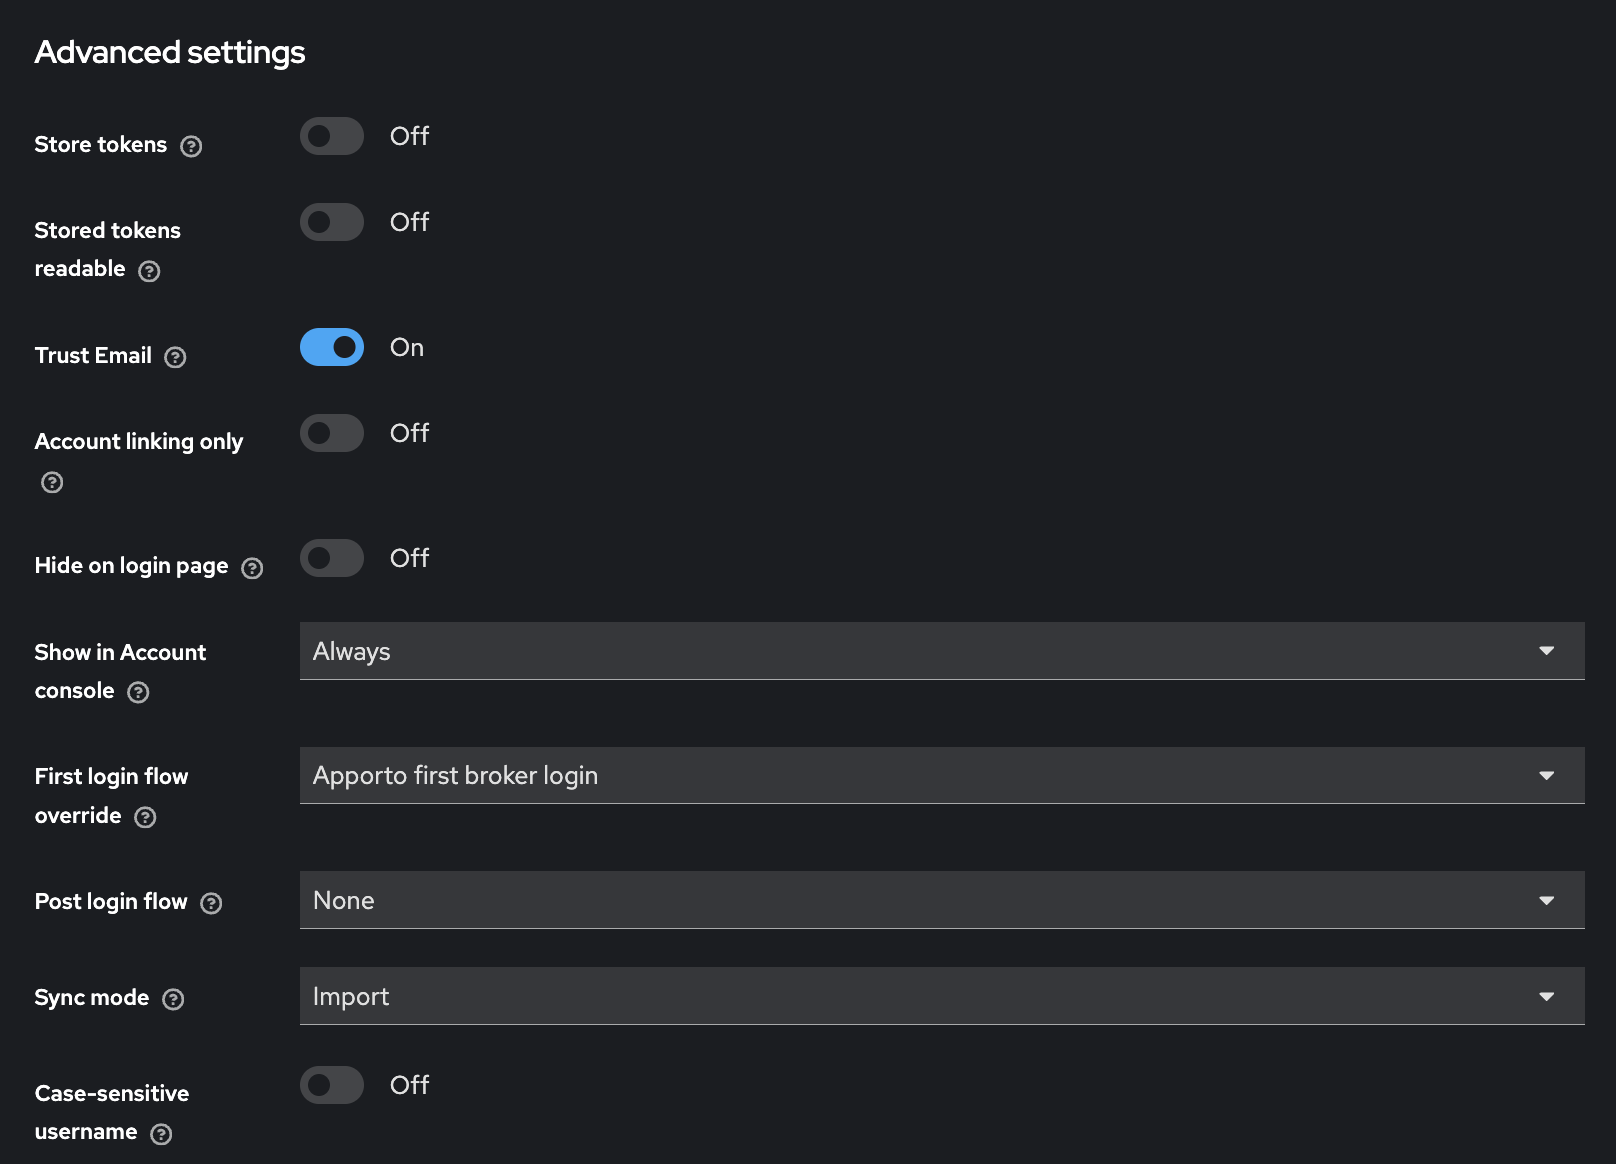
In Advanced settings, turn on Trust Email.
-
Set First login flow override to Apporto first broker login. This flow is already provisioned with the realm.
-
Leave Post login flow as None, Sync mode as Import, and Case-sensitive username turned off.
Click Save after reviewing the configuration.
Step 8: Map user attributes in Keycloak
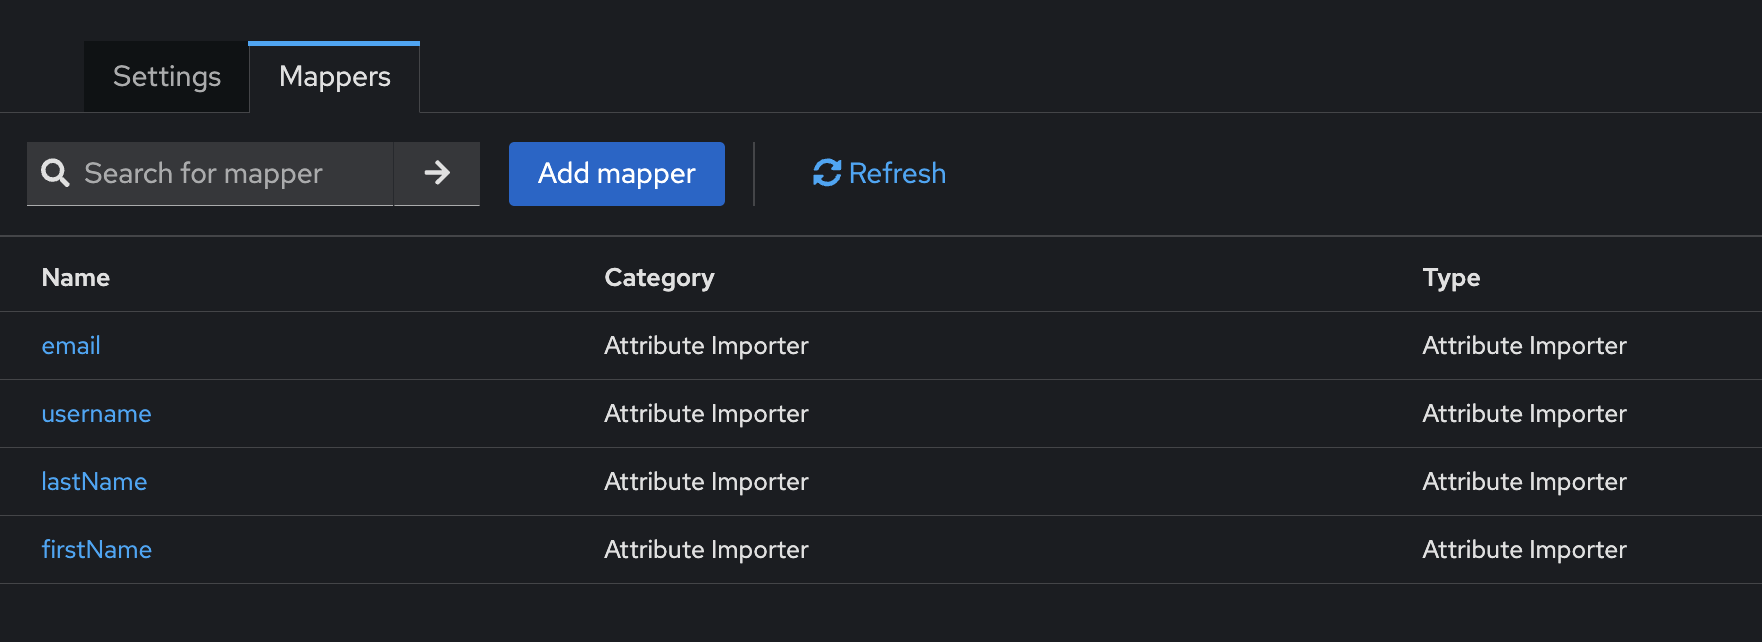
Create mappers so Keycloak can read the user attributes sent in the SAML assertion.
-
In Keycloak, go to Identity Providers → Your SAML Provider → Mappers.
-
Click Add mapper.
-
Create the recommended mappers listed below.
Recommended mappers
|
User field |
Mapper type |
SAML attribute name |
Keycloak user attribute name |
|---|---|---|---|
|
Username |
Attribute Importer |
|
|
|
|
Attribute Importer |
|
|
|
First Name |
Attribute Importer |
|
|
|
Last Name |
Attribute Importer |
|
|
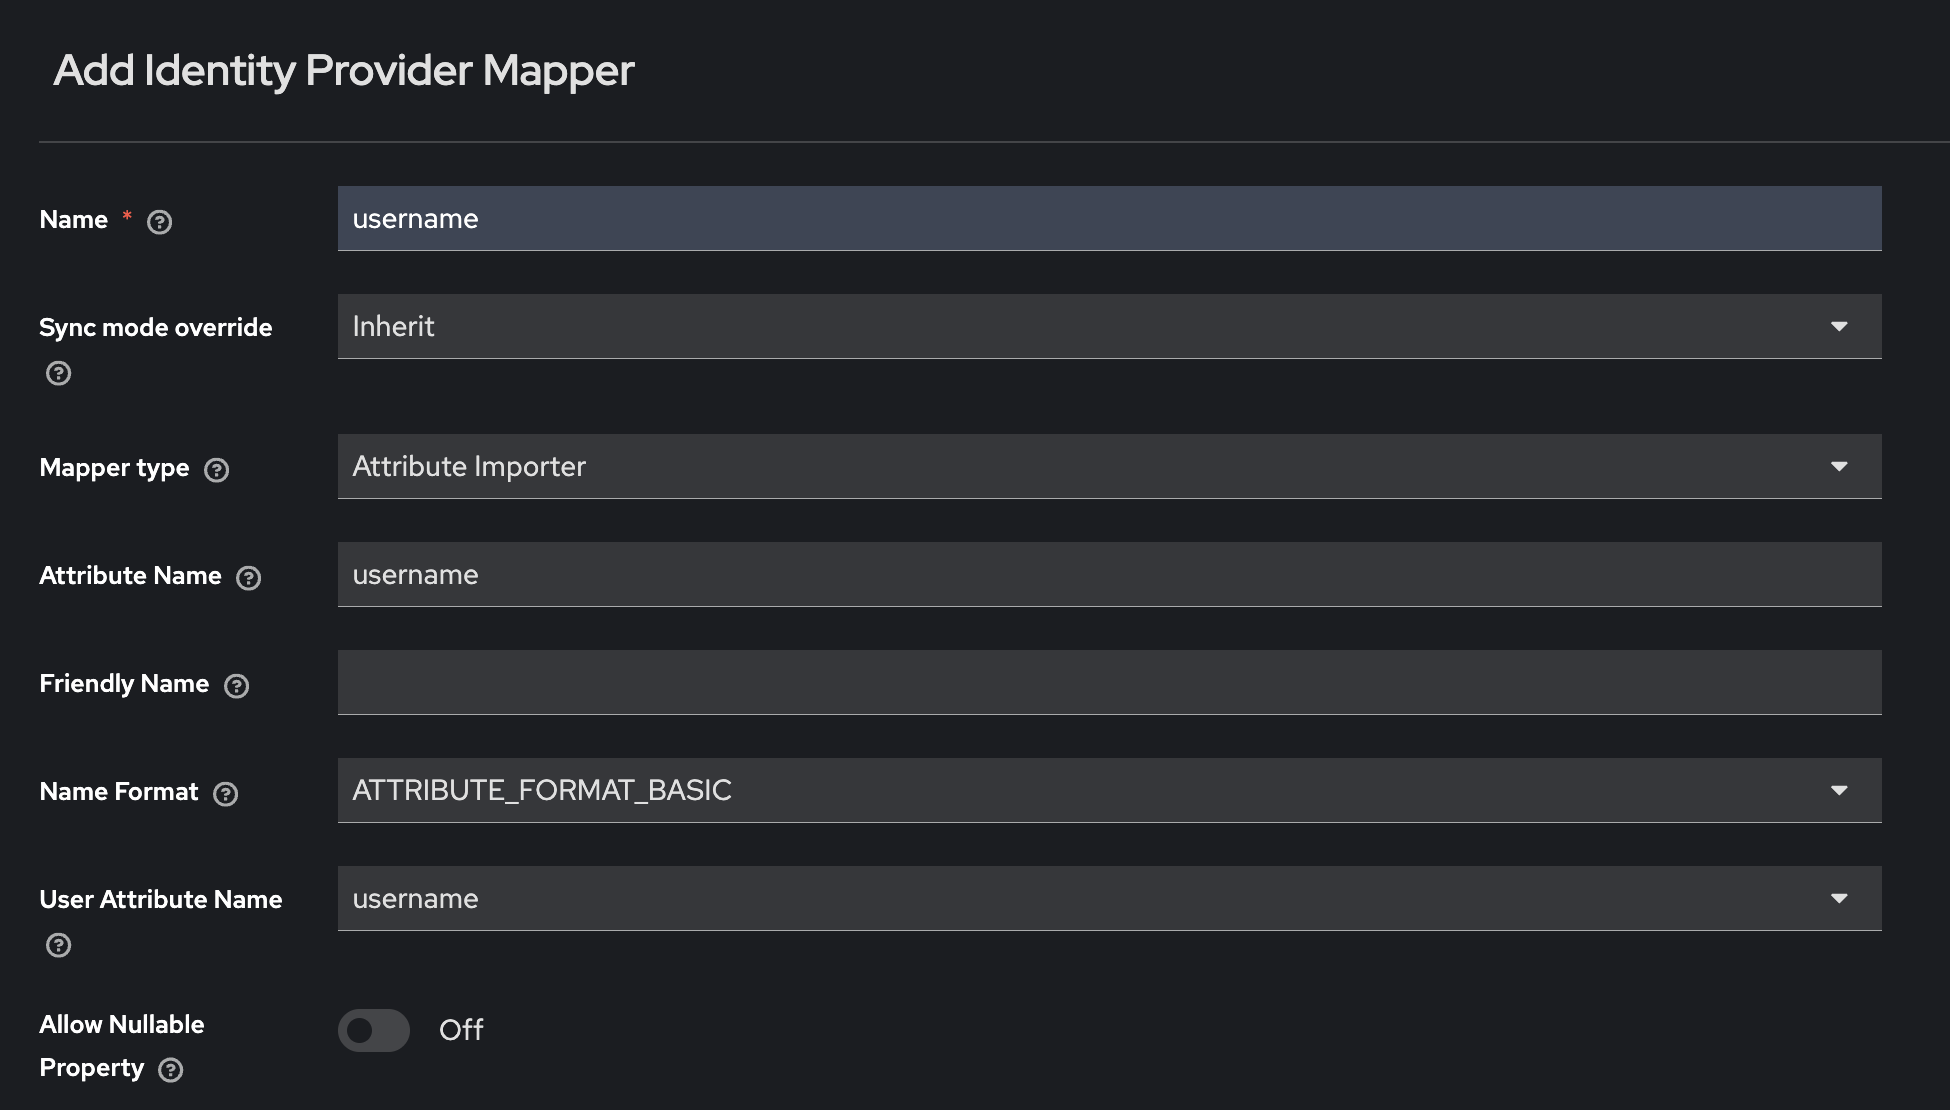
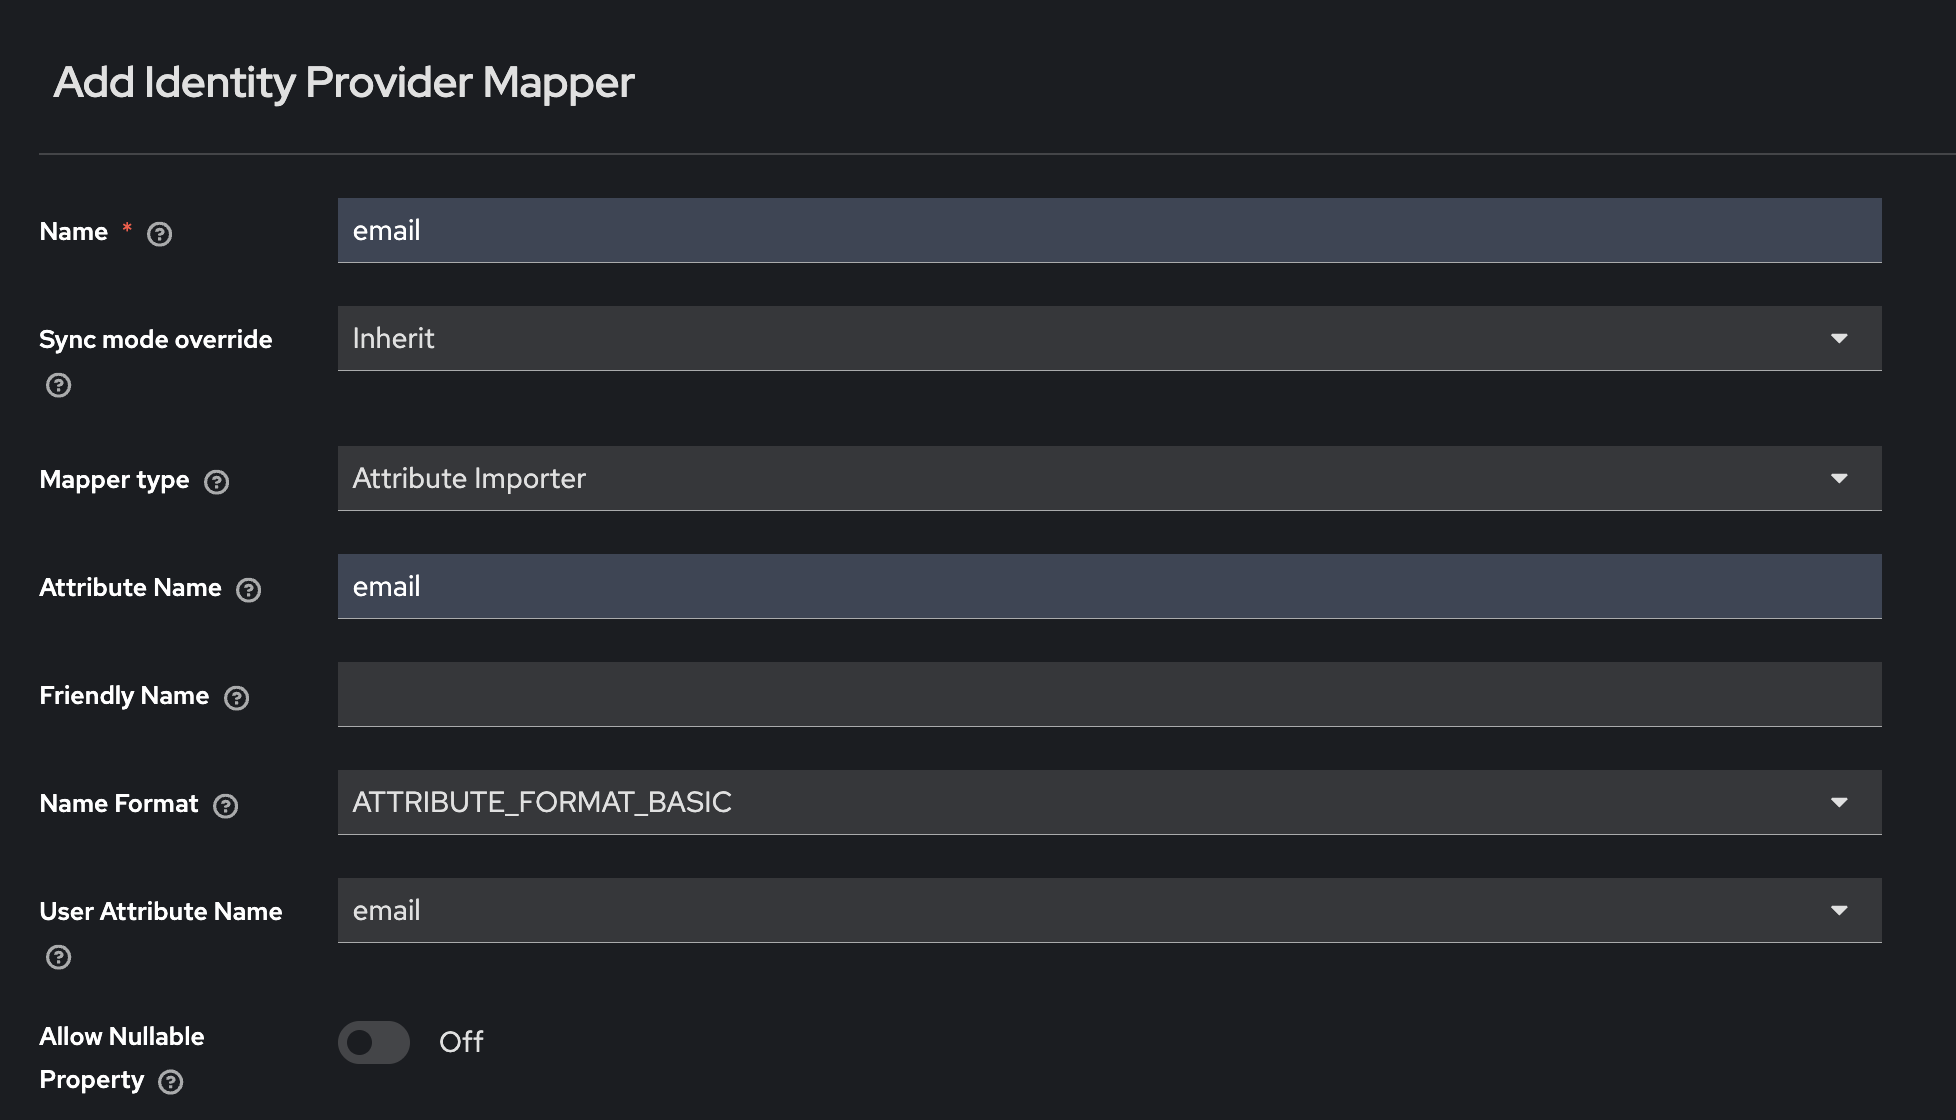
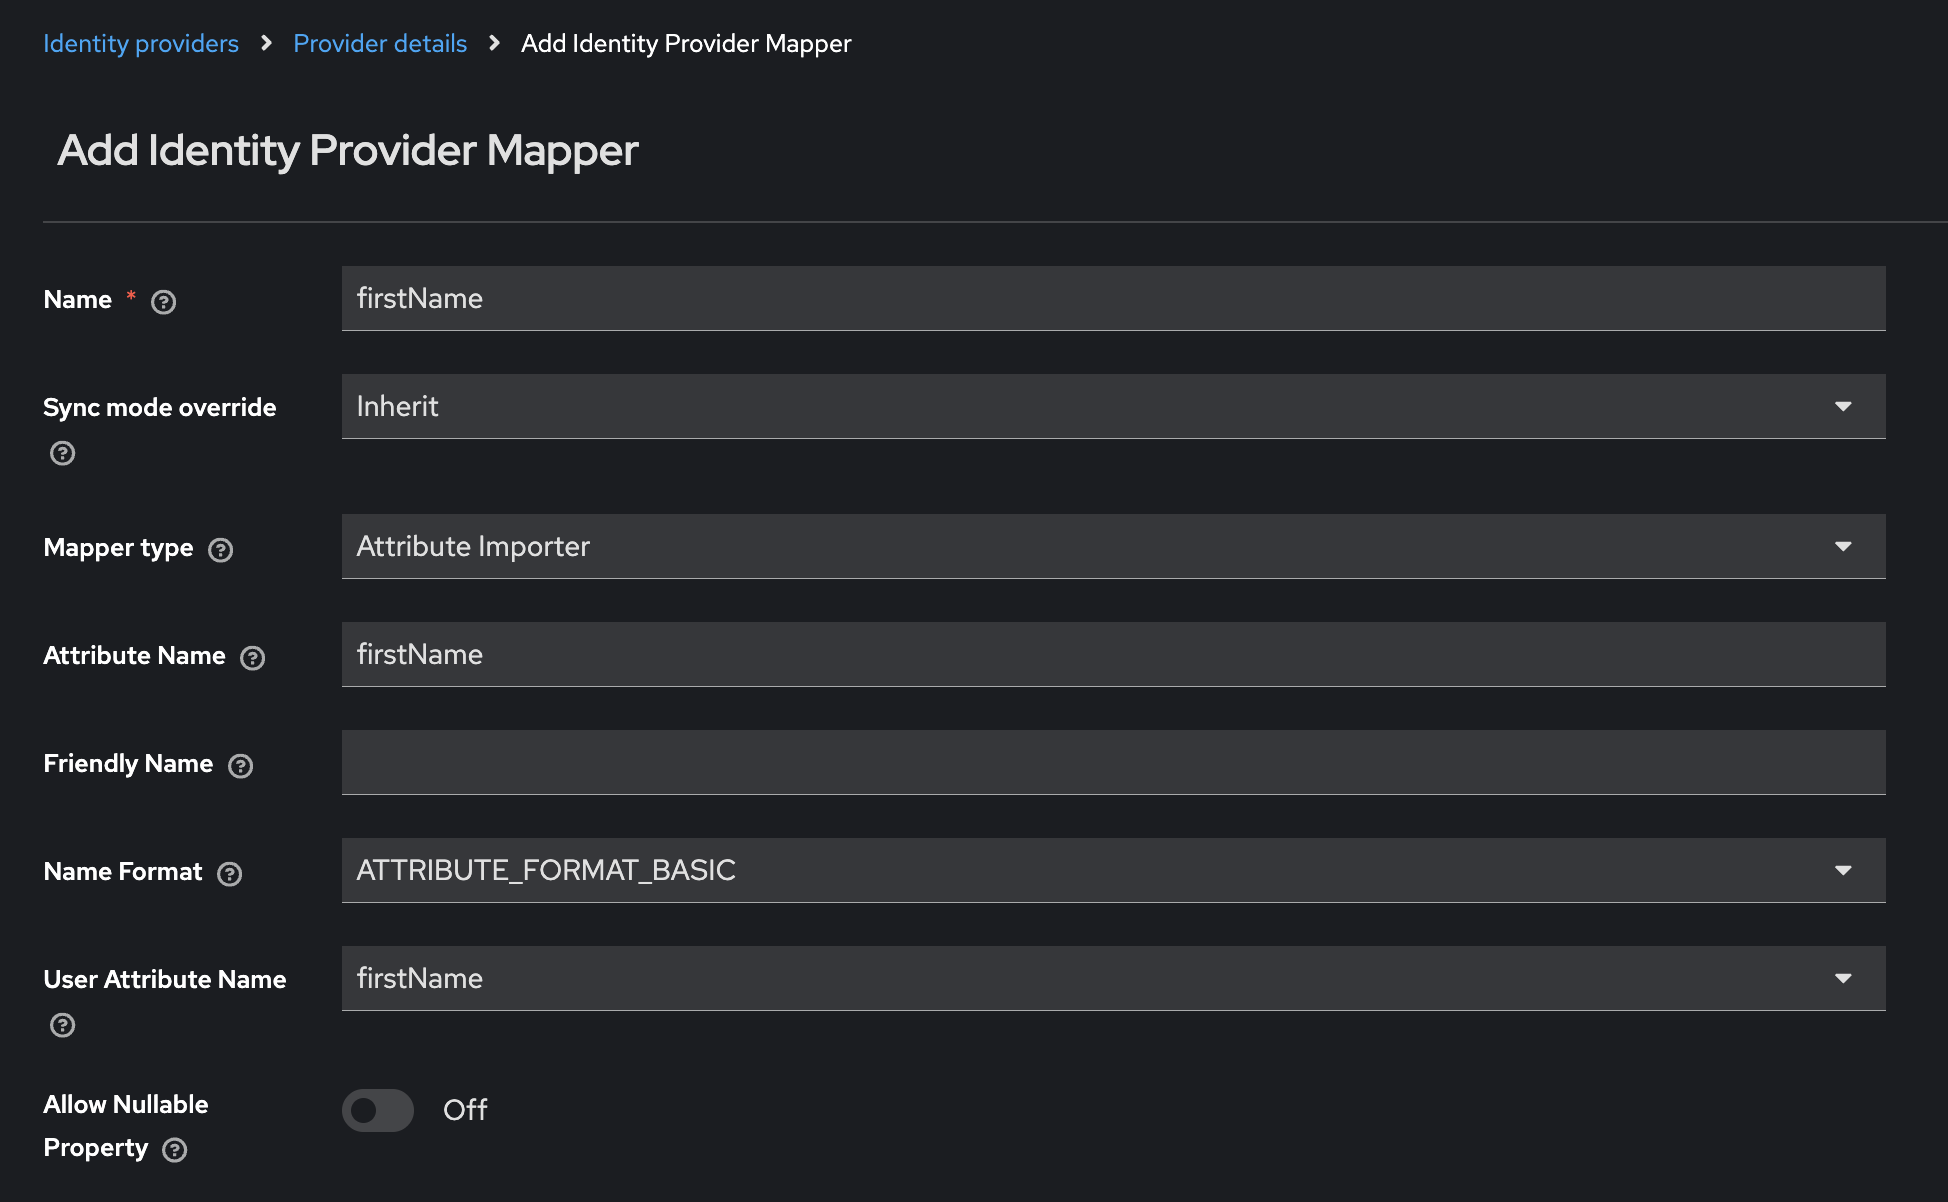
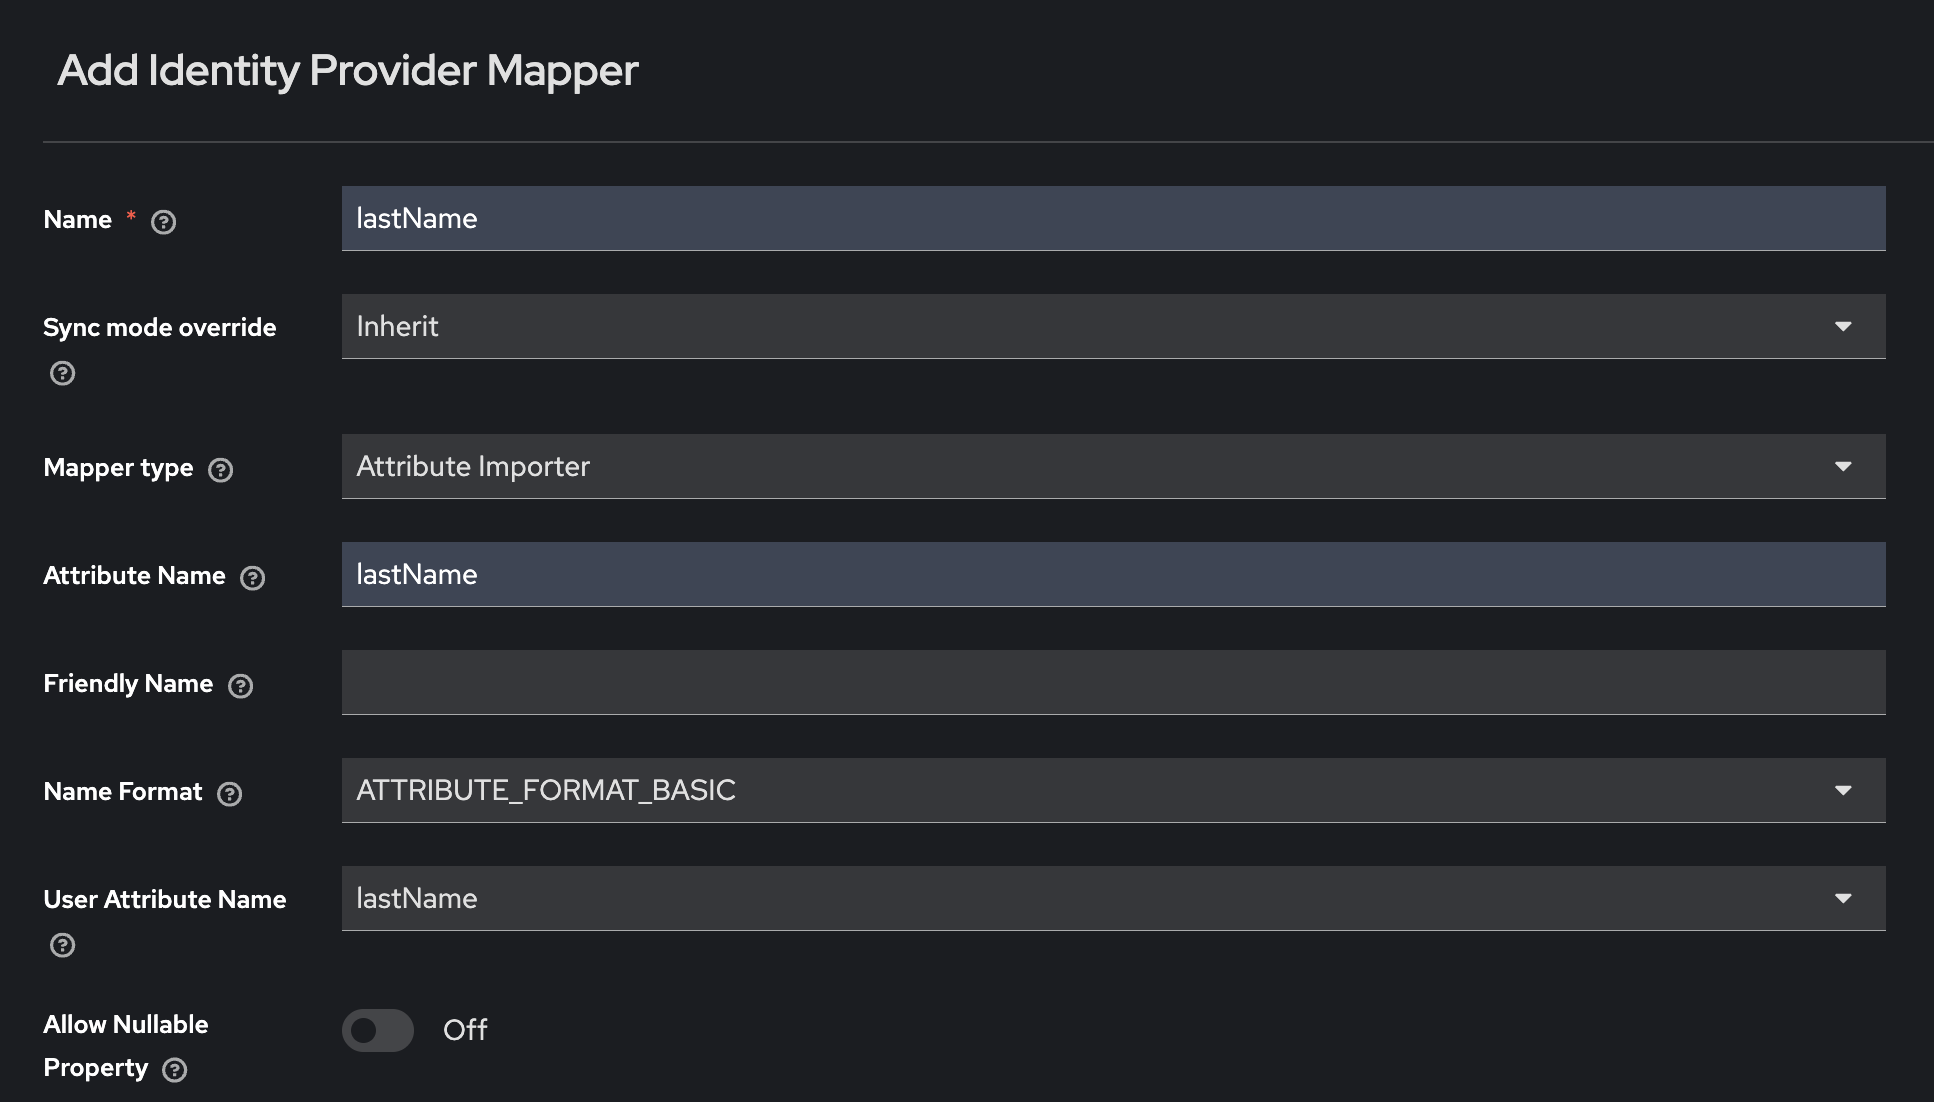
If the username is provided only in the NameID, use the appropriate NameID-based mapper instead.
Attribute names are case-sensitive. They must exactly match the names sent by the Identity Provider.
Step 9: Optional group and role mapping
Complete this section only if the Identity Provider sends groups or roles in the SAML response.
Group mapping
If the Identity Provider sends group memberships, the SAML assertion should include a group attribute such as groups.
For a small number of groups, create an attribute-to-group mapper for each group and set Sync Mode Override to FORCE.
If the Group Sync Mapper is available, configure it as follows:
|
Setting |
Value |
|---|---|
|
Sync Mode Override |
|
|
Mapper Type |
|
|
Group Claim / Attribute Name |
|
Role mapping
If the Identity Provider sends application roles, configure it to send a role attribute such as roles.
Supported role names are:
-
msp-admin -
administrator -
sub-admin -
faculty -
tech-support
Create an Attribute to Role mapper in Keycloak for each role value you need.
|
Setting |
Value |
|---|---|
|
Sync Mode Override |
|
|
Mapper Type |
|
|
Claim |
|
|
Claim Value |
e.g. msp-admin |
|
Role |
e.g. msp-admin |
Step 10: Assign users or groups to the SAML application
Some Identity Providers require users or groups to be assigned to the SAML application before they can sign in.
-
In the Identity Provider, open the SAML application.
-
Assign the required users or groups.
-
Confirm that the application is enabled.
If a user is not assigned to the application, they may not be able to sign in.
Step 11: Test the configuration
-
Open the Apporto NextGen sign-in flow for the configured tenant.
-
Choose the SAML identity provider option if prompted.
-
Sign in with a user assigned to the SAML application.
-
Confirm the user is redirected back successfully.
-
Confirm the user profile includes the expected username, email, first name, and last name.
-
If groups or roles are configured, confirm the expected groups or roles are applied.
Troubleshooting
|
Issue |
What to check |
|---|---|
|
Invalid destination |
The ACS URL in the Identity Provider must match the Keycloak Redirect URI. |
|
Invalid audience |
The Entity ID in the Identity Provider must match the Keycloak service provider entity ID. |
|
Invalid signature |
The signing certificate in Keycloak must match the certificate used by the Identity Provider. |
|
Missing email address |
The SAML assertion must include an email attribute, and the Keycloak email mapper must use the same attribute name. |
|
User is not assigned |
The user must be assigned to the SAML application in the Identity Provider. |
|
Invalid NameID |
The NameID must be present, unique, and use a supported format. |
|
Group or role mapping does not work |
The attribute name and value in Keycloak must exactly match the values in the SAML assertion. |
Final checklist
- SAML v2.0 identity provider created in Keycloak
- Provider alias added without spaces
- Keycloak Redirect URI copied to the IdP ACS, Reply, or Callback URL
- Keycloak service provider entity ID copied to the IdP Entity ID, Identifier, or Audience field
- SAML response or assertion signing enabled
- NameID and required user attributes configured
- IdP metadata imported into Keycloak or values entered manually
- Advanced Keycloak settings reviewed and saved
- User attribute mappers created in Keycloak
- Optional group or role mappers created, if required
- Users or groups assigned to the SAML application
- Sign-in tested successfully
The SAML 2.0 Identity Provider is configured when users assigned to the SAML application can sign in to Apporto NextGen through the organisation’s Identity Provider.